August 1995
1975 Triumph T160 Trident 750
A deal was brokered in order to sell the two brand new Bonnevilles. It involved me part exchanging a US import basket case T160 Trident which was in a very sorry state due to having been left out in the elements for some years. I figured that because it was a T160 and I knew them well, I would be able to produce a bike from the parts I had acquired plus parts I already had. Although it had no accident damage the condition of the internals was unknown and the engine would not turn over, but probably 80% of the original parts were there. The missing 20% were going to cost a lot of time and money to locate or recover as it turned out.
I immediately began stripping the entire bike, and knowing that the engine was seized but low mileage I wanted to prevent any further deterioration.
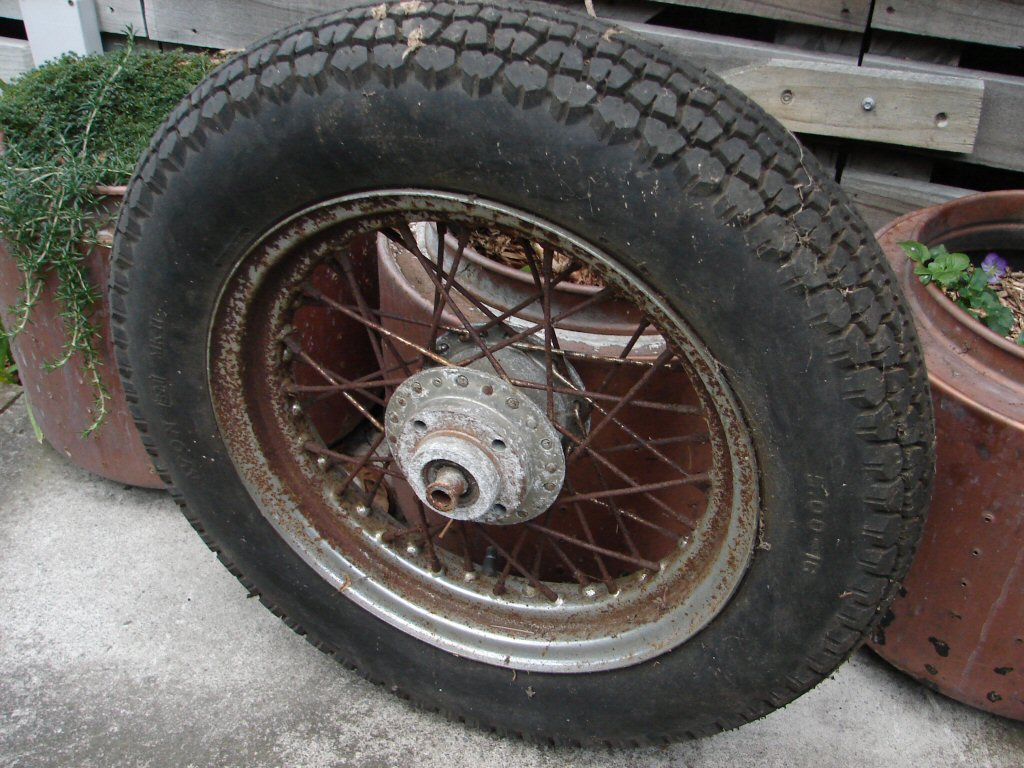
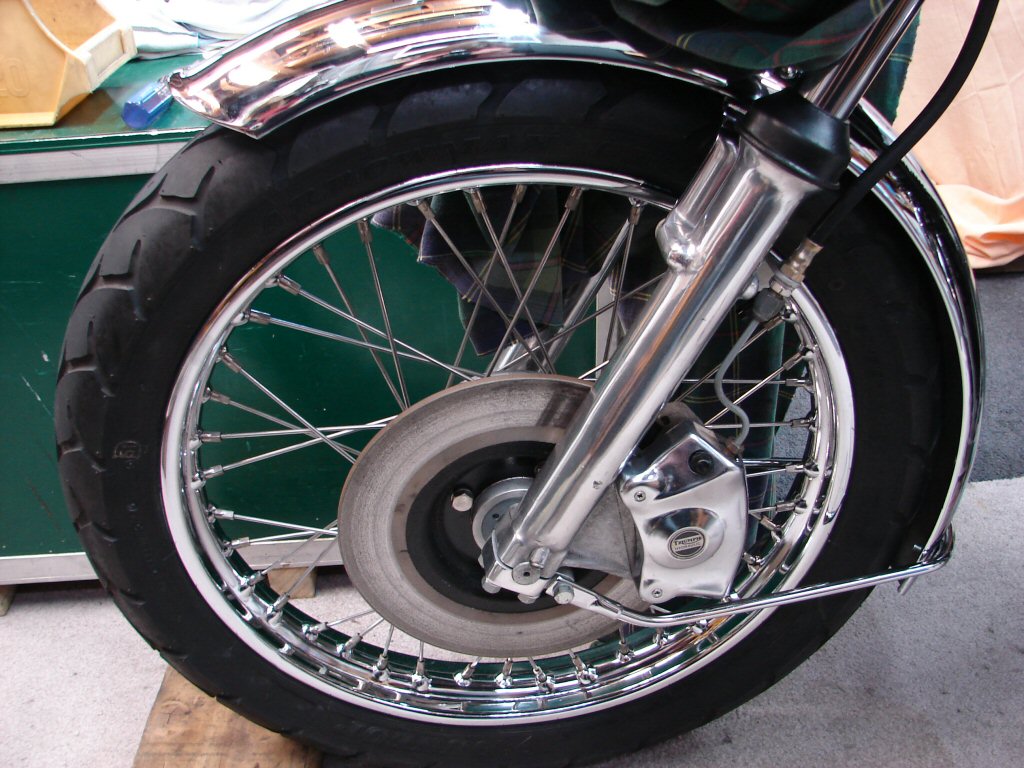
The rear wheel was an example of previous owners taste, so I was hoping they had not attempted too much work on the rest of it..
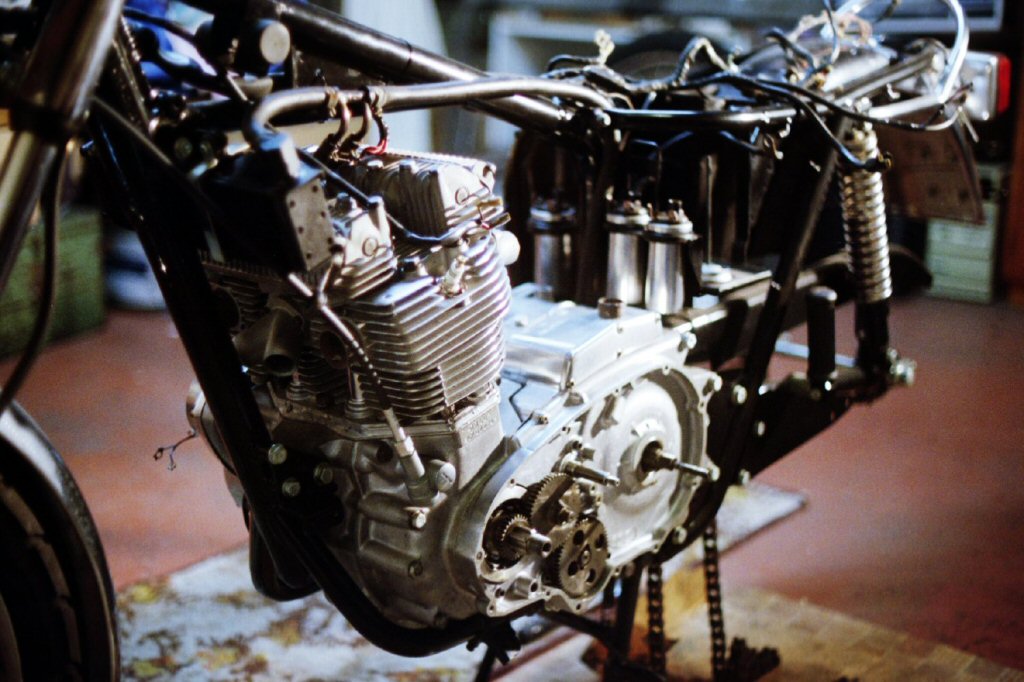
The engine obviously had not been apart to any extent previously which was the best sign. A worse sign was that the timing case had been damaged and had a large crack in it. Apart from that the worst damage had been caused by condensation, and pretty well any surfaces that had been exposed were rusty and pitted. Camshafts were throwaway - although I kept them as you never know when such things might become repairable again. Cylinder bores were good as were the pistons, though the exposed areas of the gudgeon pins were so rusted that the pistons would not move on the rods and this made removing the barrels rather difficult. All in all it was more good news than bad, as it appeared that everything had been running well up until the bike was laid up. Or down.
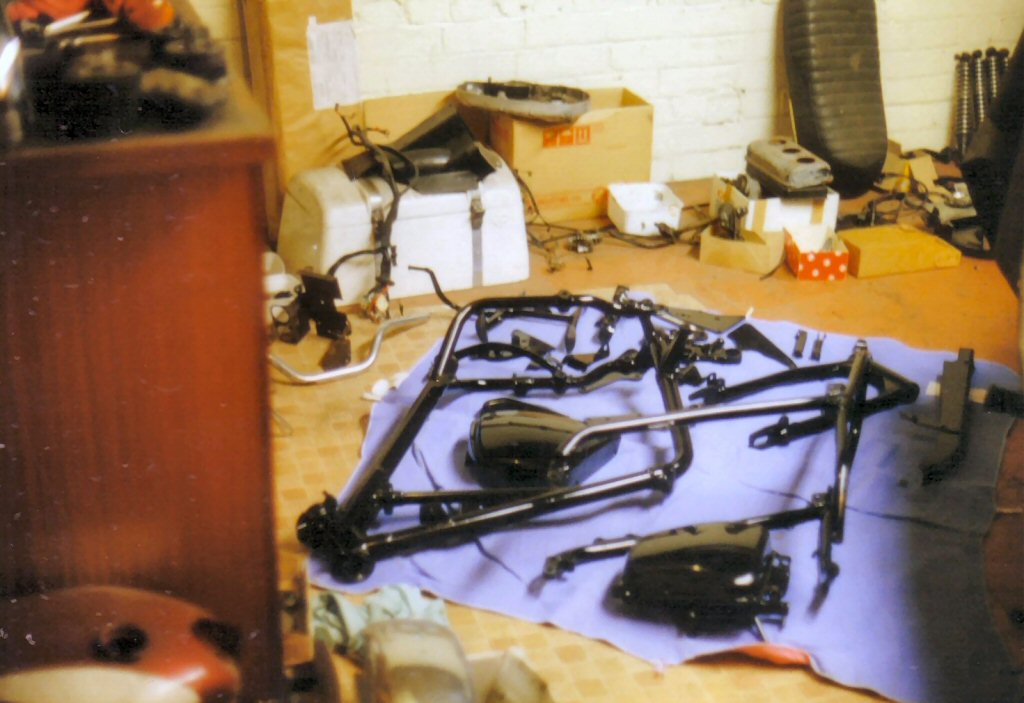
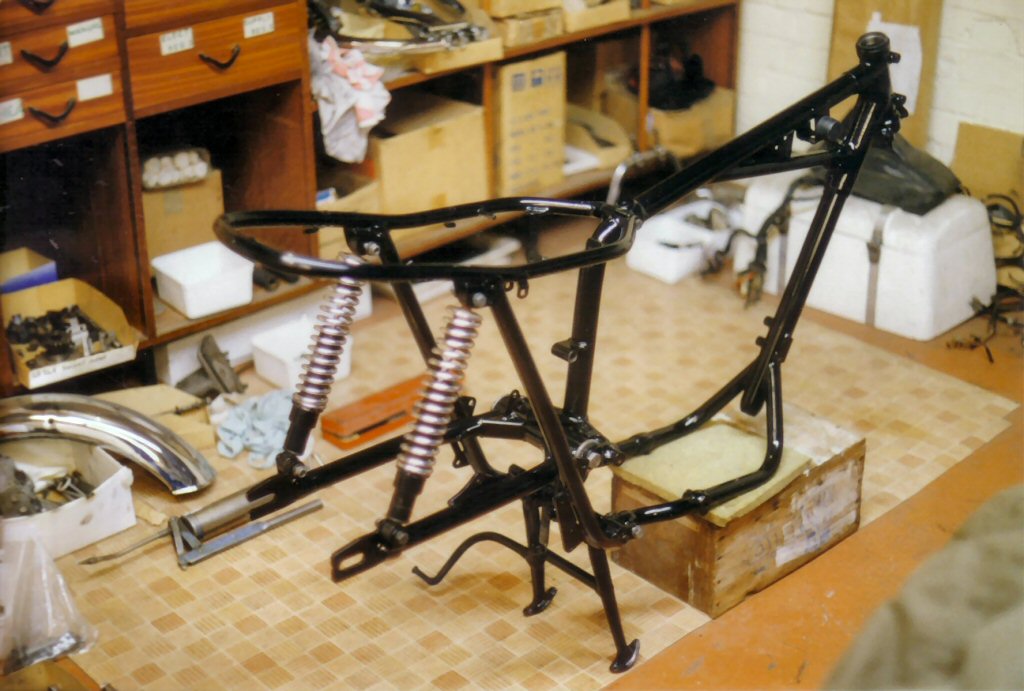
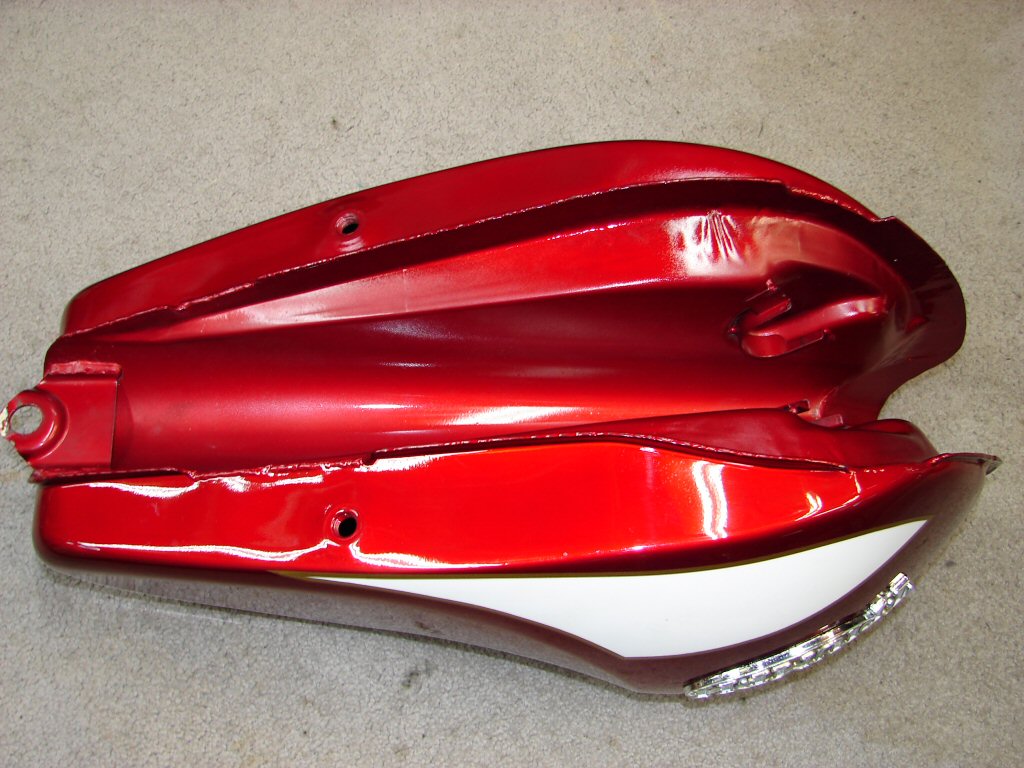
All the frame parts were taken to a friend who also owned a T160 and had a few spare parts. He would check and repaint the frame and panels, although there was no chainguard or left sidecover, and the battery tray had mostly been consumed by acid. My friend was able to supply a chainguard, and I managed to find a sidecover albeit with a hole rusted through the centre. It occurred to me that it may have originally come from the same bike. It was welded up and got the paint treatment as well.
The parts came back nicely painted - three years later.!
I had begun the rebuild of the engine in the meantime. I had meagre ready funds for parts, and it seemed to me that until I had a complete frame there was nothing to fit an engine to. I did manage one very nice find though - a brand new battery tray. My engine reconditioner of the day had it and it was only because I mentioned the lack of one in passing that it came to be offered.
The same man later checked the bores and pistons and declared them fit for service with just a hone and a new set of rings. I had carefully cleaned the rust off the gudgeon pins and managed to extract them all without any serious damage, so a new set was purchased and I had the basis of an engine.
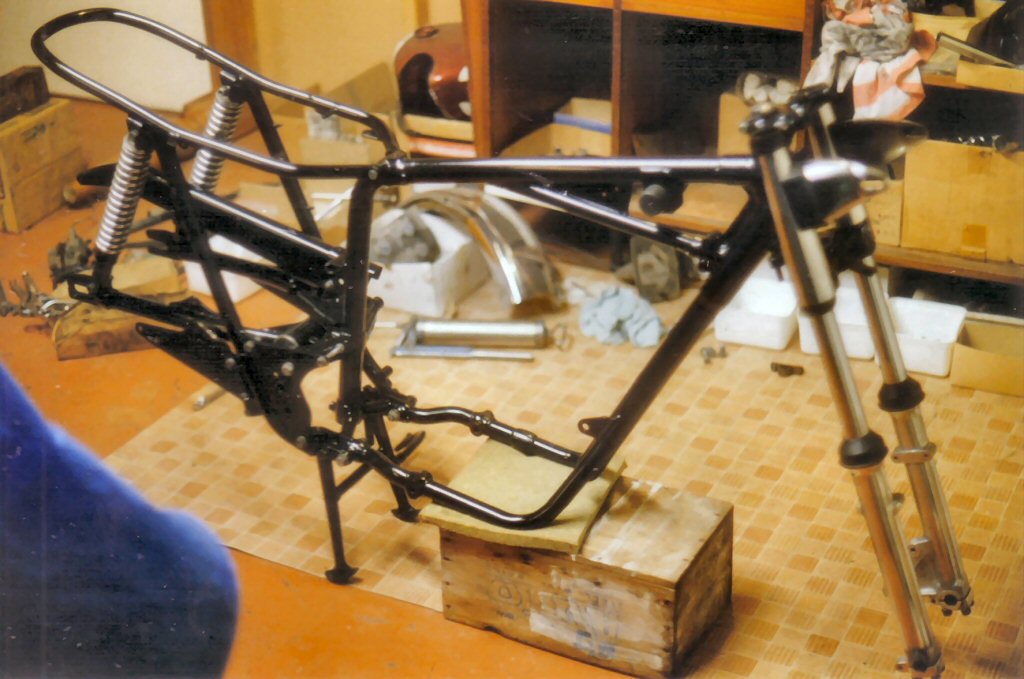
By the late 90's I had the beginnings of a frame together. Rear shocks were the Girlings from my original owned from new T160, so they looked fine but did not do their job very well.
Soon after I had resurrected most of a front end.
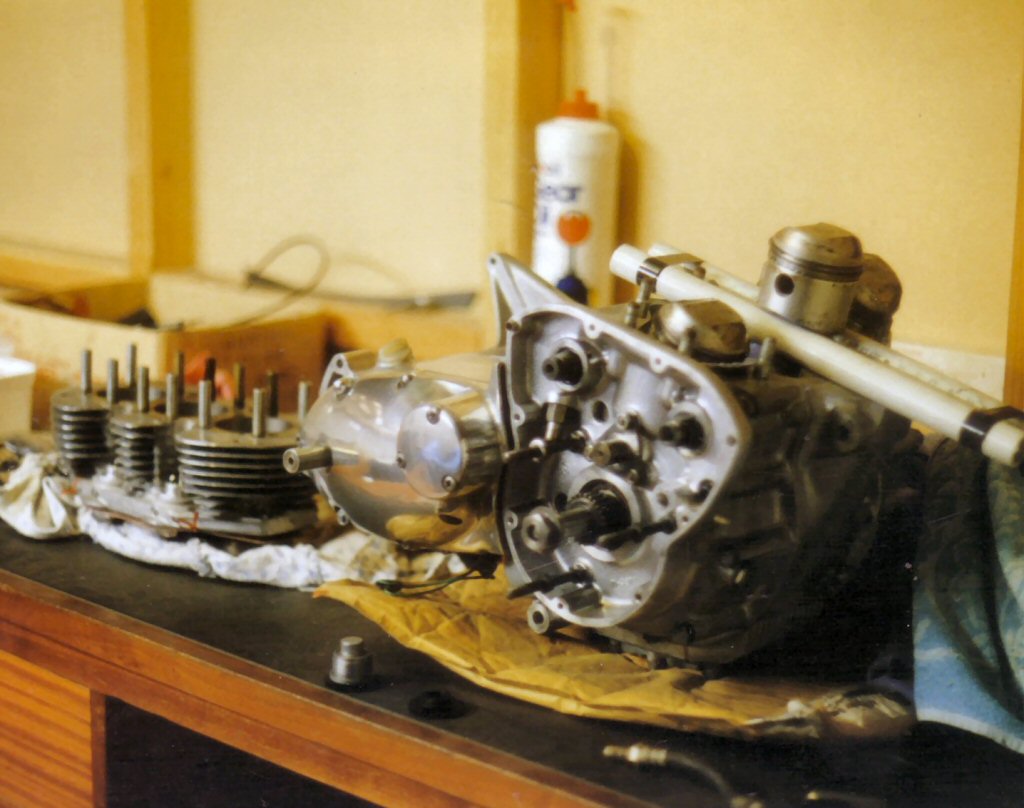
The powerplant had also progressed. I had the timing cover welded up and spent many hours trying to get a polish back on it. The bottom end was assembled along with the gearbox and clutch. Not many parts were required in the build, bearings, seals and gaskets mostly. A couple of gears were rather pitted. I soaked them in gearbox oil for a long time, wire brushed them and checked how they meshed. I shall be critical of any noise in use that suggests they are not happy, and if so will replace them. I am not sure how much it takes to be non-usable.
I bought a pair of new camshafts which were cheap as they had not received their final machining, and I had that completed by my engine guy. Mostly it was just the taper for the ignition auto-advance unit.
I got distracted by cars. I began to accumulate quite a collection that came my way for peanuts as they were a rather unpopular model. Worked for me, and I got years of service out of them. I also built and modified engines, suspensions and other naughty bits, so my focus went off bikes for a period of time.
The arrival of other people's bikes coming for repair got me centred again, and I began to pick up the pieces.
There was a reason why it had stalled. Without ordering parts blindly from overseas then waiting weeks or months to find what had been sent, there was only a meagre supply of stuff available locally. Also, I had intended to build this bike as well as I could using the majority of salvageable bits, get it on the road and sell it, so as to get my money back. As it began to come together I was simply discouraged by the look of the build. It was like half restored and half not, and my quality control instinct rebelled. I was going to have to adopt a unified approach if I was ever going to be happy with the finished product, so it looked like going backwards for a while.
So it slumbered.
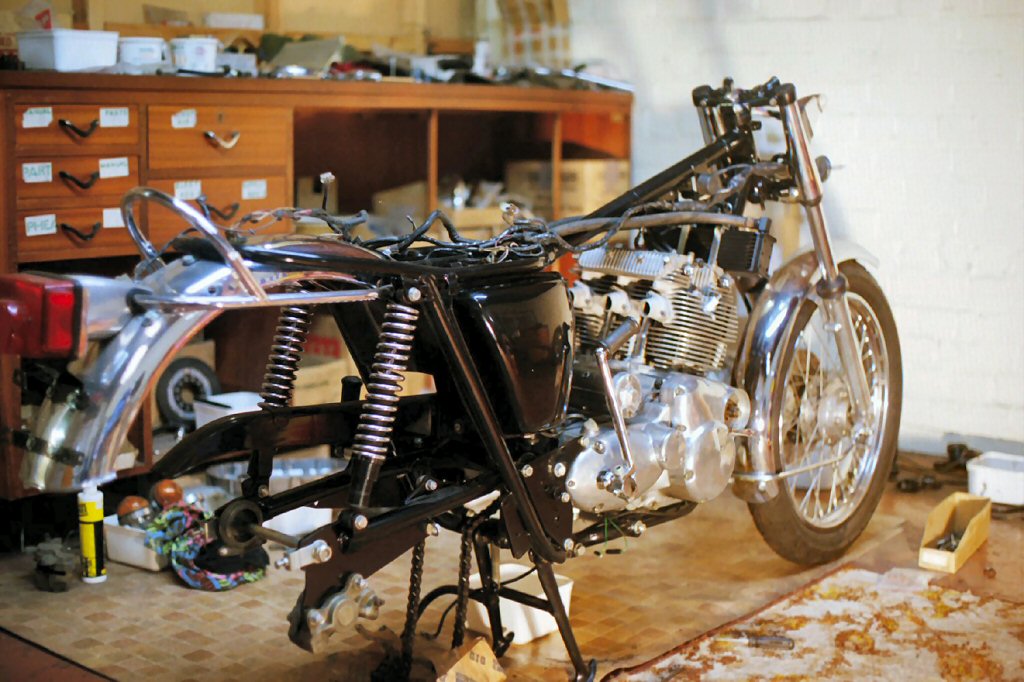
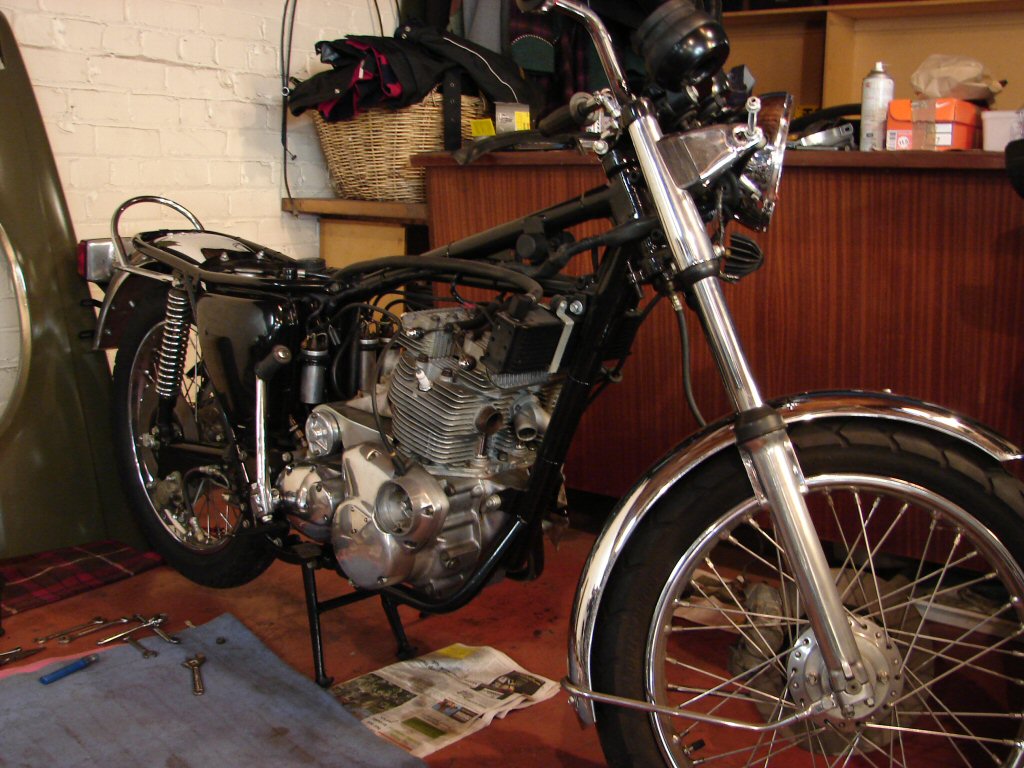
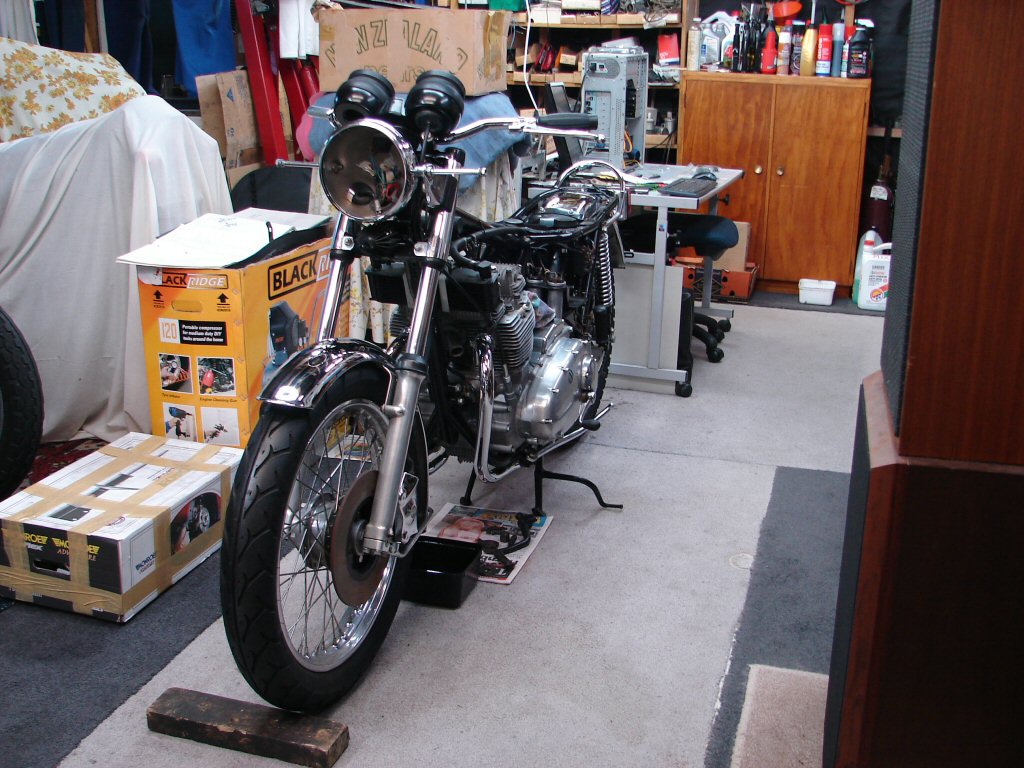
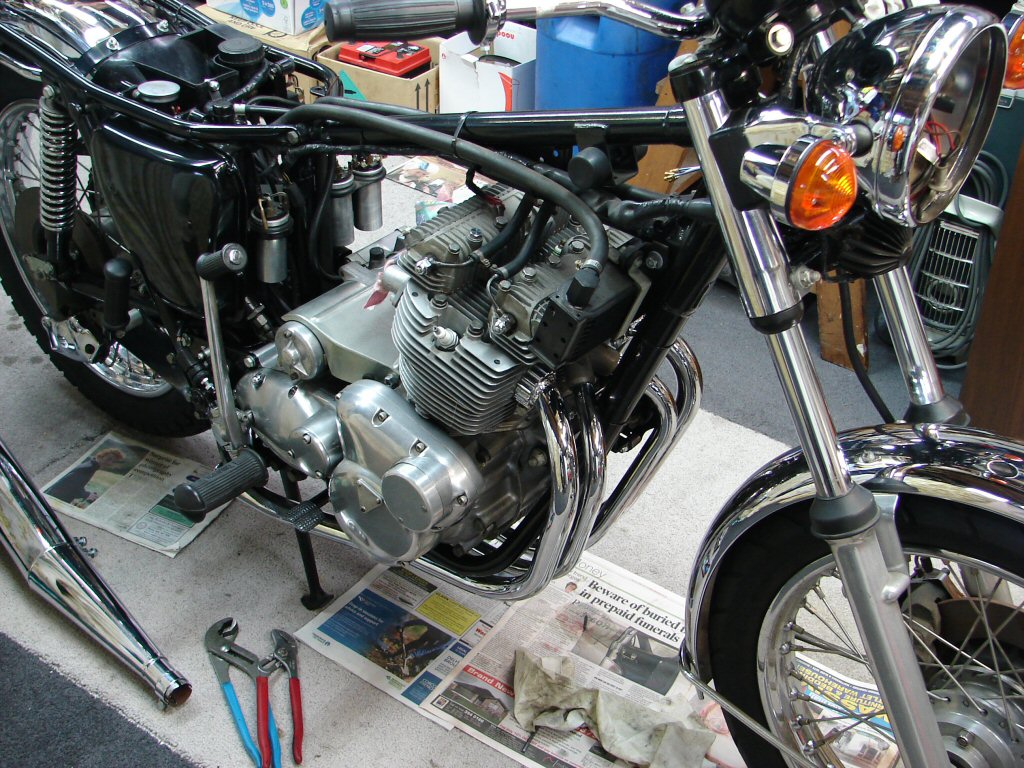
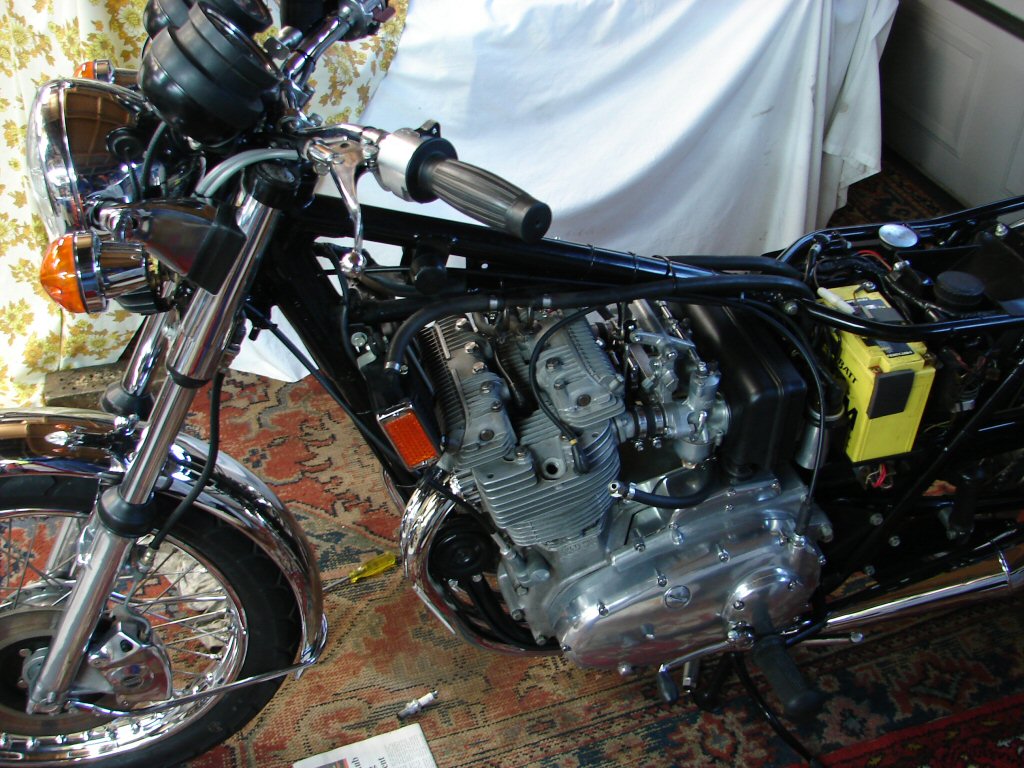
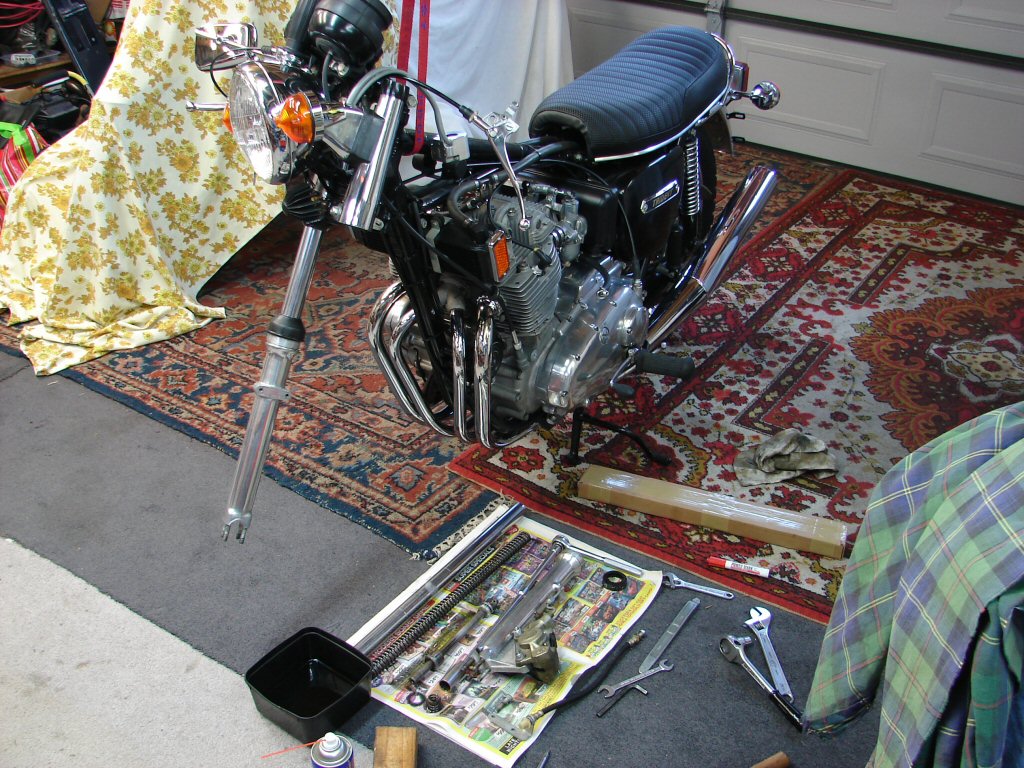
By 2002 I had made decent headway with build No.2 and the engine was getting fairly complete. I had a lot of stuff zinc plated which managed to brighten things up enormously. The front wheel was respoked with stainless and a Dunlop Arrowmax tyre fitted, and this was attached to the forks with new caps that had never been overtightened to the point that they cracked in half.
The mudguards had responded to rechroming treatment and polished up as bright as anything else on the bike. Wheel rims also passed muster for another tour of duty.
The oil tank had been fitted so that I could get some oil into the engine. The entire oil circuit was complete, and by manually cranking the oil pump gear I was able to pump oil right around the engine. I did this every few months, even though the bike was living indoors and in as dry a climate as was possible.
Coils had been cleaned up and the wiring loom was installed. I managed to polish the original tail light housing and fit the gubbings from a repro unit to actually hold a lamp.
Disk calipers were fitted - one from this bike and one from my original bike, which had been treated to a pair of Lockheed racing items. Brake disks cleaned up and got repainted centres.
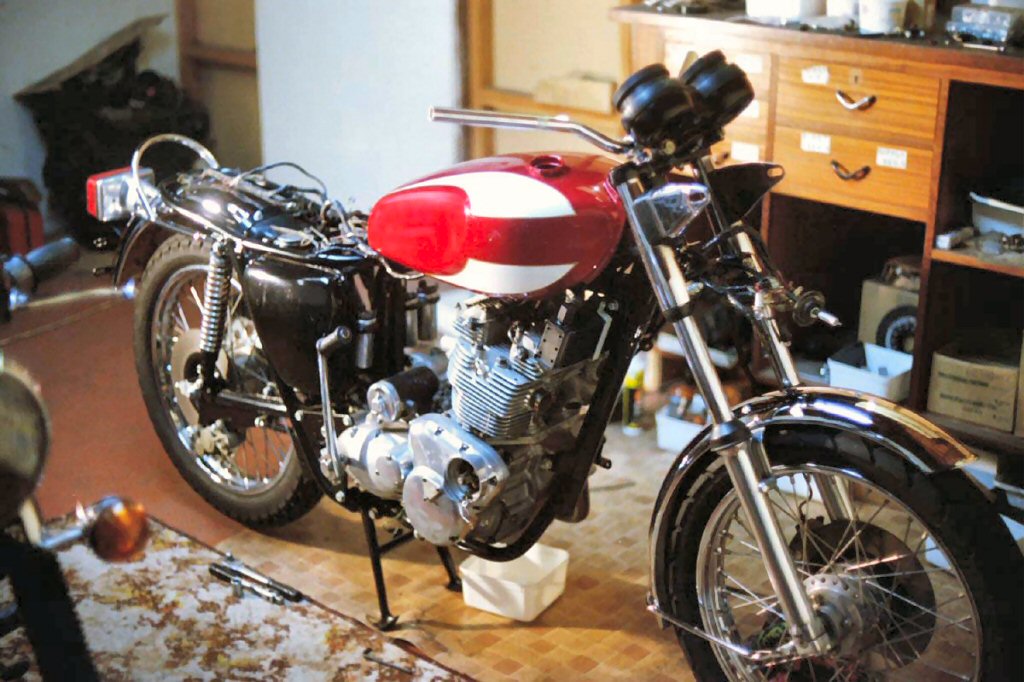
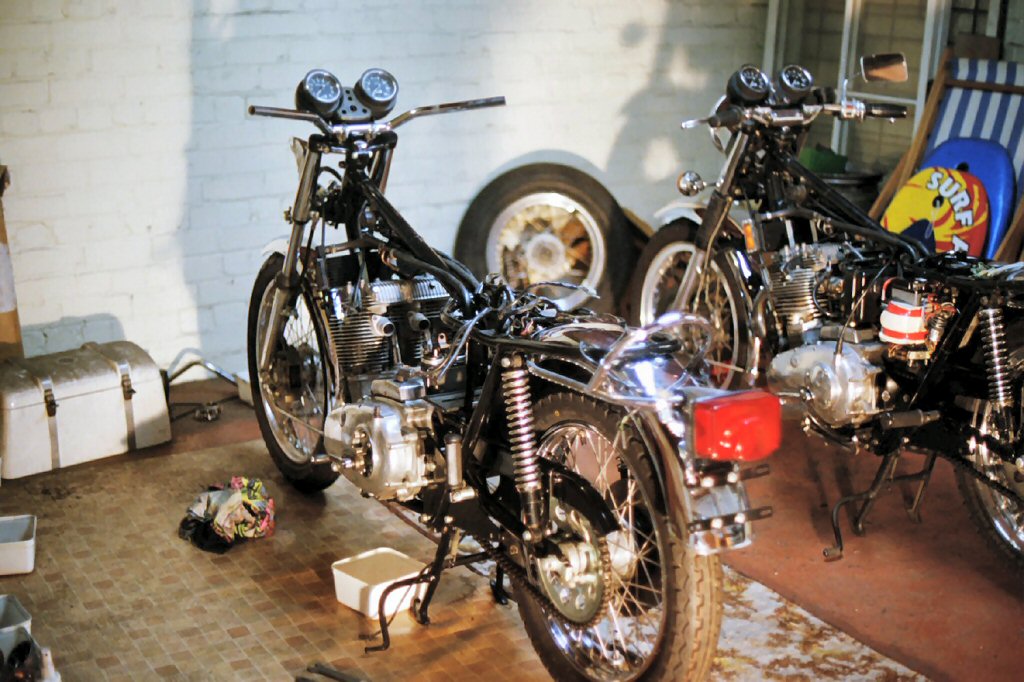
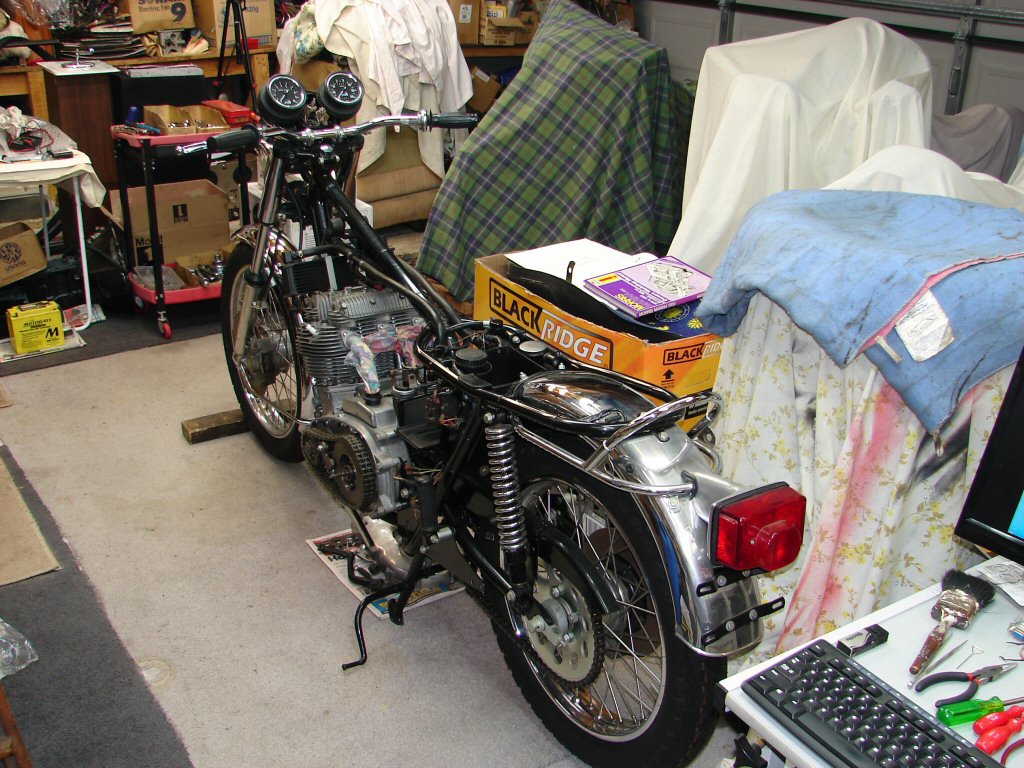
A month later I had added the rear wheel, which also got stainless spokes, wheel bearings and a TT100. This was the original from my other bike as I had built up new alloy rimmed wheels for it, and this one had come with the hideous 16" job on it. There were new standard handlebars and the repainted instrument binnacle. Many parts were only trial fitted for the photos, and to make sure that they actually would fit before taking any final steps.
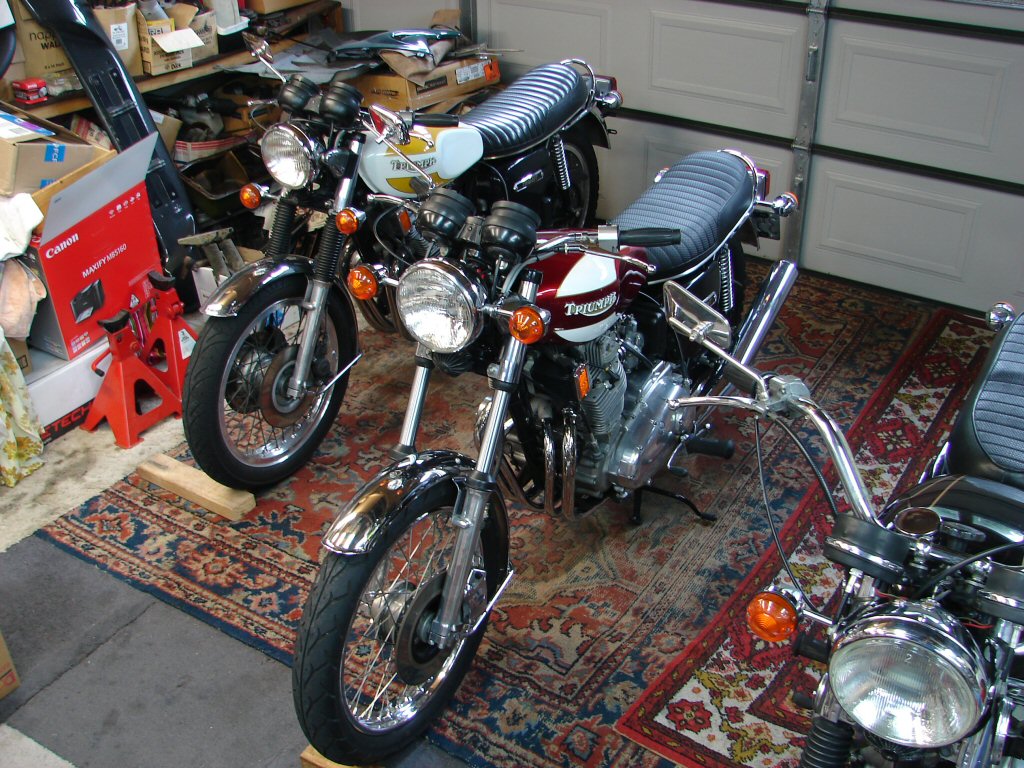
Having a totally original T160 sitting next to it was invaluable for figuring out where everything really should be, even though much of it was only detail and not critical for the function of the bike. I figured that if it was going to be an honest example of a rebuilt/restored bike that it needed a better approach than it had arrived with.
Rear sprocket was also donated by my other T160 as it had been geared up with a 45 tooth rear to better suit it's recent elevation to 830cc. It was indeed a serendipitous thing that I had many parts in great condition left over from the rebuild of my other T160 in 1991, and which filled the gaps here.
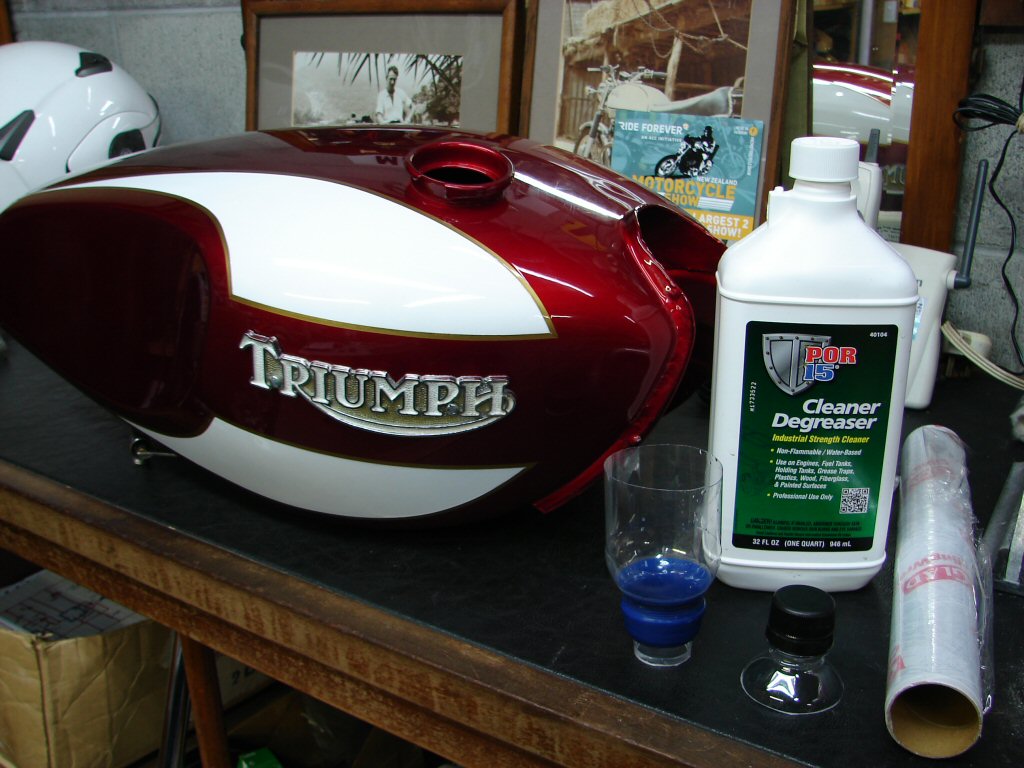
In another happy way I had solved another seemingly expensive issue. The fuel tank absolutely needed paint, and that was a skill I lacked. In the workshop below where I lived and worked there was a mechanical business with two mechanics, and with many car-type people coming and going. I got to know a painter who it turned out was building up a Ford Anglia. I had recently sold a Hillman Hunter that had featured 7" wide Rostyle wheels, and which would be the perfect addition to the Anglia. I offered him a swap for the paint and he agreed. I had to see how it would look..
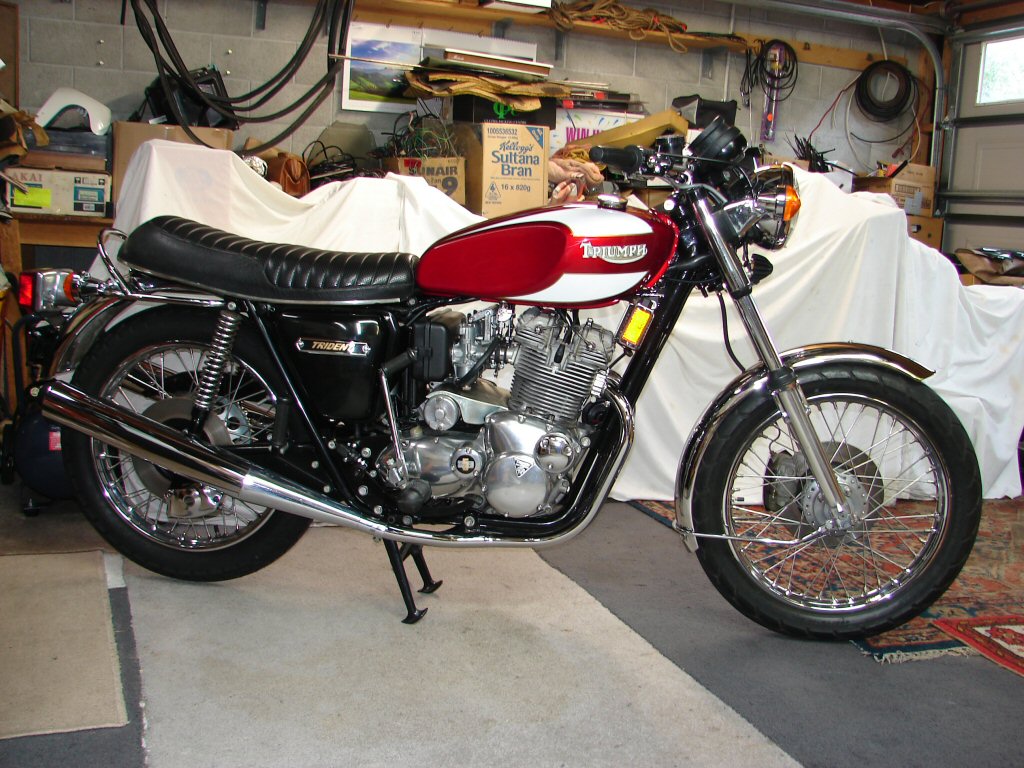
This was starting to look like a real motorcycle.!
Apart from headlight and a few other small items, things now ground to a halt again. Next photo I have is from 2008 where the bike was parked out in the workshop with a few other visiting bikes.
Primary case was a trial fit as I was still pumping oil manually at this stage.

Next photo is from January 2011. I had obtained a pair of new brake lines and stainless master cylinders. The rear was the first to be assembled though I did not have the fluid reservoir ready to fit at that time.
I did not complete this job.
In February 2011 the sky fell. A massive earthquake destroyed this building and several thousand aftershocks continued the job. While the building remained upright, it was no longer safe for habitation as every internal wall and several external ones had fractured, and the only course was to hastily evacuate. I personally probably did that in the first 30 seconds. Bricks fell around me as I fled out the door, only to watch several other nearby buildings literally disintegrate. An incredibly surreal thing to witness.
I ventured back inside the building inbetween aftershocks to retrieve my phone and camera. All the bikes were intact and still on their mainstands. The only painful casualty I was to later discover was that the beautiful fuel tank had fallen from a shelf and landed upside down on the concrete floor, with inevitable results.
It was hardly the time to feel bad, as our very lives were in danger every time we entered the building. Friends helped us drag all we could out of the place and it was stored in various places until we could find another place to live. That took 6 months, as so many houses had been destroyed there were none spare.
A new address and a new workshop. I managed to squeeze most of my stuff into a 2 car garage and the rest got dumped or given away. While I continued riding and repairing motorcycles, this bike had fallen off my radar.
It was parked at the rear of the shed and covered up, while work went on around it. Many bikes came in, got repaired and went out. There was no shortage of bike activity in general, just not this one. It became more difficult to even look at it as time went on. It was as if it had just become far too difficult.
For no apparent reason I pulled the covers off it in July 2017. I had just completed an 18 month rebuild of a T150 that had thrown a conrod. It was an enormous job and I was painstaking with the process, as it was all photodocumented for the benefit of the owner who lived overseas. The end result was an outstanding success, and I was feeling pretty pleased with myself right then.
Perhaps that was the catalyst, but for whatever reason, here I was and this is what I found.
It had survived extremely well. There were the beginnings of rust spots on chrome bits but they polished off with a trial rub so I felt a little heartened. The worst parts were actually parts that I had used during the assembly that were not good enough. They may not have been good enough when I fitted them, but now there was no question, and they would have to be replaced.
I located the exhaust headers which some kind friend had wrapped up in an old electric blanket. They were in very good condition and only required a brief polish, so I hung the outers on the bike. It felt like a hopeful sign.
Having located some suitable hose to complete the fluid reservoir setup for the rear brake, I completed that assembly and bled the rear brake. Happily it functioned very well. I trialled the outer primary chaincase and immediately rediscovered a problem that had helped to put me off this project. When the outer cover was fitted I could no longer select gears. I knew that there were a couple of parts in the outer gearbox cover which were in the gear selector mechanism that had been badly effected by rust. Although I had cleaned them up I was concerned that they would not allow a very smooth gear selection. I decided to obtain new ones, which I now easily could. I could even see photos of them before I bought them - so many things were easier now than they had been when I started this rebuild. I decided to also strip the gearbox to take another look at the gears which I had been dubious about.
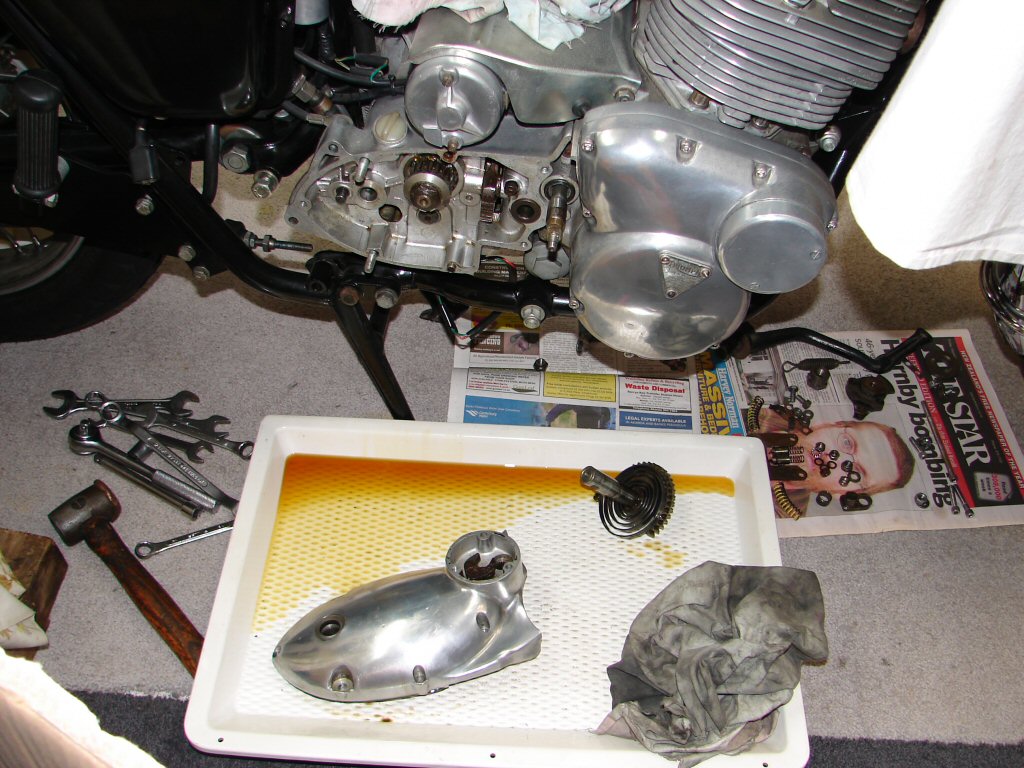
The small fork still in the outer cover is one of the parts that was not in very good shape. The other was the part it engages with which is on the floor. I replaced both, which involved getting my current engine guy to use his press to fit. Inspection of the gears revealed that the synthetic oil I filled it with many years ago was still in excellent shape with no water contamination. I also came to the same conclusion that I had previously - the gears were worth a punt. I put it all back together with much care and special attention to the timing of the quadrant that times the gear changing.
Whichever of those things made the difference I care not - I now had 5 gears available with the primary cover in place - I was suitably encouraged.
I found a set of stainless allen screws I had bought as a kit for a T160, so I found homes for them all. I also fitted an extended clutch cable abutment in the primary - partly because it helps prevent oil seepage there, but mostly because the original was nasty.
The next task was to remove the rockerboxes. I had assembled this engine long before I had begun using solid rockerbox base gaskets - either copper or alloy - and as this had the conventional items which seldom lasted very long I decided to replace them. The other benefit of the solid gaskets is that they perform a much better job of allowing correct head tensioning and generally result in a more oiltight engine. If this bike was to be sold it needed to be as good as it could possibly be.
That was done, and a set of stainless steel head bolts fitted, simply because I had them and they improved the look of things greatly.
I also trial fitted the complete exhaust header system to see what might be needed to give a good overall result when they were finalised. The inner headers were very loose in their adaptor but at least they looked to have a good covering of chrome. The entire exhaust system had been the original on my owned-from-new T160 which now featured a 3 into 1. Whilst the headers and collector had been rechromed, the mufflers were totally original and in excellent condition.
Next step was to finalise the electrics. I had noticed a few discrepencies in the behaviour of the wiring loom, and when I tracked it down I found two possibly related issues. The wiring below the battery tray where the start relay and ballast resistor would normally reside had been chewed through by what appeared to be contact with the edge of the sidecover. Perhaps to compensate, someone had chopped a feed wire off inside the rubber boot on the rear brake light switch. I see this as a flawed repair process. Instead of repairing the real fault, a new fault was created to mask it.
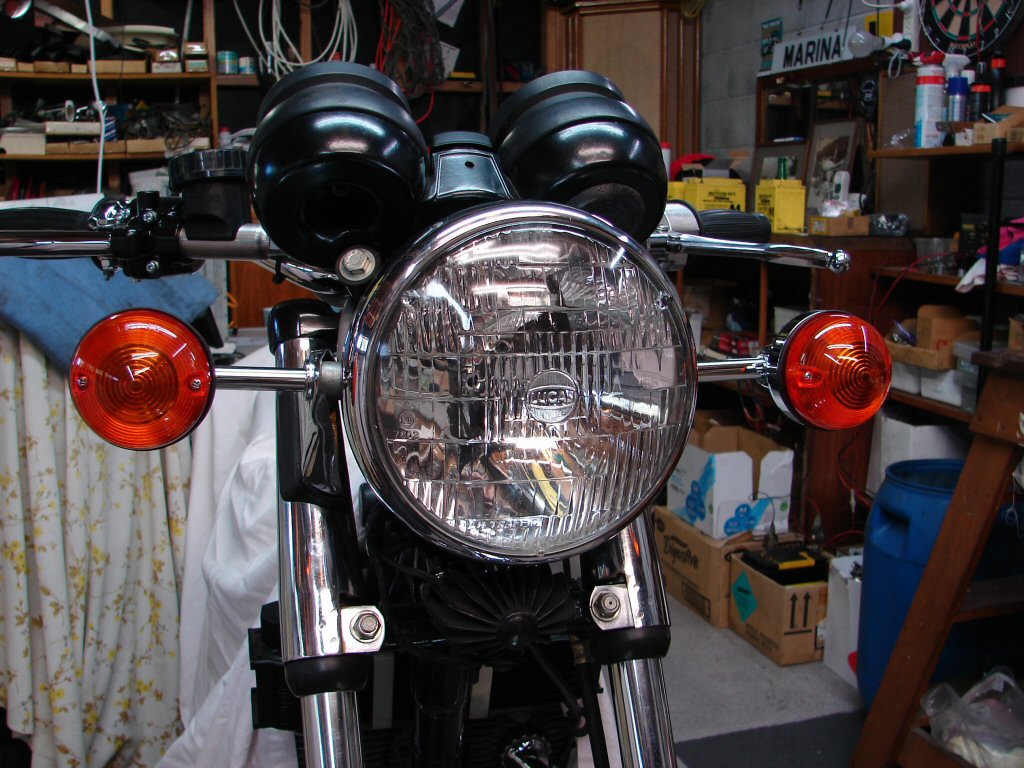
I took care of all that, and fitted the front brake master cylinder assembly and the repro left side handlebar switch unit. This allowed me to both complete the front brake and make it operational, and to make all the electrics work so I could fit the igntion switch housing with its new idiot lights which arrived in Lucas boxes.
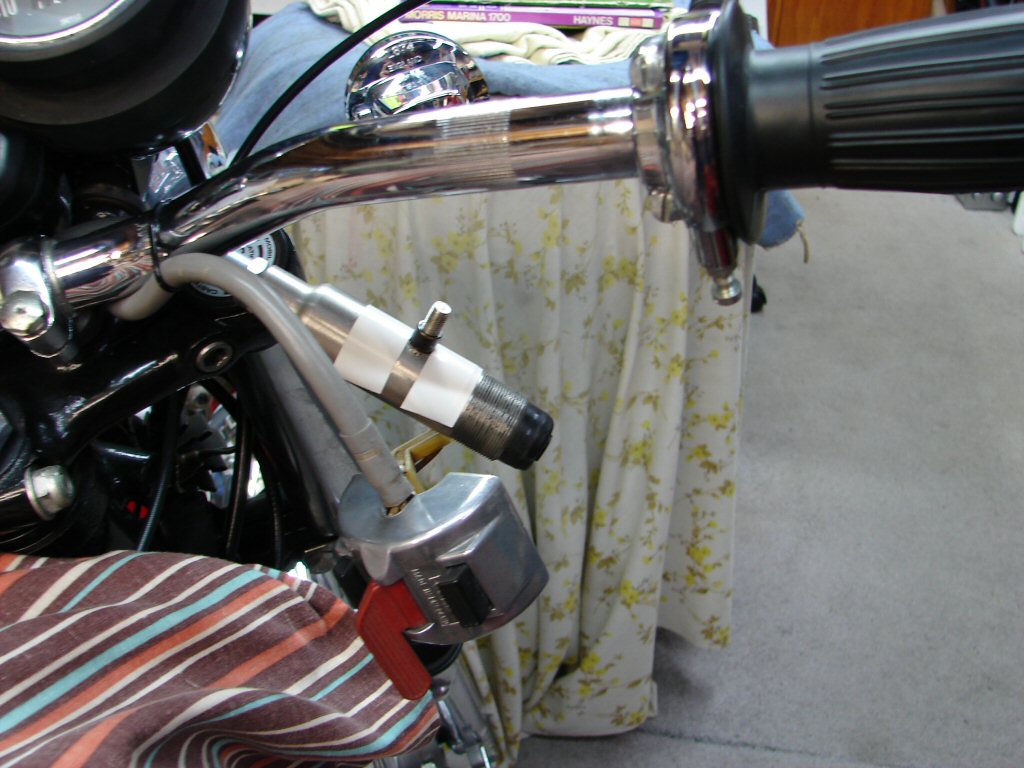
I had also obtained a new throttle twistgrip as the original was now letting the side down.
The headlight that came with the bike was an ill-fitting later type halogen unit which had required the use of odd connectors within the headlight shell. I figured I could do better. I had a number of Lucas sealed beam units courtesy of the collection of British cars I had acquired. These featured a parklight that shone through a small clear area in the back of the reflector, and which could therefore easily accept a modern LED bulb, making it a useful daytime riding tool.
I had also acquired a complete set of new Lucas indicators, but used somewhat shorter stems than original on the front, as these used to contact the ground first if the bike fell over, and in turn break the headlight mounting ears, such that they are no longer available for T160's.
My only reticence now about the entire front assembly was that for some inexplicable reason I had painted the instrument housings with semi-gloss paint rather than matte black which they should have been.
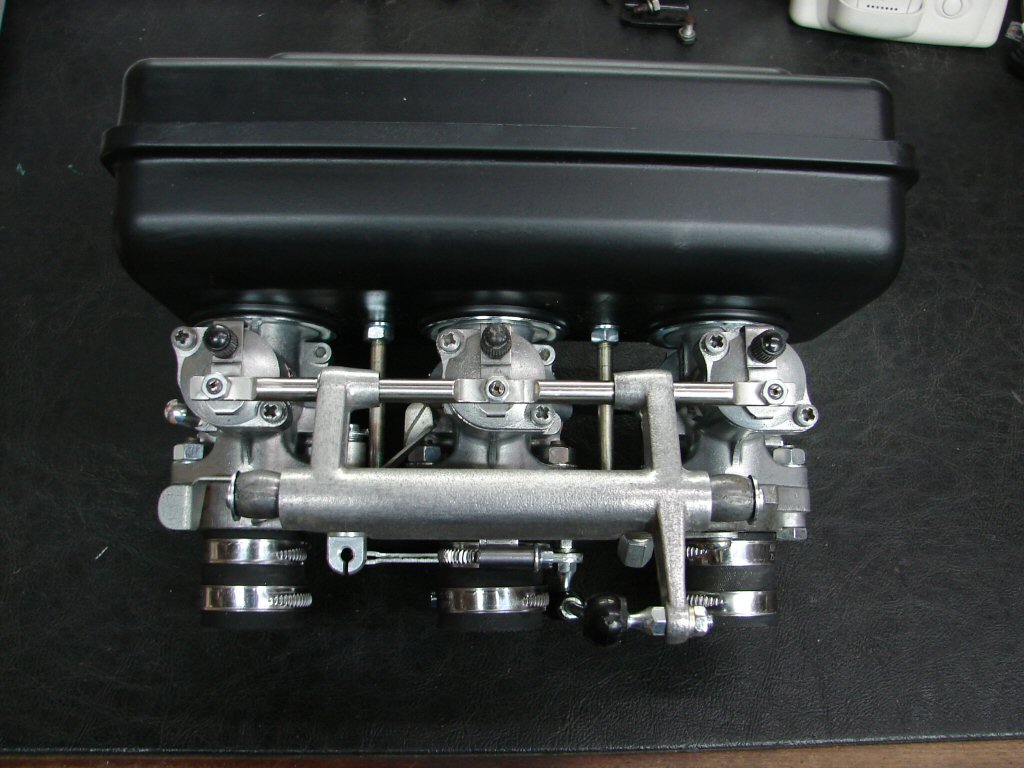
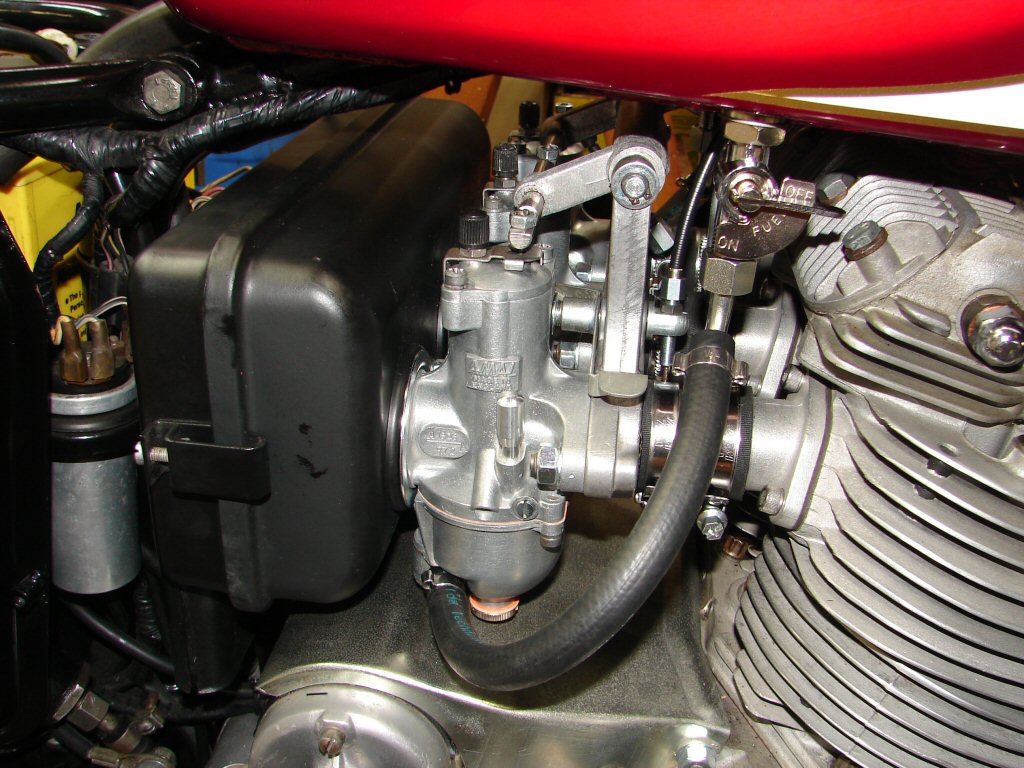
One of the major stumbling blocks of this entire restoration was the carbs. They had suffered badly from exposure to the weather, as had all the associated fittings - manifold, adaptor, throttle linkages etc. There was an airfilter housing, but it was hardly the best example. I guess it had suffered the same fate as all the alloy bits that were obviously distressed.
I did not see how I could obtain anything worthy of a restoration title from the bits I had, and that had been a psychological barrier to this project for many years.
Recently I had learned that diluted battery acid could perform remarkable restorative feats for ancient Amal carbs, and after much trial and tribulation I secured some battery acid. It seems to be a rather scarce product in todays age of gel batteries and things that are purchased with tubes of "stuff" to add to complete the role that battery acid used to play.
Battery acid is simply sulphuric acid, but that may come in various strengths, so you need to know what it is that you have been provided with. A friend sourced some "normal" strength battery acid for me, and that needed to be diluted 6 to 1 for this process. I did that. I soaked the carb components for 10 minutes apiece in this solution and it performed miracles.
You can read about the entire process here.
Suffice to say that the process gave me a set of carbs that I could clean and polish to the point that they would not only function correctly, but also look the piece. I had also reconditioned the original airfilter housing that should be attached to the carbs, and this was finally realised on 11 June 2018. Chokes removed and blanked off.
Major milestone.
Mid-July dreary winter day so I took shelter in the shed. I have been unable to paint so I have not got the airfilter as I want it yet, having found a couple of small patches of rust had unsettled the previous paint job - which I did about 15 years ago. Damn.!
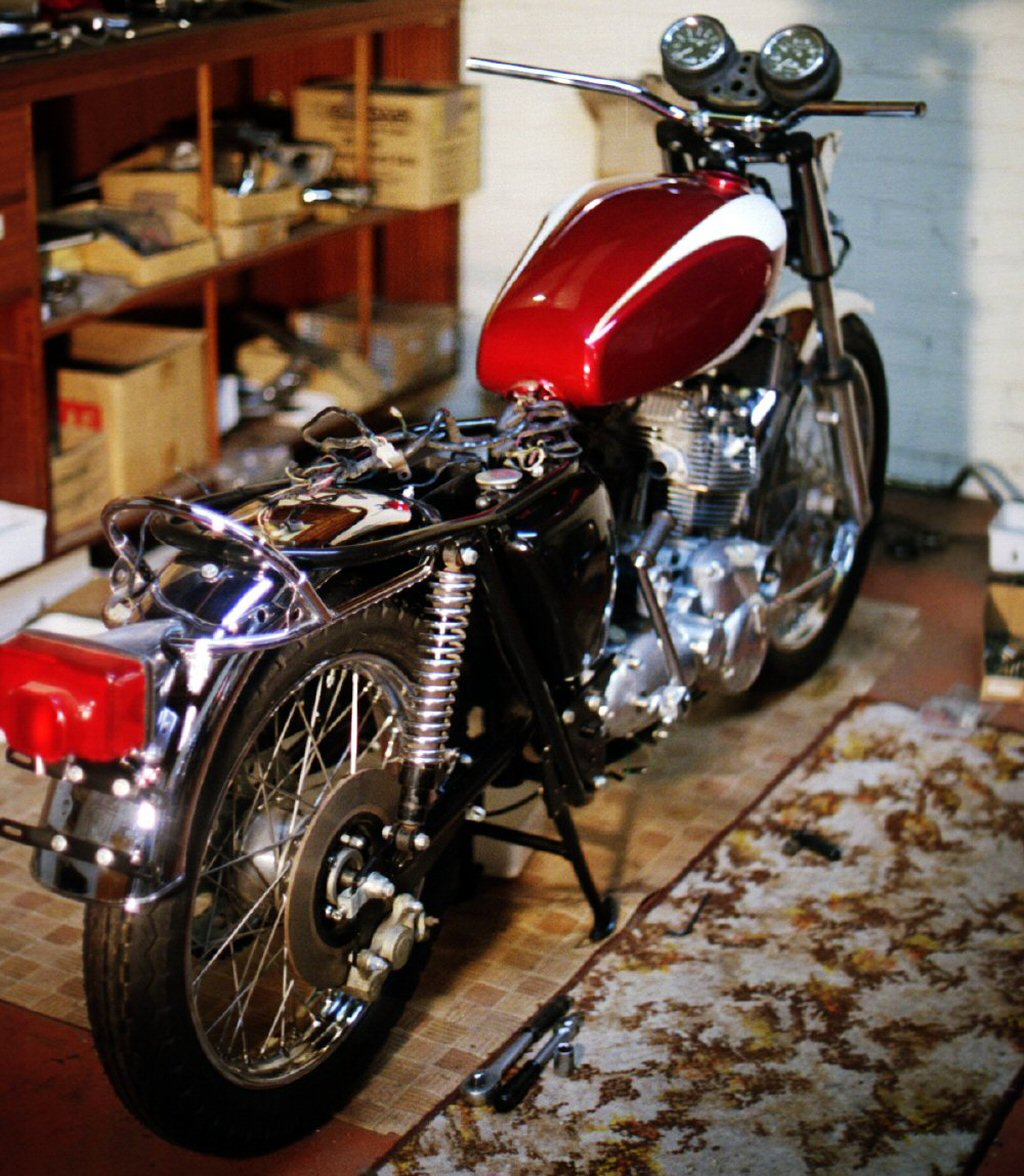
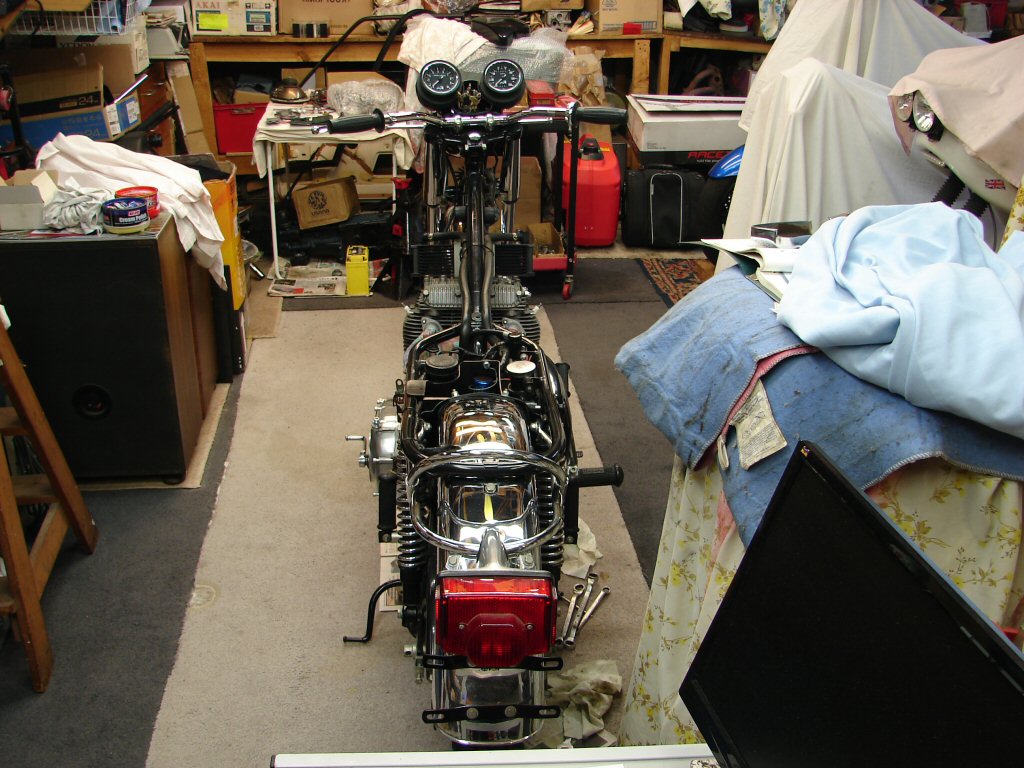
Wanting to see obvious signs of progress I fitted the carbs without the filter, then the throttle cable for which I made a rubber boot at the twistgrip end. I then decided that for a big morale boost I would drop the fuel tank on.
Yowser.!
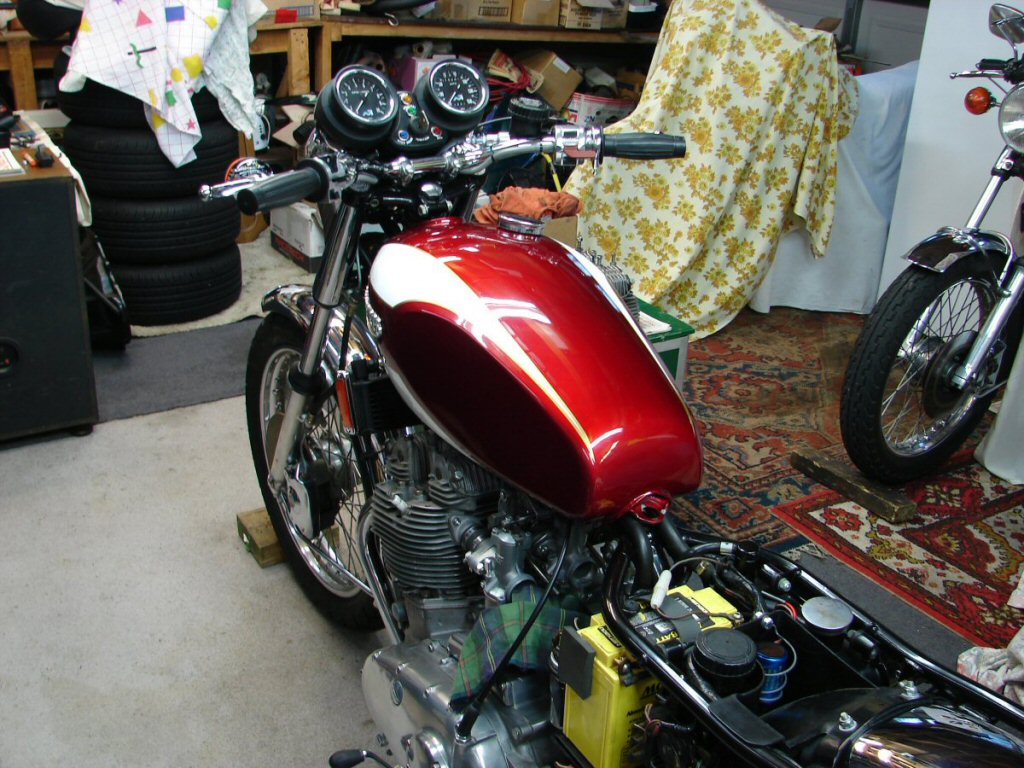
Prior to today I had fitted the new reflectors to the oil cooler, and prior to the tank going on I had fitted the decals to the top of each fork cap. After this photo I fitted the rear tank mount, which required running a tap through the thread in the frame first. Crazy with enthusiasm I also fitted both new fuel taps, so I am most happy with things tonight.
On a less optimistic note, while trial fitting the name plate to the oil tank I discovered that one of the threaded holes contained the remains of a partially drilled out broken screw. I have no memory of having done this myself, so it may predate my ownership. It may not either, considering the time frame. Suffice to say, I now need to complete recovering the thread without causing any disturbance to the tank and paintwork, as well as avoiding at all costs any chance of breaking through into the oil tank itself.
August 2018.
Used front wheel to assist in faultfinding a front brake on another bike. Turned out the disk was the problem. In the process I found that there was a fair amount of surface rust on the rim, the mudguard and the stay, so I polished them all up on the way back. Also polished the fork sliders, fitted new disk pads and split pins.
One other issue was also resolved. The "new" 25 years ago Dunlop Arrowmax I had fitted was potentially well past it's best-by-date, so I was interested to see how it performed on the road. The good news was that within a few miles it felt far more capable than the Dunlop TT100 which was fitted to the other bike. I found the same on my own T160 when I first fitted an Arrowmax 26 years ago. Shame they are no longer available in our market.
Original shine restored.
I had acquired the missing fuel tap fittings so that the fuel lines could be completed. Did that and connected them all up, which meant that I could now fit the airbox and connect the crankcase breather hose. All done in this pic.
The latest matte black paint on the front side of the airbox is very obvious here. Not obvious with the naked eye but the camera saw it. Will give it a cut.
Okay.
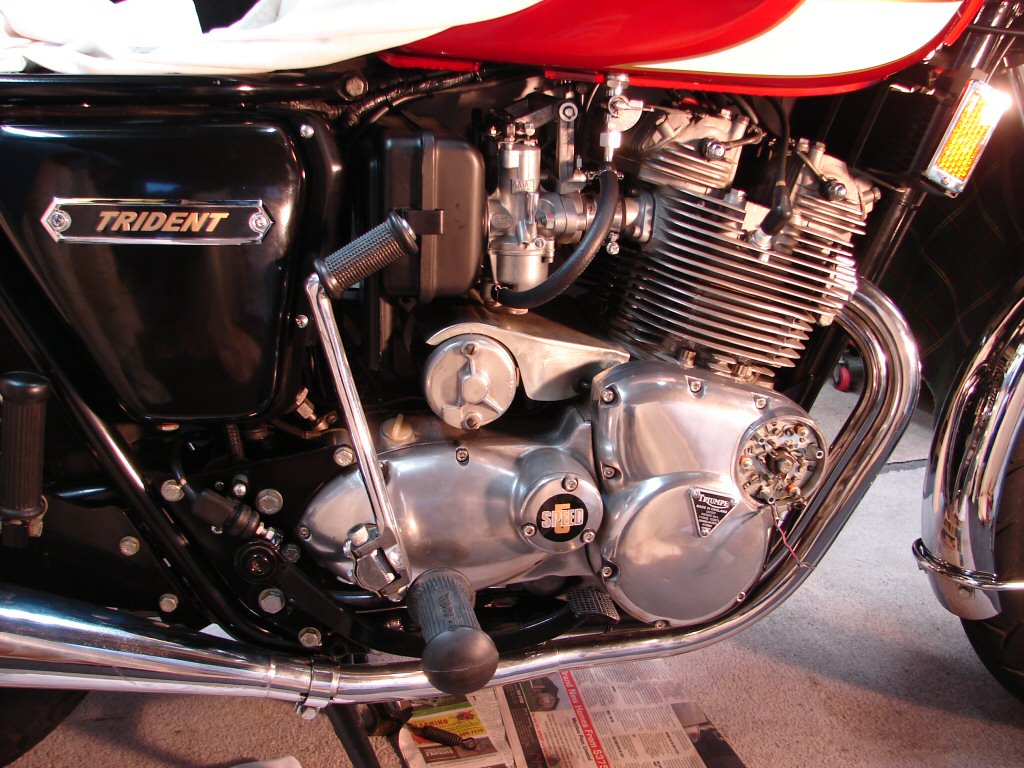
Things that have changed since the last pic. All very small details which have taken an inordinate amount of time in pursuit of imagined perfection. But besides that - I know what should be there and what should not, so I am just satisfying myself that I have done the best I can.
The real bitch, and one I was not expecting, was that there was a snapped off screw in one of the badge threads in the oil tank. I cannot remember if I removed the badges or not, and possibly if I did I would have thought - no probs, I'll sort that later. Later means it now has a coat of shiny new black paint, so you had better take extra care not to mess it up.! So with steely reserve and a selection of suitable drill bits, I passed no less than 5 of them through the centre of the defunct screw which was made of some form of kryptonite previously unencountered by mankind. After which I tapped out the original thread to good effect, dispelling swarf with the aid of a can of WD40. That finally allowed the fitting of the correct oil tank badge, and led to a number of other lighthearted additions.
5 speed transfer on gearbox.
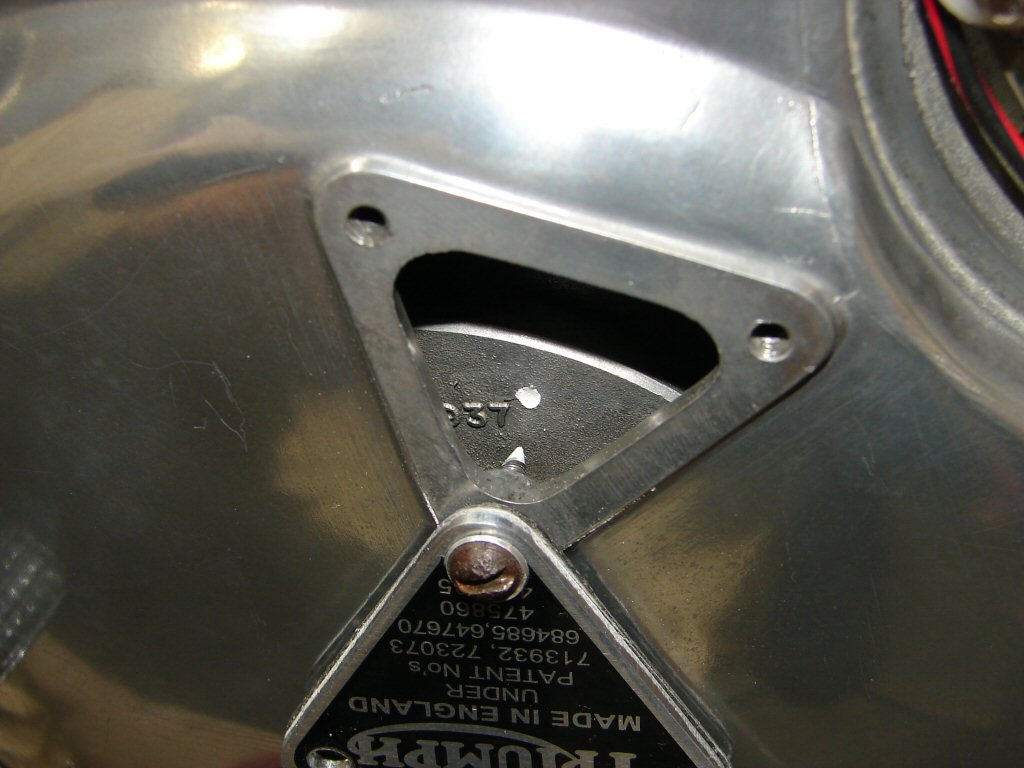
New Triumph patent plate on timing cover, resplendent with new screws and alloy washers, although the new pointer screw wanted to imbed itself 1/4" into the alternator rotor, so I shall need to shorten it and grind a new point.
A new set of Champion N3C spark plugs are housed within the original Champion spark plug leads with solid cored HT lead.
A refurbished advance retard unit is loosely fitted in the camshaft until I take the next step which is to time the points ignition with a set of new points I purchased in 1978 but never needed to fit to my other T160, as it went electronic instead. I could have splashed out and fitted something similar to this, but I have learned that every owner has their own preferences, and it is such a waste to have fitted some new part only to find that the new owner immediately trashed it. Better to remain simple and keep the price down methinks.
The time had come to time the ignition and set up 3 sets of points. This is not something you do very often, as most owners have fitted some form of electronic ignition by now. Including me. But, I must admit that I covered around 25000 miles on points on my first T160, as it performed adequately and I was happy enough just to keep an eye on them.
However - just because you are on the home straight, you should never consider that there are not going to be further challenges.
39 years ago I bought a set of new points for my bike. As it happened, I never tried to use them as I fitted an electronic ignition instead. So now when I intend to finally use them, I find that they are totally unfit for purpose.
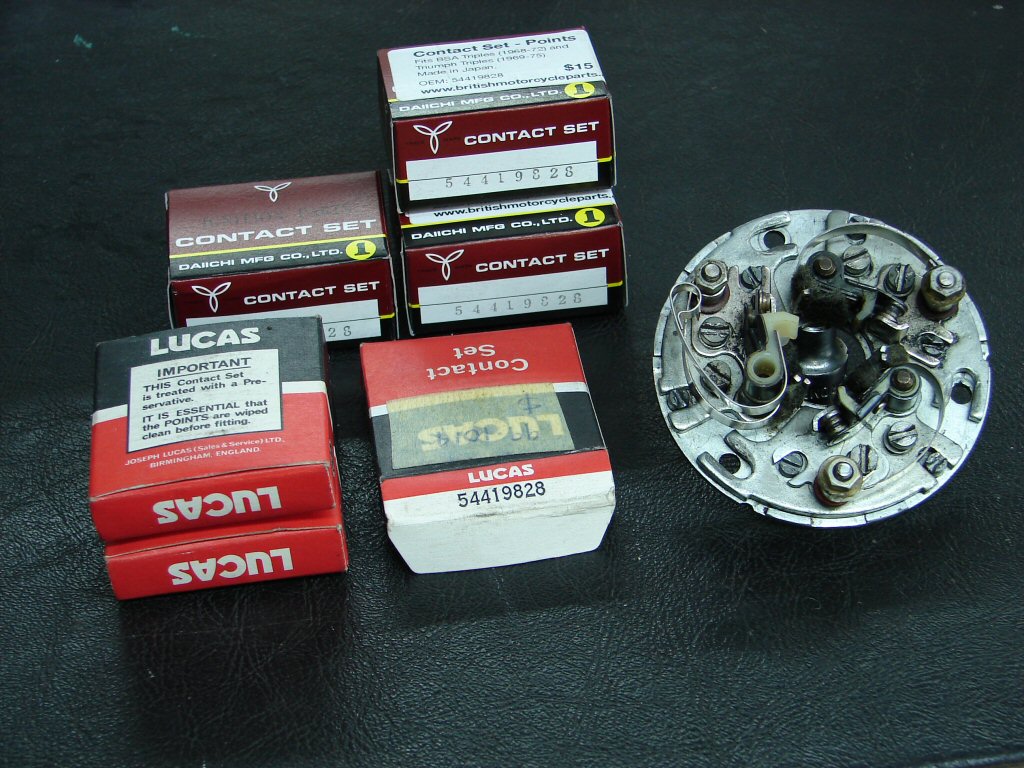
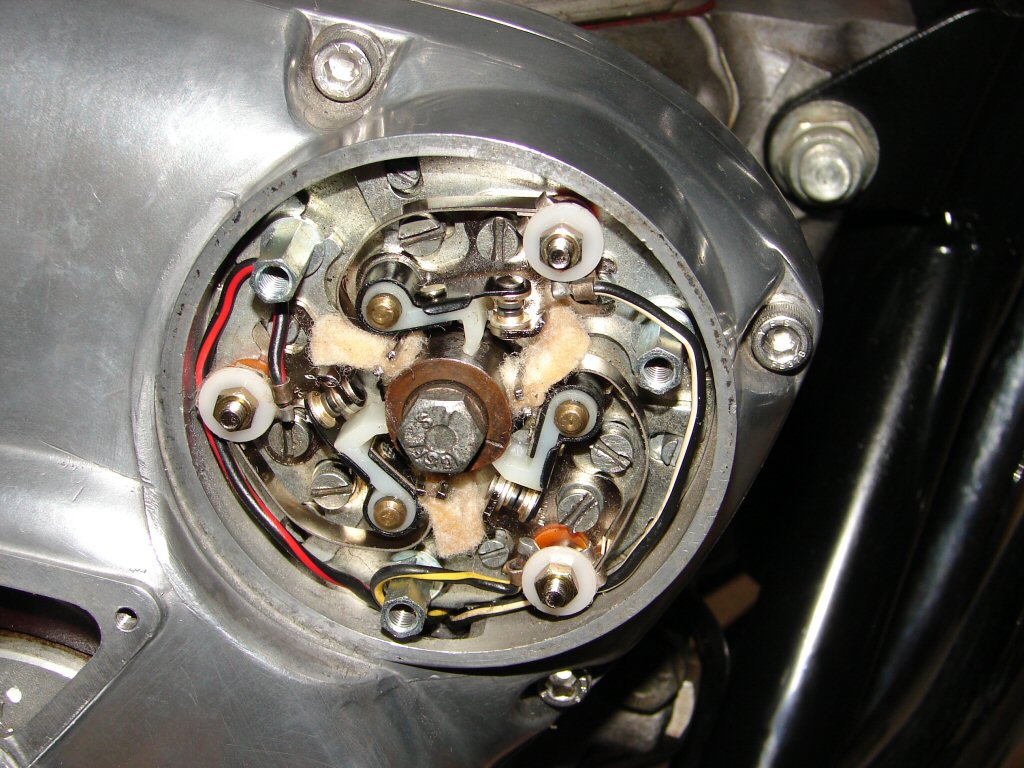
They came in the Lucas boxes, but when I tried to fit them I found that the spring arms are somewhat shorter than the originals, and because of this they sit against the head of the screw which retains the points base plate, and this grounds them and totally defeats their purpose.
In the photo you can hopefully see that I have fitted one of the new Lucas points moving contacts on top of an ancient original set, and the new one is visibly too short to perform correctly.
The next thing I discovered was that the alternator rotor did not have 3 sets of timing marks on it. Actually, it had one, but that one did not make any sense on a triple.
Consequently I had to mark the full advance position for each cylinder so that I would be able to use a timing light in future. I did this by using a centre punch then filling the indent with white enamel paint, as on the pointer screw.
At least I was now able to fit all three sets of points and locate the correct position for the advance/retard unit so that all sets had 15 thou gap and were timed to be only just opening at full advance. The timing light will pinpoint how exact I have been when I get the engine fired up for the first time in my ownership.!
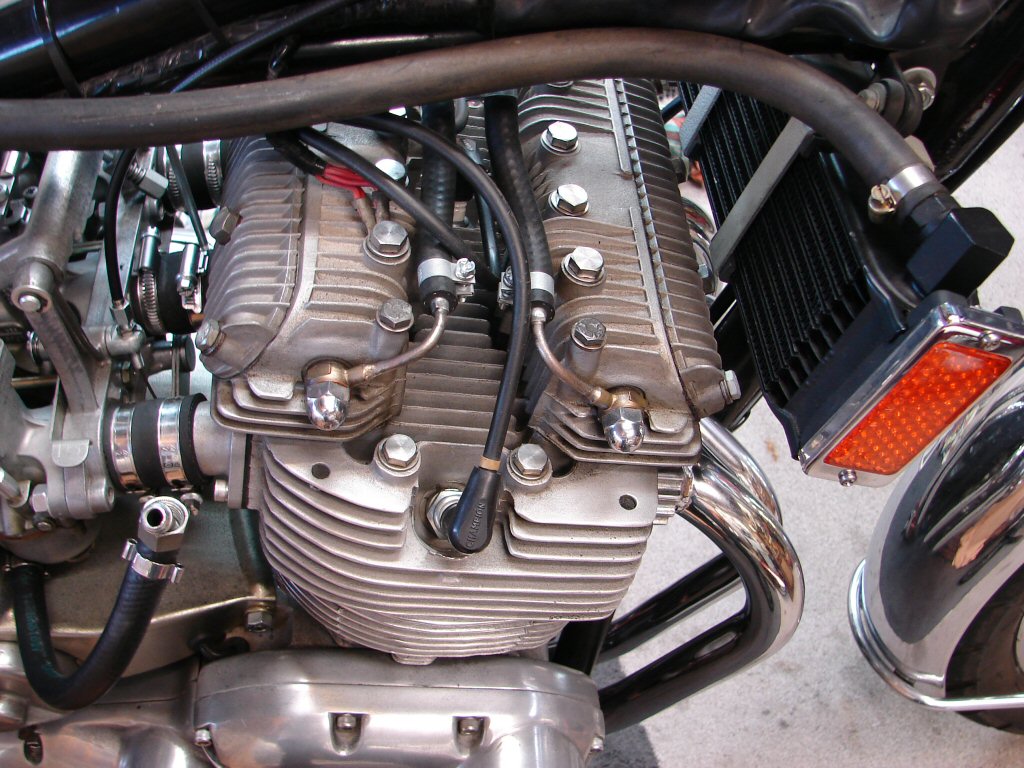
One last thing. When removing the large bung from the crankcase which allows timing by marks on the crankshaft, which is the large forward facing bolt head that can be seen in the last pic below and to the right of the points cavity, oil came oozing out, so most of the oil I had been circulating around the engine was now in the sump.
As yet I had not tested the electric starter, so I connected it up and pushed the button, and it spun the motor over vigorously. Great moment. In bursts of about 15 seconds I soon had all the oil back up into the tank, with the added benefit of having now oiled the rocker gear rather well.
The next job I was not really looking forward to.
I had trial fitted the exhaust system and was greatly relieved that it managed to end up in a nice even position. However, the centre headers had obviously been polished to within inches of their lives during the rechroming process, and as a result were an extremely loose fit both at the manifold and the collector.
Most of the bikes I work on these days require some degree of sealant in the exhaust fitment, most often at the exhaust manifold, but these headers were not going to respond to that treatment well enough. I removed the entire system and measured the amount of gap in the joints, then made some brass shim sleeves which resulted in a very firm sliding fit. The shim stayed in place during several trial fits, and after trying the whole thing, I finally bolted it all up without a single drop of sealant. I also feel entirely secure in the knowledge that there will not be any leaks.
Mostly that is to do with the fact that the standard T160 system featured a very generous overlap in all of these connections. Another nice feature which does not seem to be present on all stock T160 systems, is that the collector features integral clamps, thus there are no external clamps to spoil the sleek lines of the pipes. It looks a million bucks.
As I had been able to move the bike, I had straightened the left footpeg and then repainted it. As the paint had not sufficiently hardened, I had not yet fitted the footpeg rubber in this pic. I had however fitted the sidestand and found that it worked just as my own T160 does, without too much lean and just as you would want it. Perfect.! I also fitted a rubber buffer over the stop as I have on my bike, so it neither rattles nor wears the paint off the frame tube.
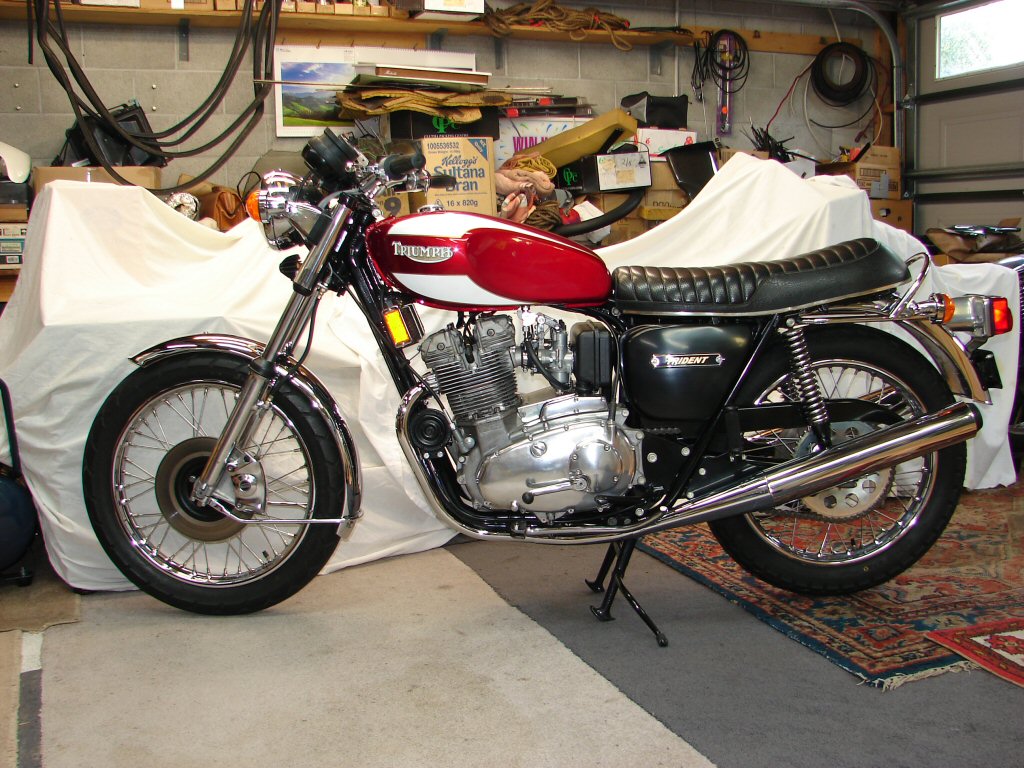
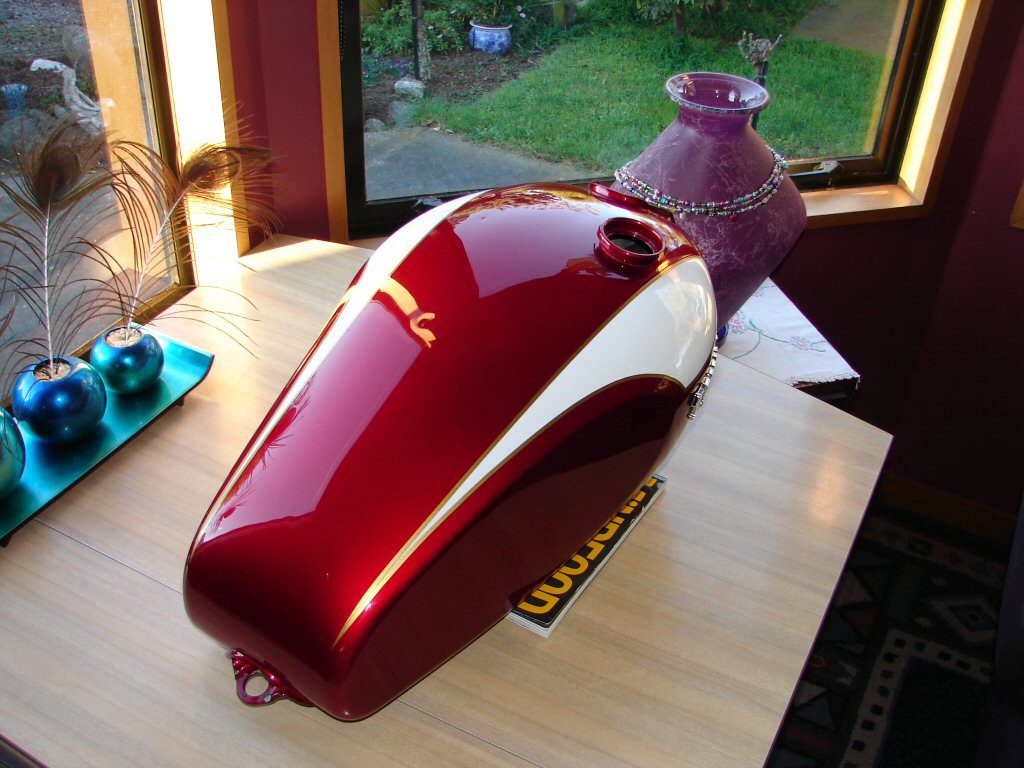
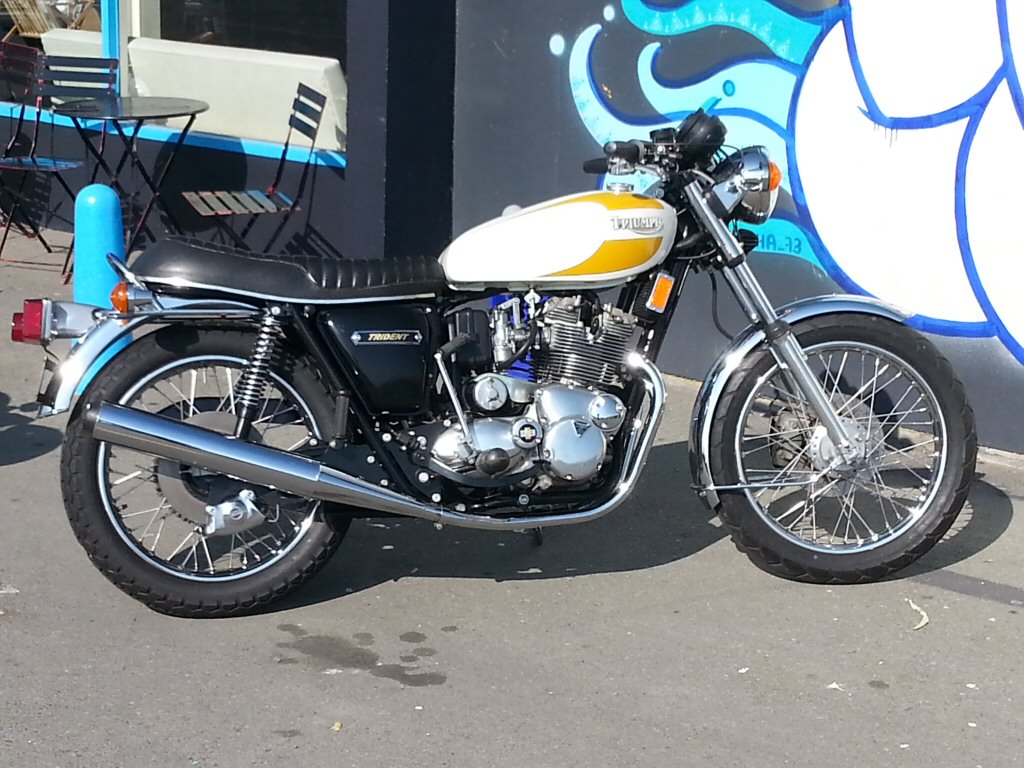
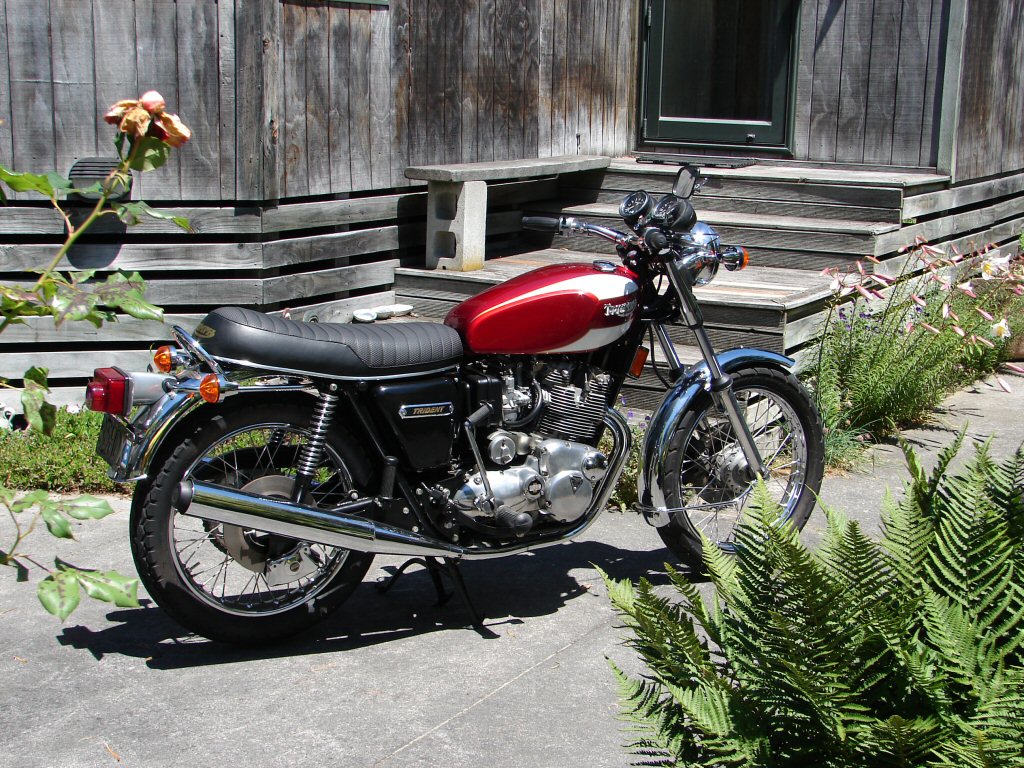
Feeling rather euphoric at the state of completion after 27 years, I took a few more pics.
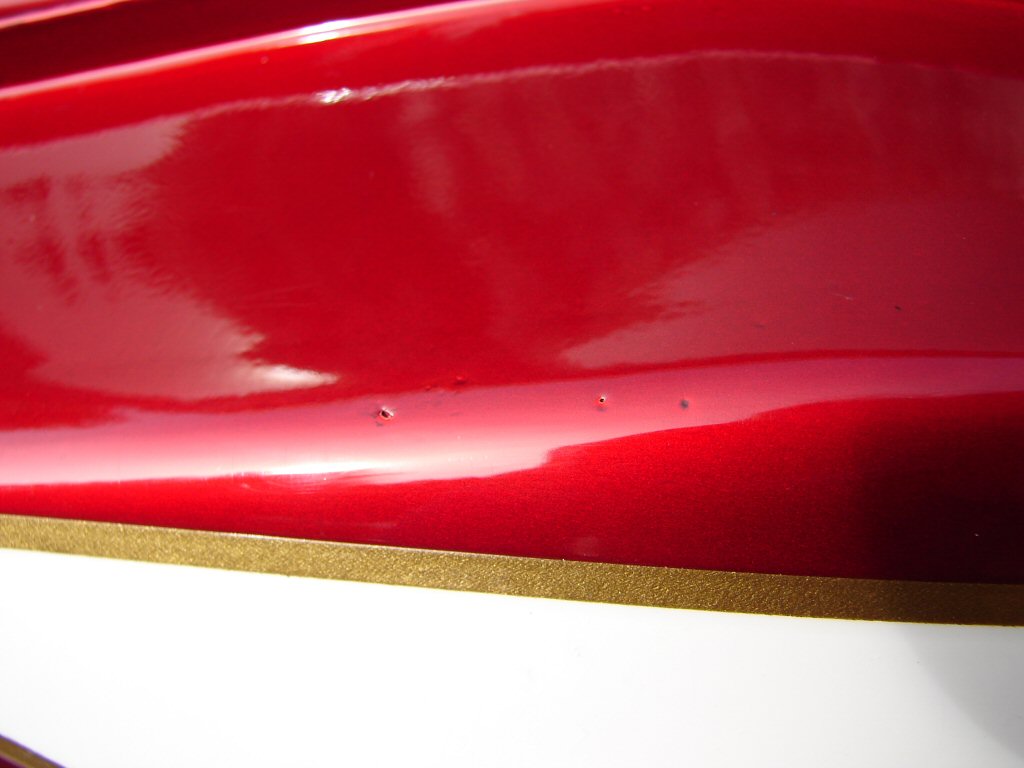
That seemingly perfect tank paint has a number of small scars caused by the tank having fallen from a shelf during the Christchurch earthquakes. I was most distraught. The problem is, I cannot imagine a more perfect colour and reproduction, so I refuse to even touch it. I think it is a badge of honour, and it removed the fear of scratching it.
I wish to add another comment on the tank. I have seen so-called "concours restorations" which then proved to have some glaring shortcomings which made one feel that the buyer would have felt they had been deliberately duped. This tank on the other hand was as close to perfect otherwise as could ever have been expected on a new machine in the day.
The overall impression that the camera gives is slightly more glossy than the naked eye records, but despite that, this looks to be the closest thing to a brand new T160 you could imagine. I feel so justified in all the work that I have poured into this machine for nearly 3 decades.
I now need to fit the missing footpeg rubber, and flush the fuel tank of any dust or particles that might cause any issues with the fuel delivery. After that I will test for leaks in either tank and taps, or carbs and fuel lines.
Footpeg rubber fitted. No drama. Blew the fuel tank out with compressed air, a bit of debris but nothing nasty. Fitted the fuel taps with a smear of Hermetite Blue on the threads - stops any fuel tracking down the threads.
Next day being 27 August I poured two litres of gas into the tank. I run toilet paper around the fuel tap mountings to catch any hint of a leak. None. Run it along the underside seams. Damn - we have fuel here. Hasty emptying of tank which manages to spill fuel in several places I would rather not have. There are two pinholes in the lowest point of the tank. Probably where condensation had pooled during its sojourn outdoors in the USA. As I had never put any fluid in it I had not discovered this. Nor had my friend who painted it 25 years ago.
Bother.!
Oh well - I can swap the fuel tank from my other T160 and continue with progress. Did that. Attempted a start. Engine fired up but did not keep running. Same for several attempts. I noticed a rather unpleasant intermittent rattle from somewhere on the right side which was of some concern, so I halted proceedings and removed the fuel tank to check the valve clearances. As I had previously cranked the engine over a lot on the starter with no protests this was a bit of a puzzle.
All the valve clearances were near enough that there was certainly no cause for concern, so time to try again.
Well that turned into a real cause for celebration.
I timed all 3 sets of points then proceeded to tune the carbs by removing the airfilter and using a vacuum gauge on each carb. Finally reached a point where the engine would start on an instant prod of the button with hands off the throttle, start on idle and continue to run happily there. That is my set point.
Engine sounds happy and quietens down with a few revs as things begin to work as intended. Happily the original blackcap mufflers make a nice deep tone that I know will not be audible at 100Kph, but still sound rather tasty at idle. Unmistakeably triple.
Topped the oil up exactly to the mark so that any consumption will be noted. While running on the mainstand I went through the gears, all engaged cleanly with no protests, and coming back down it was possible to engage neutral with the same ease as eating fudge. Excellent.
Left the bike overnight and today removed tank and retensioned the cylinder head. I was not expecting much movement as there are now solid gaskets under the head and the rockerboxes, but in fact it tightened by about a quarter turn after loosening by an eighth, so I also went through the valve adjustment process as well. I use 8 and 10 thou clearances as opposed to the factory 6 and 8 - this was a recommendation by Doug Hele for allowing better oiling of the camshaft lobes and has been adopted by many triple owners.
Seems I am one.
Close of play tonight saw all that completed.
One other glimmer of optimism for today. Consulted my miracle panelbeater who is the oracle as regards anything made of steel. Asked him about any repair of the tank. He lamented the problem and stated that any type of repair involving welding would destroy the paint job for sure. However, he had enjoyed great success using a fuel tank repair kit on a classic car and strongly advised me to adopt this approach and preserve the fabulous paint. I have only ever heard good reports about the company who makes this kit. They are called "POR15" - the POR comes from "Paint Over Rust" and I have seen many instances of their products in service. Quite an expensive kit but that generally indicates that you are getting something serious. I think I have.
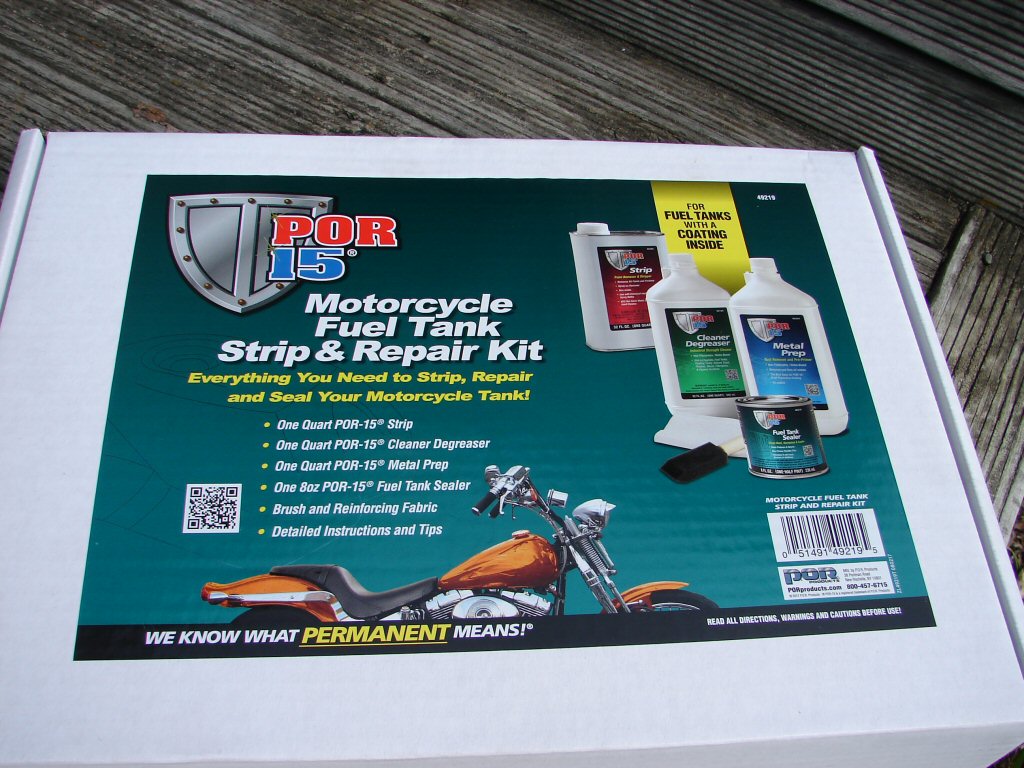
As my tank has never had any internal coating I can skip the first step, but the process seems guaranteed to cure my two pinholes as well as provide the tank with a serious internal coating that will preserve it for a very long time.
I have seen a lot of internal coating processes that did not work well enough and had been put off such an approach, but as always, it comes down to which product you use. This one costs less than a new paint job, but not a whole lot. I am so enamoured of the colour and quality of this paint that I am rather determined to preserve it.
I will record the treatment process.
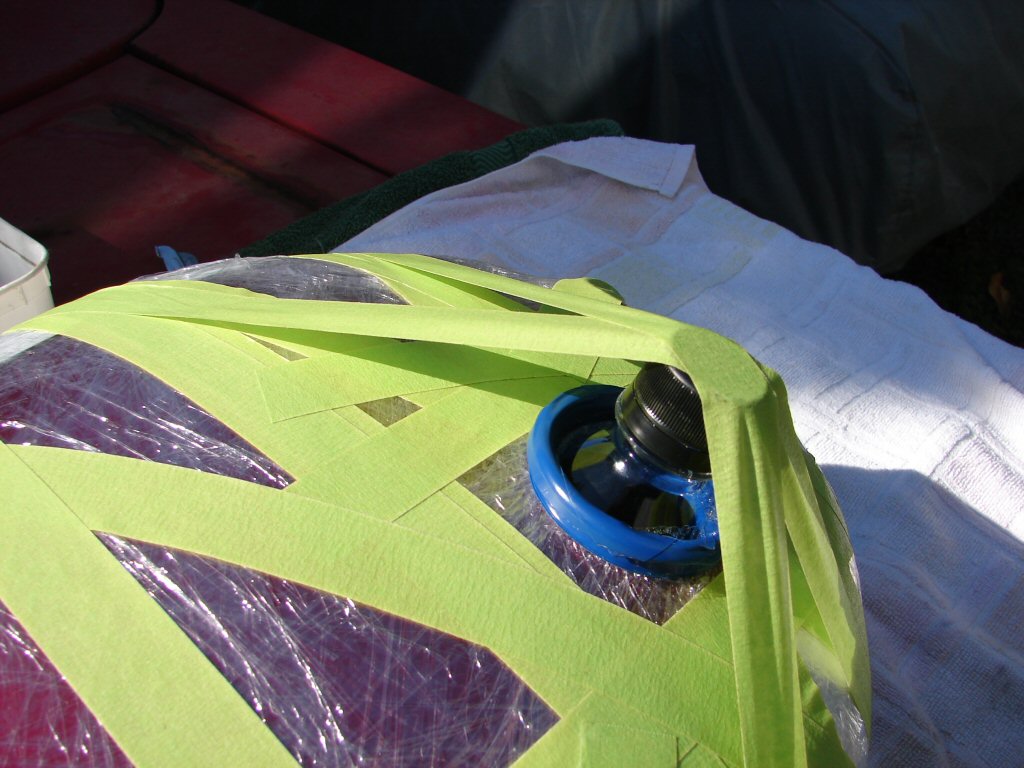
The first step in the tank treatment process was to manage to make it fluid tight. I fitted a pair of sacrificial fuel taps and poured a kettle full of hot water into the tank to test it. Some water got out around one of the fuel tap threads, so I redid that. Then I wrapped the entire tank up in clingwrap to protect the paint. I had fitted some insulation tape over the pinholes and hoped that would withstand the chemicals that were coming their way.
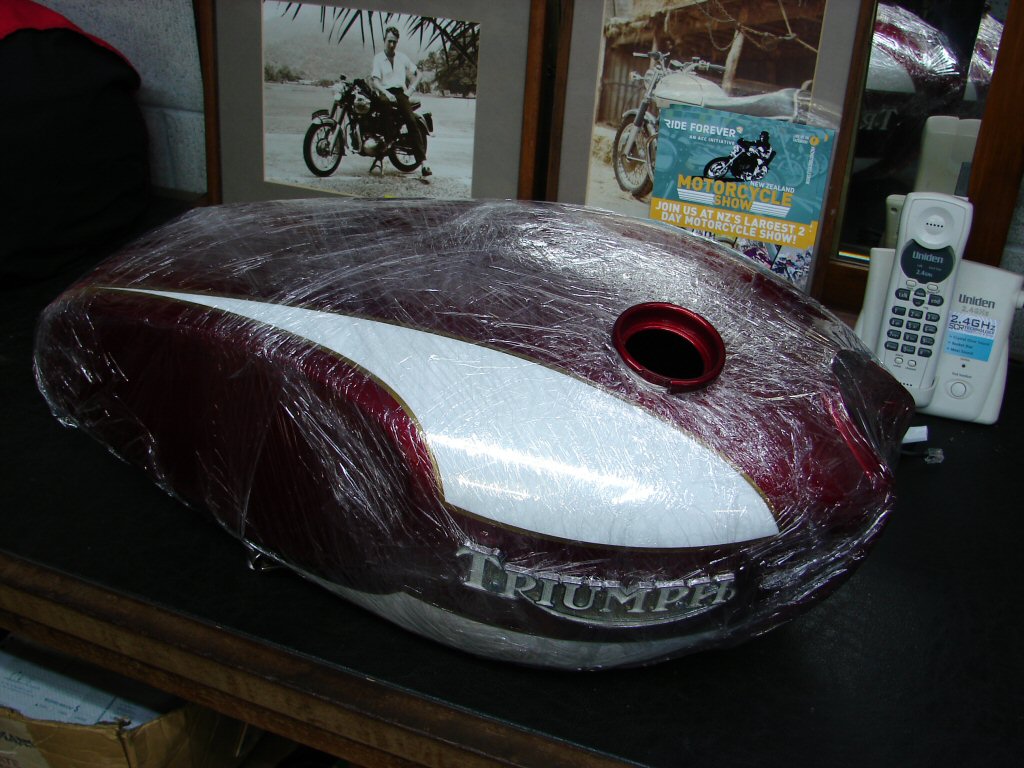
I needed to protect the filler neck from the chemicals so I wound insulation tape tightly around it with the sticky side out, so It would not attempt to lift any paint when I pulled it off. Then I wound more tape around over it sticky side in, so as to protect the inside of the filler neck, after all, it looked a million bucks when you took the cap off.
This was the tank prior to beginning the treatment process. First step would be the alkaline degreasing process. I guess there was going to be a fair amount of caustic soda in this.
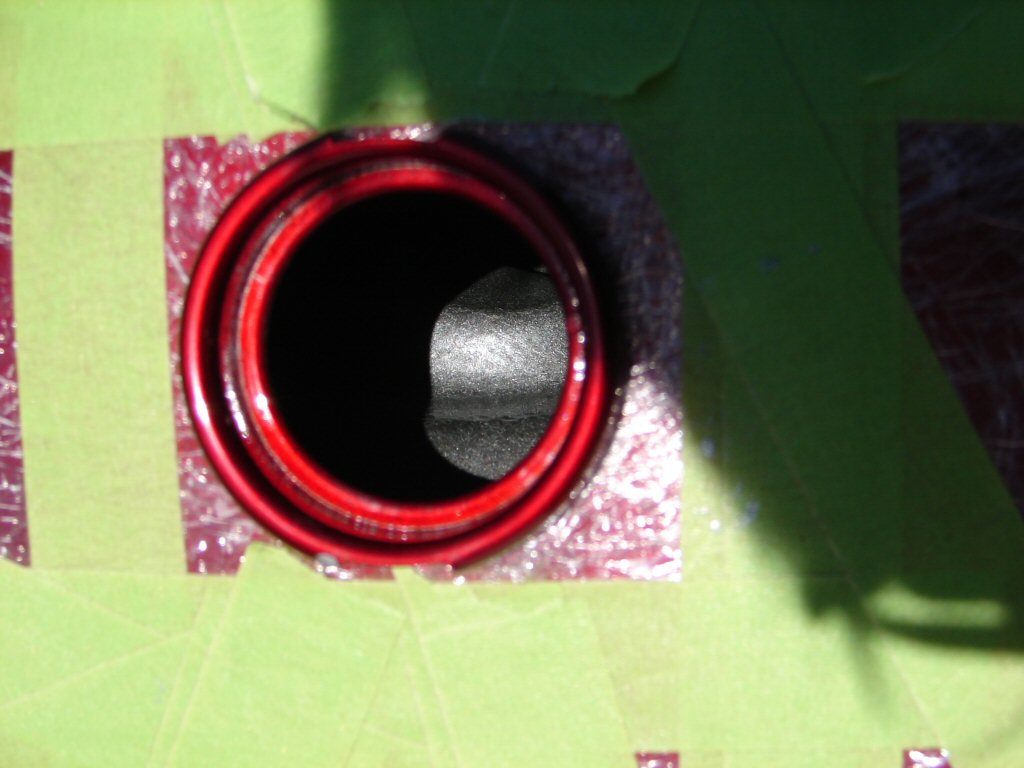
The first step went well. I had invented a filling funnel that wedged into the flange at the base of the filler neck, so as to avoid manking out the lovely paint inside the filler neck. There was another funnel for emptying nasty stuff out of the tank without hitting the paint anywhere. Here are the various bits after step 1.
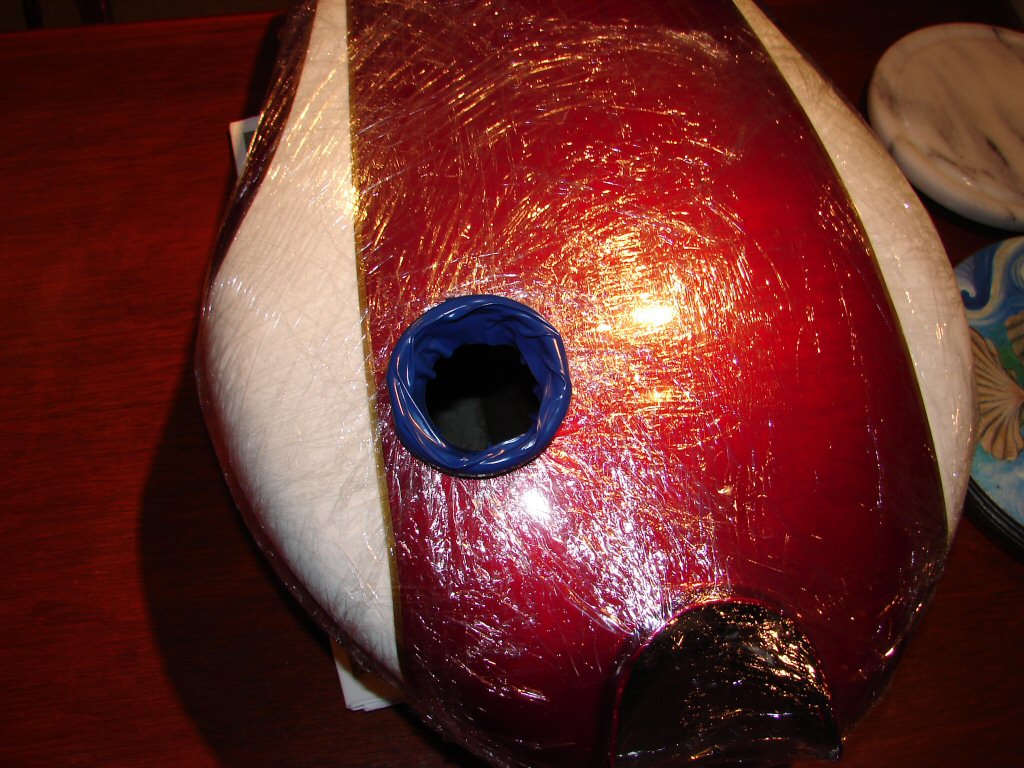
Part 1 had also proved that my funnel arrangements were watertight, so no fluids had made their way beneath the protective clingwrap. Before steps 2 and 3 I rewrapped the tank and added some strategic masking tape, to allow easier and more secure handling of the tank while rotating it with nasty stuff inside, but also to allow anchoring points for taping the emptying funnel in place so I could invert the tank without needing 3 hands.
That worked too, and here is a pic of the tank with the acid etch treatment in progress - you can see the froth inside the emptying funnel, which was a plastic bottle top. When each process was complete I could simply remove the plastic cap and empty the tank without allowing the chemicals to come in contact with the filler neck surface.
All parts of the treatment required totally inverting the tank, so it was important that nothing leaked out. Happily, it didn't. After the acid etch treatment here the tank was flushed with hot water and dried thoroughly by use of a vacuum cleaner on blow mode. The sealing agent will not work on a damp surface.
After that was completed, the sealant was poured in and the emptying funnel refixed. The tank was now rotated in all planes so that the sealant would be applied to every internal surface. The sealant was a silver colour and it is clearly seen inside the emptying funnel during a pause in the coating process.

The sealant only needs to be in the tank for long enough to cover all the surfaces, so after 5 minutes I emptied the excess sealant, after which the instructions called for a 30 minute draining to avoid "pooling". This would be likely to become a problem should it occur, but the instructions did not say why. I drained it for half a lifetime, then turned it upright again so I could remove the pvc tape from the filler neck to ensure no sealant had managed to spoil the paint there.
There had been warnings about getting the sealant in the fuel tap threads, so I had fitted a pair of sacrificial taps that I could throw away after the process was complete. So far we were going to plan.
I was pleased to find that we had a very uniform layer of silver sealant over every surface that could be seen through the filler neck, so hopefully that would apply to the entire inside of the tank. It did not look like a layer that would easily delaminate.
I am quite reassured that this was the right approach, and not only will I have sealed the pinholes that were the problem, but also that I have removed any likelihood of rust attacking the inside of this tank for the life of the product.
Currently waiting out the curing process - minimum 4 days.
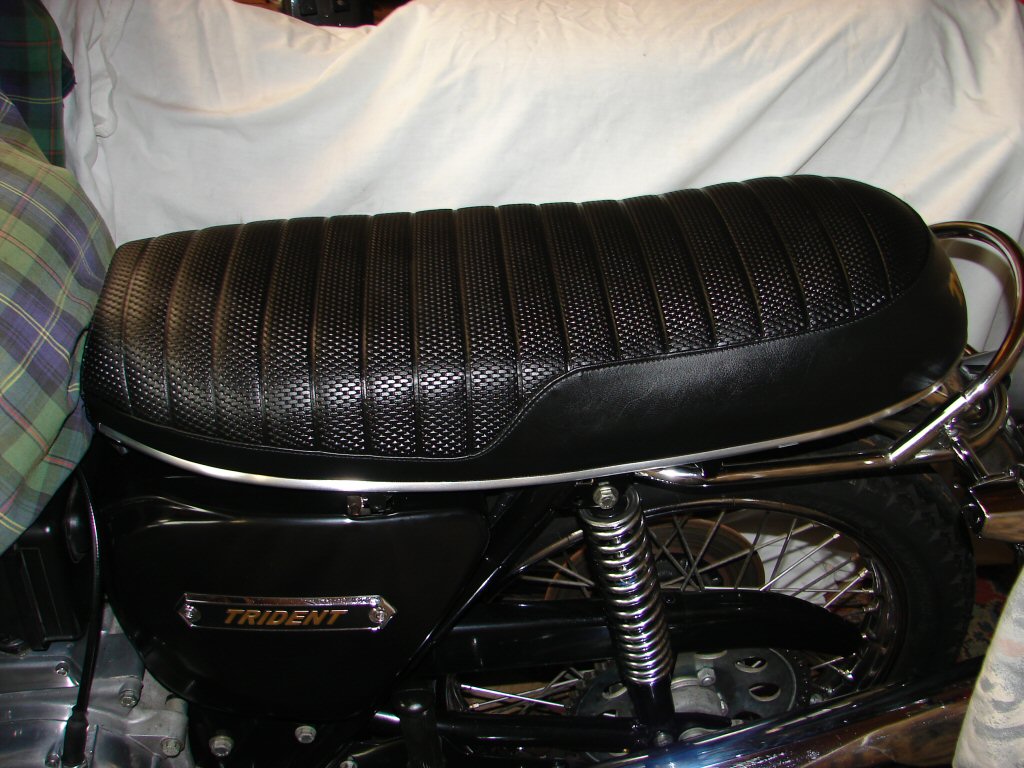
I got the seat back from having a new cover fitted. I had painted the base and the original foam was good for another tour of duty. All I had to do now was to fit the new trim around the base.
Used a hair dryer to heat the trim to avoid creases or cracks. Kept a glass of wine nearby in case of fire...
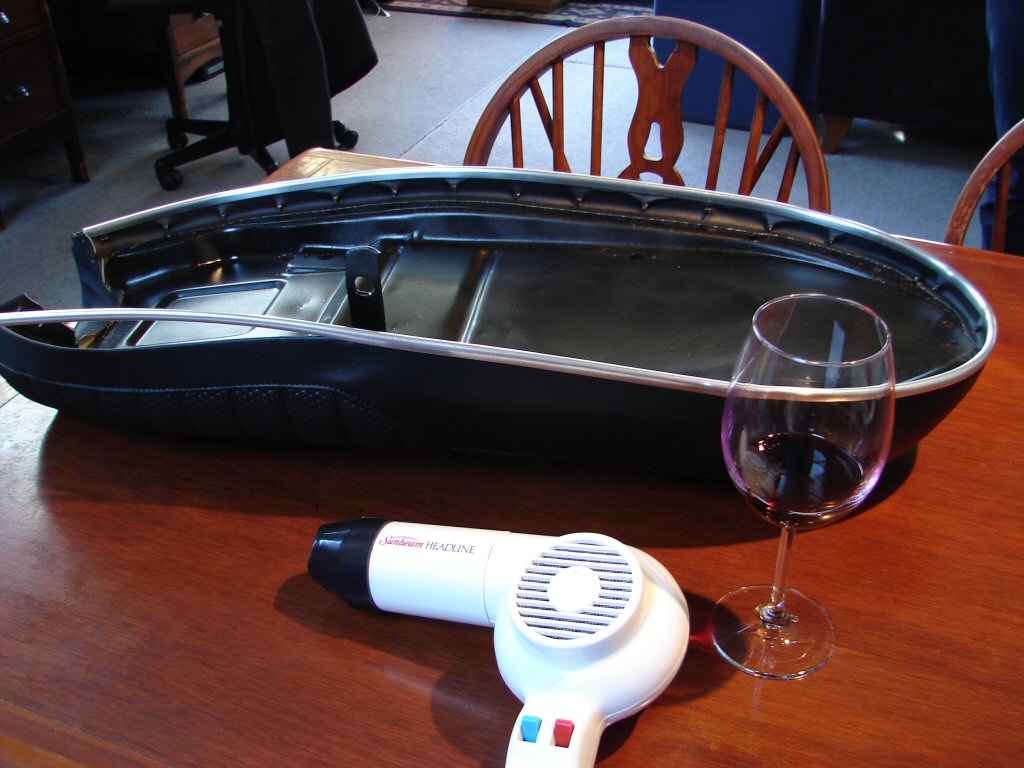
It went extremely well, as things do when undertaken slowly and methodically. The trim obeyed my commands, and the 4 clips which retain the trim were easy to fit and of the original design - kinda hard to find these days, but light years better than the current items.
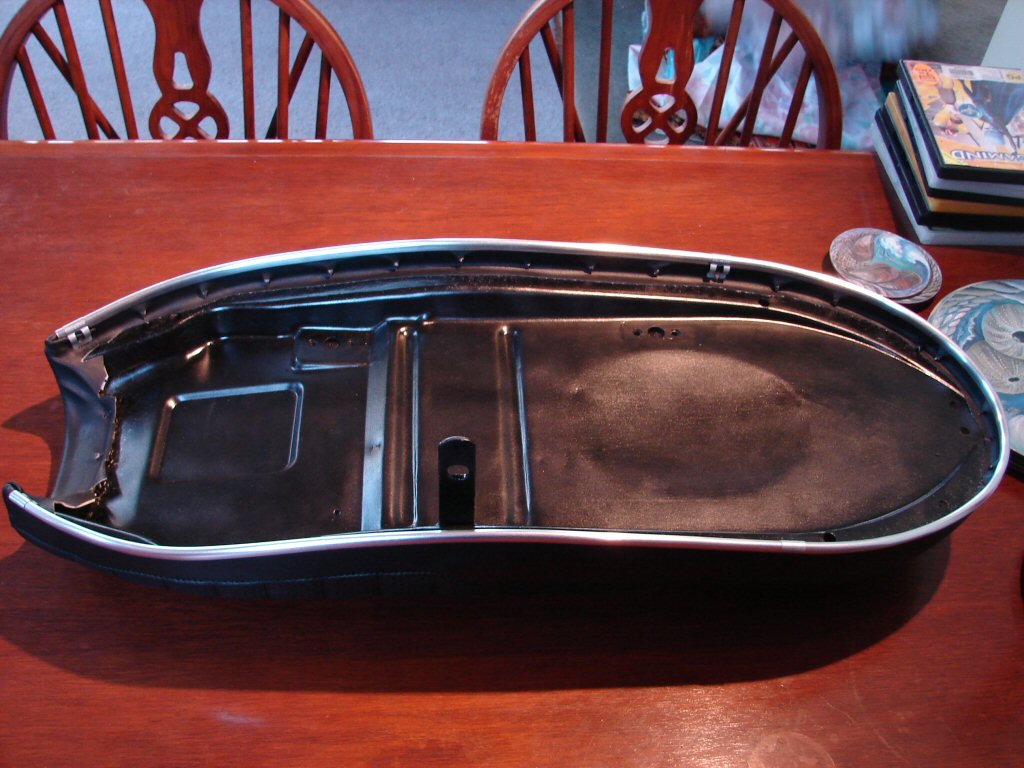
After this I gave the base several coats of cutting polish and then some wax, and it now has a glow to it.
Fitted 4 new rubber supports, bolted the hinges back on and Voila - we have our original seat back - only much better.
I have not yet detailed the first test rides.
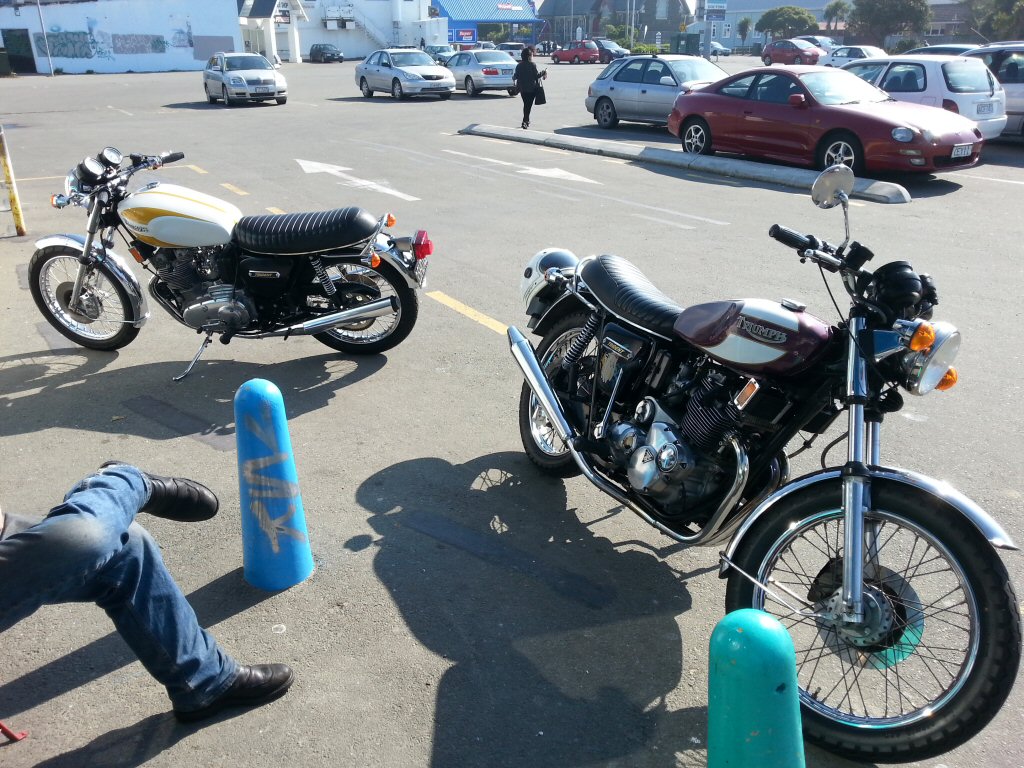
There have been 4 so far. All have been undertaken with the fuel tank from my original T160 fitted. First was just a few miles, down to the local coffee shop to compare notes with T160Red, another T160 owner who is currently going through the process of awakening an X75 from a long slumber - so we are experiencing many of the same issues.
First impressions were that the bike feels like a new one, no slack in any of the controls or the suspension, but a serious lack of braking efficiency due to zero mile disc pads which have not yet bedded in. Carburettion very much on the rich side at low throttle openings.
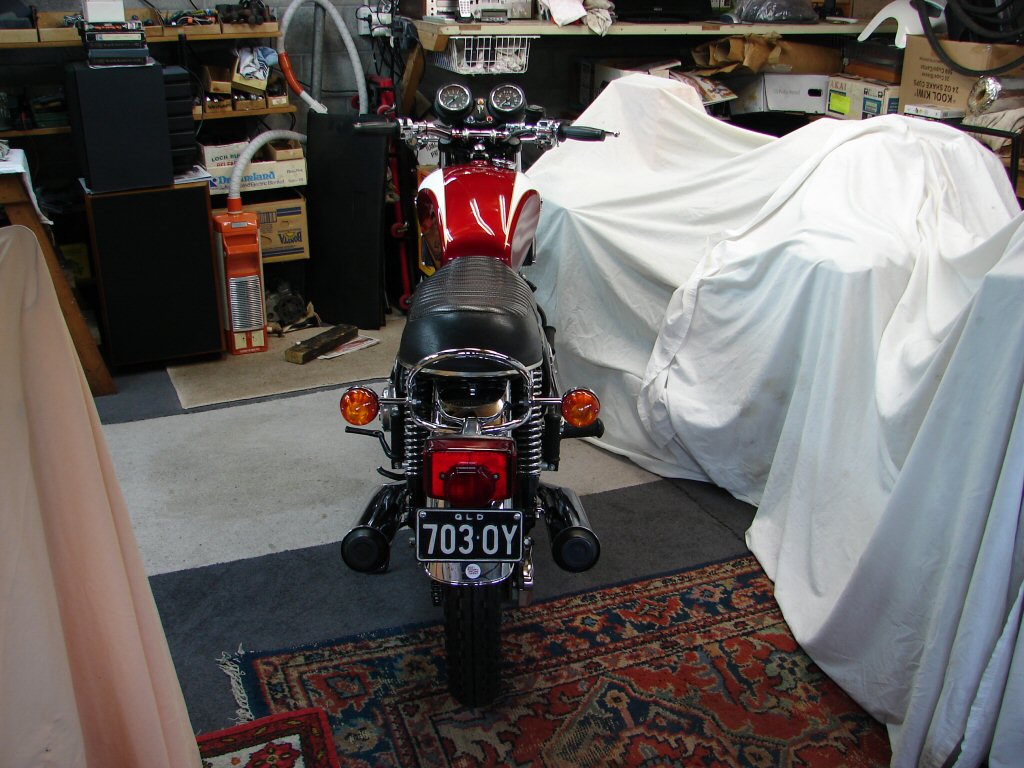
I also swapped the numberplate from my other bike, but forgot to add a mirror. Felt naked..
Next ride was slightly longer in duration, and Red followed me to make sure nothing untoward happened. It didn't. But the tuning became more obviously too much on the rich side as the bike warmed up, to the point that a slight misfire began to appear which I assumed was down to the spark plugs being swamped in excess fuel.
Total mileage was now to around 13 miles. I checked the head tension but nothing had moved. I wanted to take a ride over the Port Hills, so I could get the engine hot enough to bed rings in on the way up, then bed brakes in on the way down. However, on my way toward the aforesaid hills the bike began to run very rough while dawdling through traffic which was where the rich fuel situation was occurring. It got worse so I headed for a friend's house and the engine stalled as I coasted up his driveway.
A few tests revealed that a spark plug had failed totally. My friend gave me an old plug out of his T140 and we were all sweetness and light again. I headed home but included a section of open road in the route and gave the bike some serious revs. When I got home there was oil weeping from the base of both exhaust pushrod tubes. Bother.
I realised that while I had replaced the first fitted rockerbox gaskets with the newer type aluminium items, I had not allowed for the fact that the newer ones were thicker, and had thus reduced the compression of the pushrod tube seals, and now they had chosen to leak.
I immediately removed the exhaust rockerbox and fitted extra fibre washers beneath the lower pushrod tube seals so as to rectify this. I also checked the tension of the head studs but they tightened back to the same position, so nothing else had compressed, and the valve clearances would thus remain as they should be.
I now undertook the same test ride but without the complications. Whilst I worked the engine hard uphill, the air temps were so low that it still did not get very hot, but on the downhill side, the brakes were convinced to get quite hot indeed, and there were immediate and obvious improvements in the braking effectiveness. There was another high speed section on the way home, and I took the opportunity to give the bike full throttle for several bursts, slowing inbetween to give me a space behind the other traffic. When I got home all appeared well, but I then found some oil on the fins of the cylinder head on both sides. I cleaned it off but could not find a source on the engine, as the exhaust pushrod tubes were now totally dry.
The answer soon became evident. Both fork seals were leaking copiously.
I removed the dust covers above the seals and could feel that both fork stanchions had some serious surface wear right at the point where the fork seals operated. It would seem that I had reused the original fork stanchions when I began the rebuild in 1995, but despite the new fork seals, the wear areas had prevented the seals from doing their job and allowed a considerable amount of fork oil to escape and coat the outer edges of the cylinder barrels.
Obviously the fork stanchions needed replacing, so I ordered a new pair. Total mileage covered was now 57 miles.
As the weather suddenly improved I spent a week doing car repairs outdoors and only got back to the bike today - Saturday 13 October 2018 - being a somewhat cold southerly day. First step was to remove the entire front fork assembly.
The new stanchions were far more reluctant to fit up through the lower triple clamps than the old ones were to slide out, which can only be due to dimensional quality control I feel. However, I cleaned the internal bores of the triple clamps with emery paper and applied a coating of grease to the new stanchions, after which they agreed to slide into place.
During the process I also replaced the fork seals with a new pair of standard replacement types - in case the current ones had been damaged by the worn stanchions they were trying to seal against - and obviously there was a new serving of 15 weight fork oil applied to each leg.

So this is how the bike looks tonight. Unfortunately the tank sealing process did not succeed in both of the pinhole leaks. The larger of the two still leaked on the post sealant trial, although I suspect that the PVC tape I placed beneath the hole may have trapped an air bubble that prevented the sealant from entering the hole in order to block it. I purchased another tin of the sealant and will simply treat the lower reaches of the tank to a second coat. I am waiting for a suitably warm day to undertake this procedure.
A suitable day appeared, so I poured another 150mls of sealant into the tank and allowed it to run to the lower reaches of both sides, then kept it moving fore and aft so it would amply coat both sides as far as any imperfections might reach. I made sure that the sealant found it's way through the pinhole, and wiped off any excess until it began to harden and nothing more came out.
The tank was then left out in the sun upside down on every suitable occasion so that it could bake really hard. Finally I put a screwdriver inside the tank to see if I could make any impression on the sealant at the bottom. I couldn't. I figured my work was done.
Meanwhile the tuning problem.
The bike started well, rode off well, and did everything you could want well. But as it warmed up, it would get very rich at low throttle settings - such as when you were caught in traffic and only able to use less than 1/8 throttle. It would begin to misfire as the plugs sooted up. Opening the throttle further would clear it and the bike would accelerate normally. A few plug checks confirmed that too much fuel was present just above idle. As the jets were brand new I decided that perhaps the slide cutaways were not big enough. They were the originals, but I had no way of knowing how the bike had performed when last run in it's former life. I decided to take a bit more off the slides and see what happened. Nothing much.
The carbs came off numerous times as I tried to find the reason why too much fuel was getting through. Eventually I tried another set of carbs which made it run perfectly, so it was definitely the carb internals.
In the 1980's I had fitted needle jets one size smaller than standard on my own T160 to cure a very slight rich tendency, and it worked very well. They are still in it today. I decided that I should try a set of 105 needle jets in this bike. I did so, but now it was so lean that it would not even start unless I covered the air intake with my gloved hand. The answer had to be somewhere between the two.
In a conversation with another triples guy he mentioned the two small side drillings in the needle jets. Their purpose is to bleed air in with the fuel coming through the jet, thus to emulsify the mix I guess. He suggested that opening those holes a few thousandths of an inch would have a similar effect to making the slides leaner. I did a little more research and found some measurements that had been used to good effect. My smallest drill bits included 0.9, 0.95 and 1.0mm. These equate to 0.0354", 0.0374" and 0.0394", and as the nominal size of the side drillings was 0.035 it seemed I would be able to carefully increase the hole size and see what happened. I began with a safe 0.0354" in case the original holes had been a tad undersize to begin with. I thought perhaps I could detect the slightest improvement in the performance, but certainly not a cure. Out to 0.0374" next. Now we had a definite improvement, and the bike would nearly run smoothly on a low trailing throttle. Final move was the 0.0394" (1.0mm), and now we were cooking. Easy start, smooth takeoff, and mixture maintained even after warming up. As it happened, I was simultaneously working on a T150 with exactly the same mixture problems - also with new carb internals - and it responded to exactly the same measures. It would seem that something is up with Amal needle jets these days.
The fuel tank proved to be perfectly sealed, so we now have a bike that I shall be happy to pass on to it's potential new owner.
Once I make it legal.!
After a period of going nowhere I have finally begun the compliance process. Because I have no documentation whatsoever I have to firstly invent some. The approved method is to fill out a 7 page form and submit it to the local chapter of the Vintage Car Club. Along with suitable remuneration. I have done that, and the friendly chap I spoke with seems to think it will be pretty much a formality and should be complete in a week or thereabouts.
Once I have the resulting "Certificate of Authentication" I can present that to an appropriate testing facility who will VIN the bike and issue a warrant of fitness, after which a New Zealand numberplate can be obtained. With suitable remuneration taking place of course.
Well - it's progress. 27 March 2019.
It took 3 weeks for the completed certificate to arrive. With it came a declaration that needed to be signed in the presence of a Justice of the Peace. I got all that sorted and also managed to track down the chap from whom I bought the bike in 1995 and he agreed to sign another declaration stating that he imported the bike as parts from the USA and sold it all to me, and although this took some weeks to arrange, was a totally accurate account of how it took place.
I then obtained another form, filled it all out and sent it with every other document I now had to the NZ Land Transport Agency applying for permission to use "alternative documentation" in order to VIN the bike and register it for use on NZ roads. This would cost another several hundred dollars but was the only way to proceed.
I was currently working on a T140 Bonneville which had been imported from the UK, and part of my job was to comply it. I therefore arranged for both it and the T160 to receive their compliance test which normally results in the issuing of a warrant of fitness if everything passes muster. While both bikes passed, the wof for the T160 would be withheld until the LTA document came through, which was hopefully just a matter of due process. We would see.
Three weeks after the LTA cashed my cheque I received an email with a copy of the document attached. It was approved.! Phew. Unfortunately the original version was still in the post and I needed the original version to get the VIN plate on the bike. Copies are not acceptable. I received the original yesterday, 5 June 2019.
Friday I shall present the bike and the form to the inspector and see what happens. I am learning not to assume anything is a certainty...
There are times when being 'right' is not at all rewarding.
I turned up with my new document. They said "where are your other documents?". "The LTA kept them". "Oh yeah. They do that. Why didn't you send them copies.?". "Do you accept copies.?" "No..". I have emailed the NZLTA and asked for my original documents back as I cannot register the vehicle without them. Which makes something of a mockery of the fact that I was applying for the new document so I could do exactly that.
If only there was just one version of the process regardless of whom you consulted.
So. If you ever wondered about buying one of the numerous imported bikes advertised on Trademe, claiming that the "documentation is all there so obtaining the VIN will be simple..", do not believe it for an instant. It is never easy. If it was somebody would have already done it and could therefore ask a higher price. This paperchase has now spanned 6 months and is not looking like ceasing any time soon.
At least I got a ride to the testing station I guess.
A couple of small problems showed up during the shakedown period. A small amount of brake fluid had managed to seep from the front fluid reservoir and made the paint on the alloy housing bubble up. Not good enough.!
The reservoir that came on the bike had been filed and sandpapered to allow the correct fitting of the new stainless master cylinder which has slightly different dimensions to the original, and this unfortunately resulted in a small crack at the base of the reservoir. I had it plastic welded, but this obviously had not been entirely successful. I therefore pulled it all apart to get it right.
I purchased both an AP Lockheed item and an L F Harris one, as it seemed likely they may have differing dimensions and that one might prove more agreeable in the mounting location. Unfortunately neither did, so if the master cylinder fails to work correctly I shall need to extend the operating rod attached to the lever. I did however paint both black as white is just not proper, and also got a new coat on the alloy housing during this weeks only sunny day.
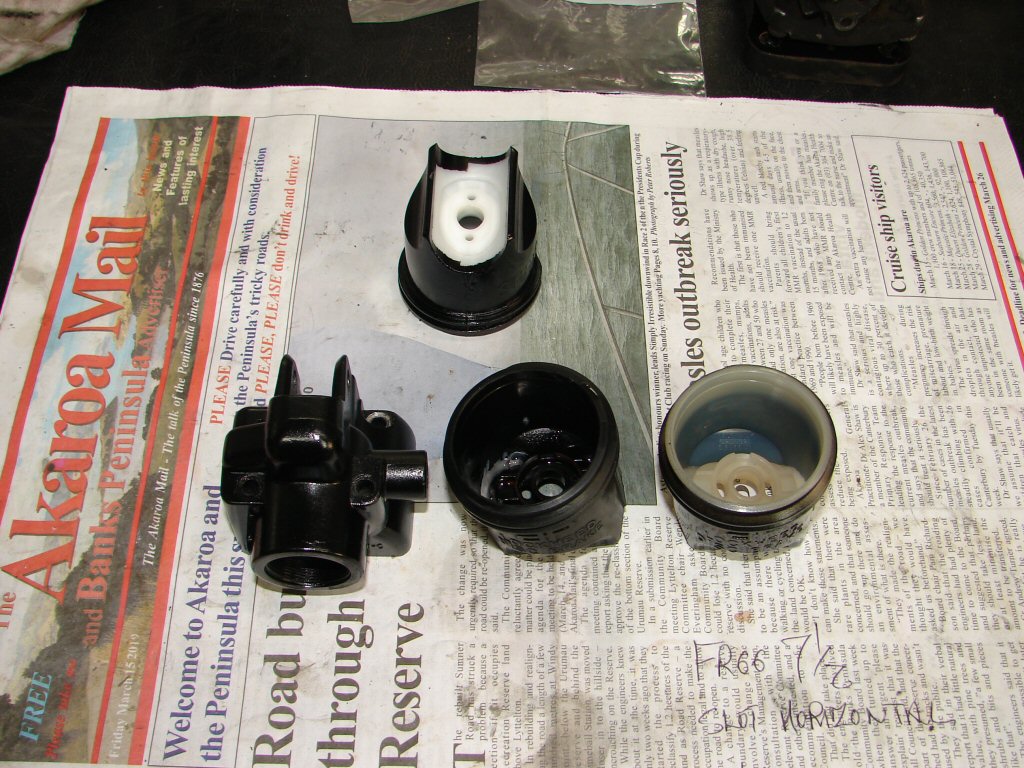
I have decided that the AP Lockheed gets the nod, but I am not happy with the glossy look the paint has given it, so will find a satin paint for a final coat.
The second problem is that an oil leak has developed from the points wiring into the rear of the timing cover. There is no oil in the points cavity, so it is not the oil seal, but a failure of the timing cover gasket to seal around the wiring cavity. I shall investigate more thoroughly when the current repair is complete.
In somewhat better news, the bike finally has a numberplate - albeit one that would more suit a Beemer.
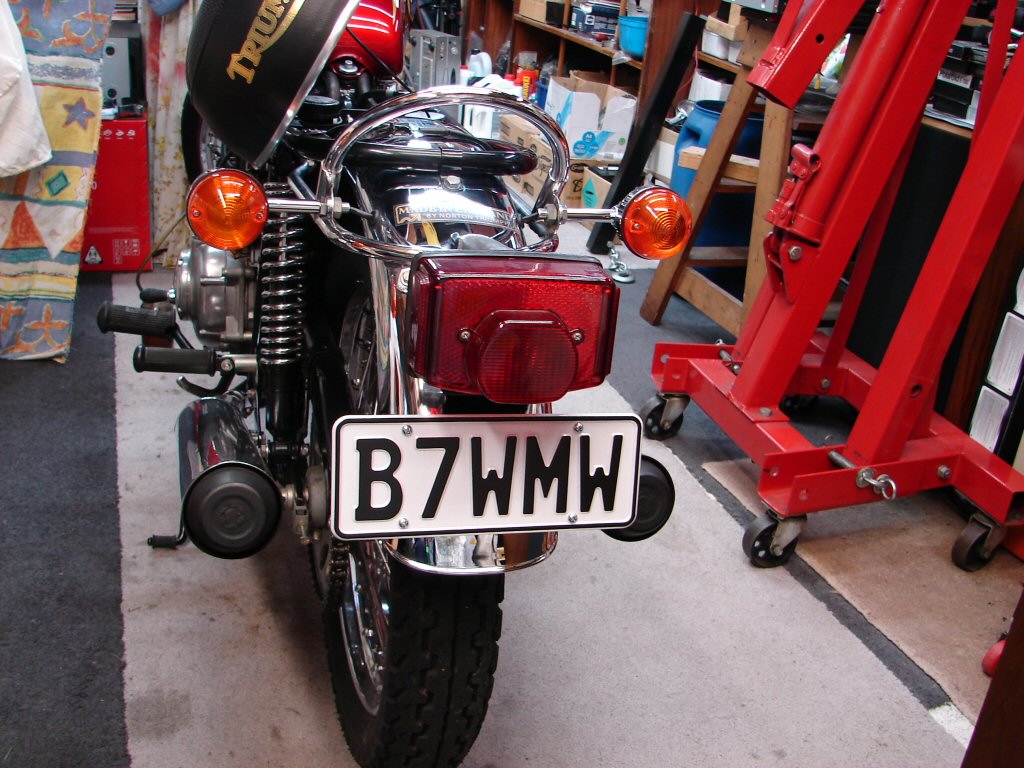
This entire process has taken months and cost a total of $560 including the compliance test. Make sure you get the damn papers.!
Test ride.! Yay. A 'spirited' ride of 70 miles was completed with no issues other than the slight hesitation just off the idle stop. This is annoying when trying to roll the throttle open very gently, but if you give it a good twist the response is instantaneous. Brakes, handling, suspension all excellent although I thought I detected the smallest amount of looseness in the steering head bearings so tightened half a flat on my return. I checked the spark plugs after the last mile home at very low throttle to see if the symptoms I had were rich or lean. The plugs were quite sooty, so I had in fact adjusted the pilot air screws the wrong way by 1/4 turn before the ride to see what happened. Have now reversed that by 1/2 turn and will see what the difference feels like.
Final head retighten and valve check completed today so only oil and filter left to replace. While I 'used' the bike thoroughly on a variety of road conditions I would never call it a 'thrash', as I do not ride that way. Max revs probably 5000 this run but some quite heavy loading to fully bed the rings in. Pleasing to note when I removed the fuel tank that there was no oil to be seen...
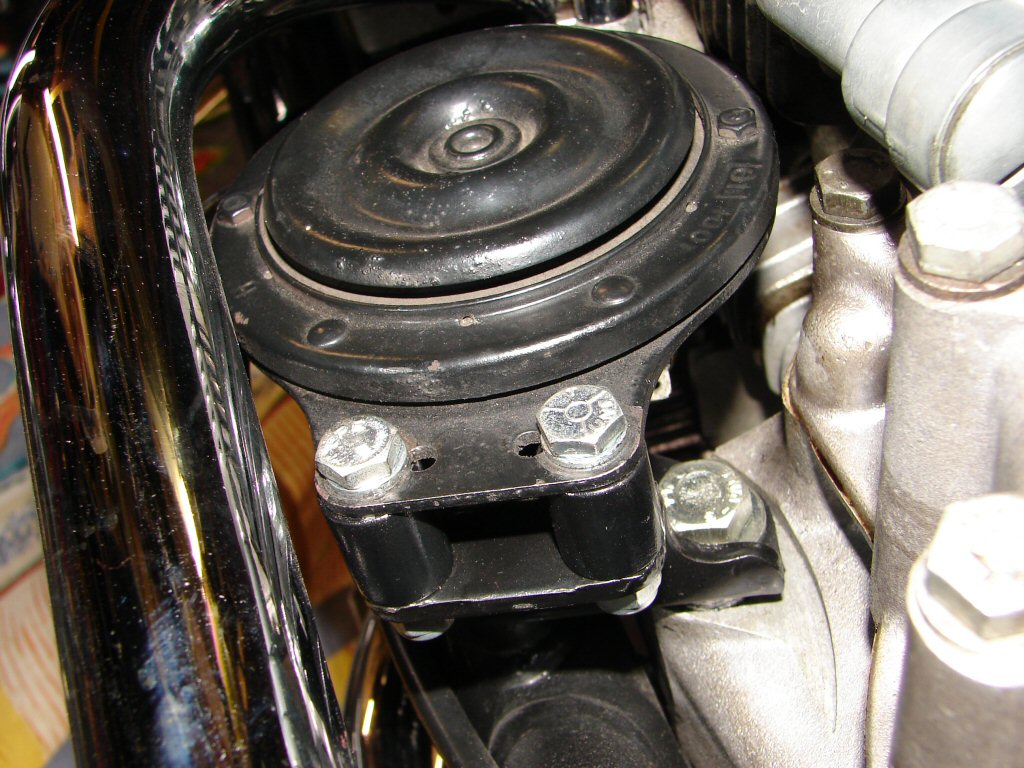
While checking for oil leaks around the base of the cylinders I discovered that the two spacers which are part of the horn mounting were showing signs of rust, so they came off today and got a few coats of paint. Attention to detail we call it.