Restoring Mk1 Amal Carbs
In 1994 I part exchanged a basket case T160 as part of a multi-bike transaction.
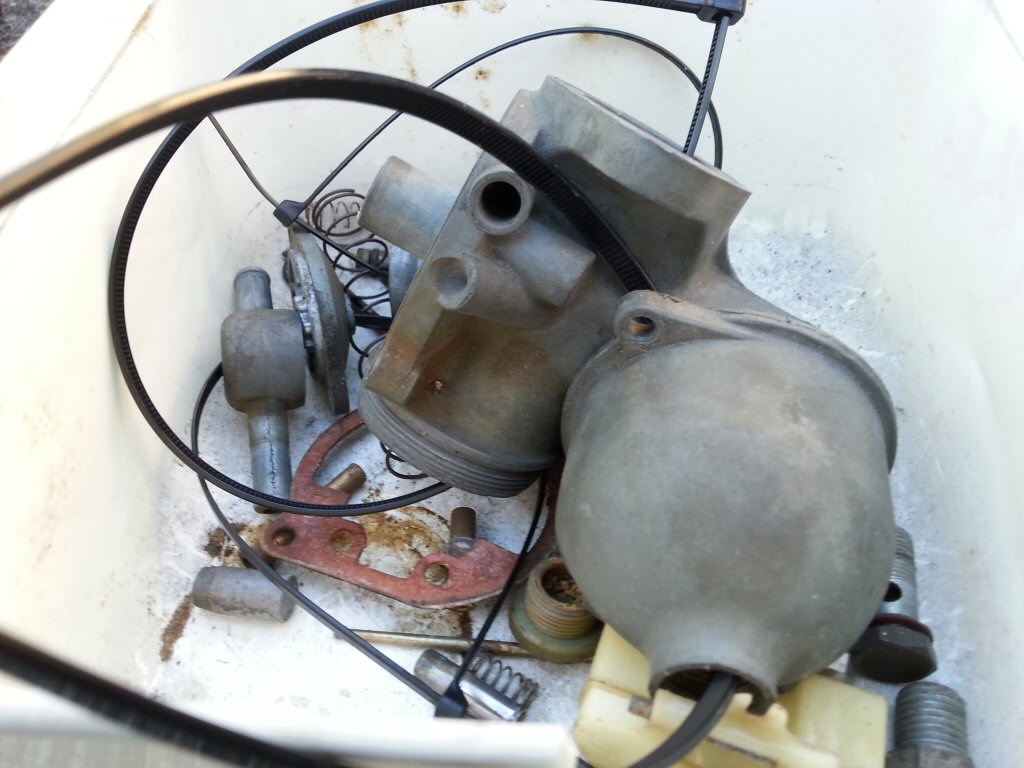
What I got was not very attractive, but it was original and untouched so I figured I could make something nice from it. Main problem was that the bike had lain out in the weather for some years so many parts had suffered corrosion on top of decay of the natural juices. The carbs were rather unpleasant but as one can imagine - compared to the overall project, the carbs seemed like a fairly small part of the equation.
As an integral part of my stripping the entire machine down to inspect before rebuilding, I stripped the carbs and gave them some rudimentry attention before consigning them to individual containers in which they had now languished for 24 years. On many occasions I have had to move them to new locations within the workshop, and even to a new physical address or two, but I had always looked upon them as representing a rather large block of time and menial labour if I was ever going to be able to return them to service.
Recently I learned of a process which might not only afford a great result - but reduce the labour content enormously. This was to immerse all of the alloy components in a dilute solution of battery acid for a mere 10 minutes - with the promise that a miracle transformation might take place. Sounded good to me.
What turned out to be a harder part of the equation than one might have thought, was to find battery acid. In this age of sealed batteries, gel batteries, and batteries with tubes of whatever they need included in the package - less people are stocking battery acid per se. A friend finally came up with a few hundred mls of the stuff in an unmarked container so I figured this was the time. However, I was unsure what strength battery acid I might have. I have a hydrometer which measures the state of charge of an in-service lead-acid battery, but what strength would new battery acid be.? I thought I might be able to measure it's strength and work from there, but what proved easier was to contact the person who originally posted the information and ask them.
It would seem that new "battery acid" is in fact sulphuric acid at a state of 30% strength. The strength of the solution required for treating Amal carbs is 5%, so by diluting what I had 6 times with water I should end up with the desired mix. I decided that a plastic ice-cream container would be the best choice for totally submerging all parts of one carb at a time, and proceeded to experiment with what amount of fluid I might need in order to achieve that. My result indicated that the optimum would be 1400mls, so 1200mls of water, to which would be added 200mls of the acid. With high strength acid you always add the acid to the water rather than the other way around, because adding water to high strength acid can cause a reaction which sprays highly corrosive liquid over all and sundry. Best not to take risk.
When I did actually pour 200mls of the acid I had into 1400mls of water, nothing adverse happened at all, but the acid still had a very strong odour to it so I could tell it was most certainly a serious liquid.
I prepared all my carb parts beforehand by removing as many non-alloy parts as I could, which included the tickler mechanisms, jets, jet-holders, screws, etc. Basically there were only 5 parts per - main body, float bowl, banjo, top and slide. While all of these parts were in various states of age related decay and corrosion, they still looked reasonably ok on my phone camera. I placed cable ties through them in order to make handling simpler.
The acid solution appeared to be totally clear but as soon as the parts were placed in it a strong reaction began and in short time there were a myriad of bubbles and the entire container was a very active place. I did make a couple of checks within the recommended 10 minutes of immersion but despite the obvious activity very little was taking place on the surface of the alloy parts, so I left them in for the whole 10 minutes.
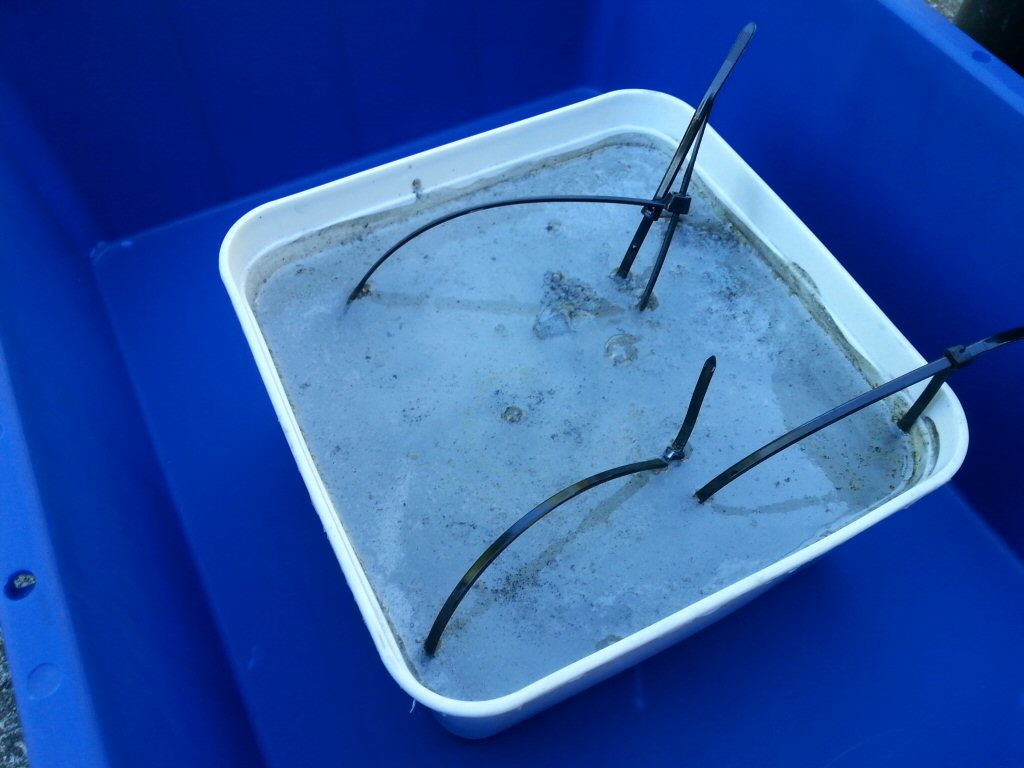
At the 10 minute deadline I plucked all the parts out and dropped them into a bucket of water. I swished them about a bit to dislodge the air bubbles that were caught in the smaller threads and openings. The parts were then left out to dry whilst I copied the procedure with the next set of parts.
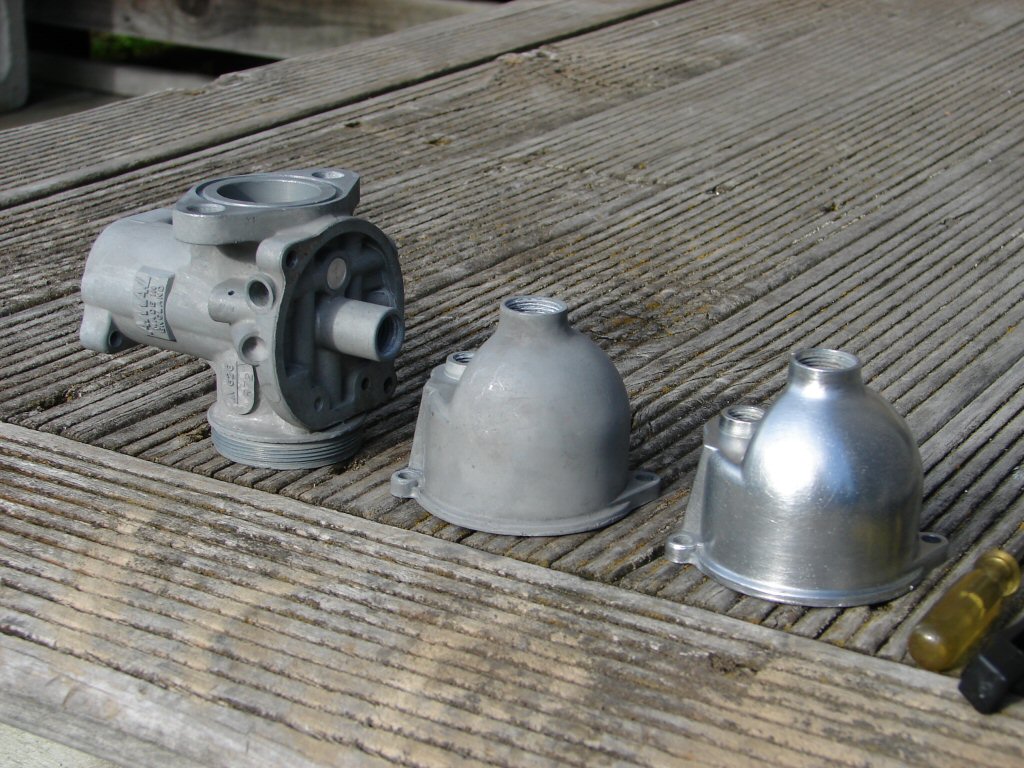
Once dry, the parts appeared to be nicely stripped of most previous contaminants and in an excellent state for beginning further improvement. The slightest touch with a brass wire brush elicited a very high degree of polished alloy, and in rather short time I was able to bring the entire surfaces to life. Changing to stainless pads brought a slightly scratchy appearance to a much more even shine, but I lacked a stainless wire brush which may have provided the ultimate finish.
I had also heard that immersing the steel parts might allow the easier removal of some rust, so I doused the jet holders and a number of other small items for a similar 10 minutes. I am not sure that this made my task any easier, but a small time with the brass wire brush made a huge improvement to all of the small steel parts which I needed to reuse. I had already purchased a new set of screws for retaining the carb tops and float bowls, but a brief brush with the copper restored most parts to a state that I felt quite happy would not let the side down, and allowed me the pleasure of knowing that most of the original parts were going to find their way back to the final product.
In the final analysis the only parts I replaced were the main jets, needle jets, needles, pilot air screws, tickler assemblies plus gaskets and o rings and the float bowl drain plugs - simply to allow the improved sealing afforded by brass plugs versus the original plastic items. I reused the original floats and float needles even though I have the viton tipped alloy versions on hand if required. I feel that the original items allow quicker filling and proper fuel level without having to alter the jet positions.
No doubt we shall see...
I have purchased stainless wire brushes and will see what improvement in appearance they may offer. I will also quality check all the drillings in the carb bodies before declaring the restoration process complete. If you revisit this page over the next week or so there may be some updates.
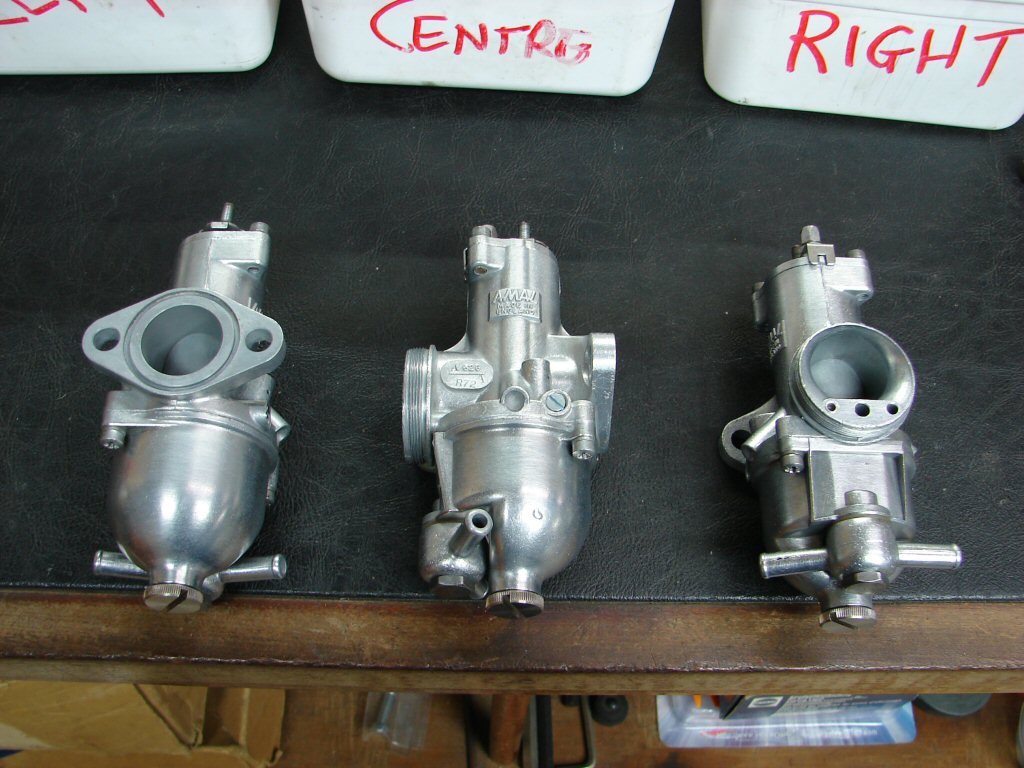
Here is the status as of 21st May.
Bear in mind these carbs had been exposed to the weather for many years - including under snow - when I purchased the wreck in 1991. There was serious corrosion which had put me off trying to restore them until learning of the battery acid method. Quite a lot of surface pitting is still evident even after this somewhat miraculous process.
And this is what I have discovered.
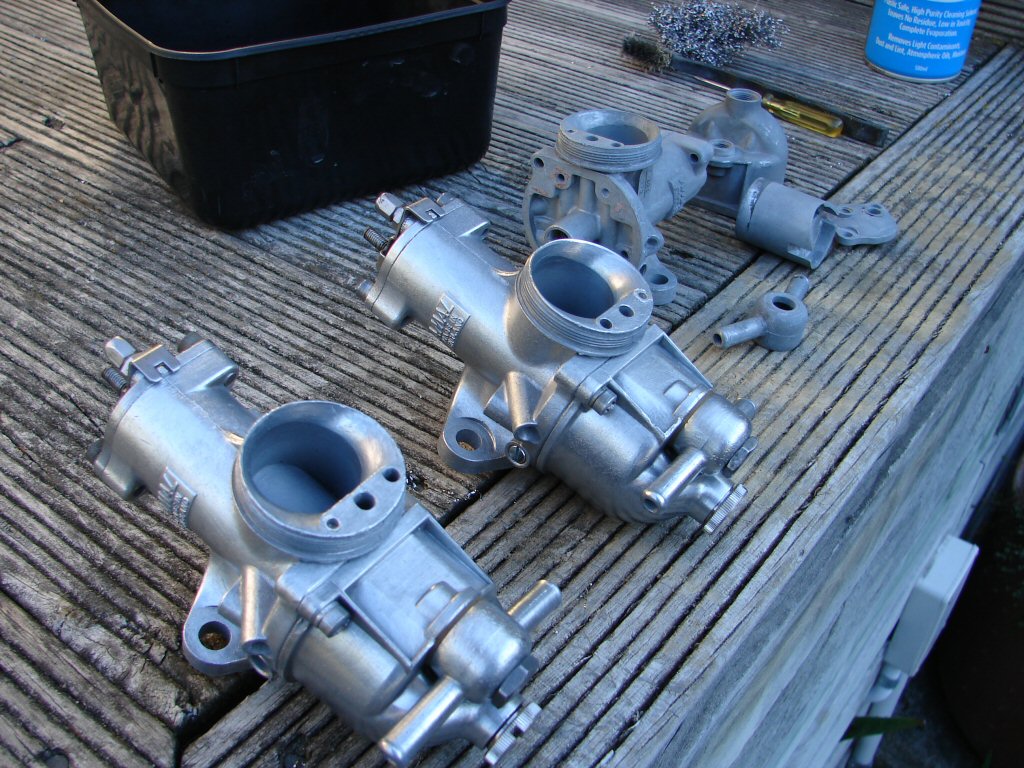
Firstly - the two carbs I cleaned up immediately after they had dried from the acid bath responded very quickly to use of a brass or copper wire brush. I cannot be sure which it is. The third was left for two days and was somewhat more resistant to polishing up. Not seriously, but noticeably. I do now have both copper wire brushes and stainless ones. The copper one has longer bristles than whatever it was I used first - brass or copper - but copper definitely brings a better finish than stainless. My suspicion that the first one was brass was due to the fact that the bristles were seemingly stiffer than the later purchased copper one. Either will do a good job. Stainless gets a better response from the steel bits - screws and washers and stuff.
I have to say that I really wondered if I was simply making a rod for my own back when I began cleaning the first carb parts out of the acid bath, but as the surface is a matte gray powdery finish I figured I did not have an option. Now that all the carbs are somewhat too "shiny" for my liking I can only hope that they oxidise fairly quickly back to a more factory appearance.
Checking the viability of all the drillings showed that all three carbs had the same serious blockage at the far side of the idle jet from the pilot air screw. A piece of 10Amp fuse wire would not penetrate beyond the far end of the jet, nor would CO Contact Cleaner spray through it. I realise that the last fuel in these carbs was leaded, and the residue from dried out leaded fuel is a white cement-like substance which can only be removed by physical means. That I know of. My intention is to drill out the blanks on the opposite side of each carb body and pick out the blockages, then reseal the openings. There is already the beginning of a thread there which would have been for a carb of opposite side, so I shall repair that thread after the job is done, and fit shortened versions of pilot screws as plugs. As I have three old ones with rusty heads they will do. I shall try blowing the contact cleaner through again first, in case my first attempt may have resulted in any softening of the blockages. I had to drill one of my own carbs in this way in 1981 after returning from a year overseas to find it irrevocably blocked. The culprit was immediately obvious and easily removed with a small screwdriver. Hopefully these will be the same, as it is reassuring to find clear evidence of the problem.
I also have still to fit the new tickler mechanisms, plus the float bowls and the mounting surfaces would benefit from a slight resurfacing with fine emery paper. I noticed that the shafts of the original ticklers did not have drillings to match those in the carb body - for the fuel to escape. Perhaps they were never drilled. The new ticklers have the holes already in the shafts - so it is a precise manoeuvre to press them in so that the holes in shaft and body line up. If they fail to do so I just drill new holes through the body into the shaft.
Tonight I am mostly clearing blocked idle jets.
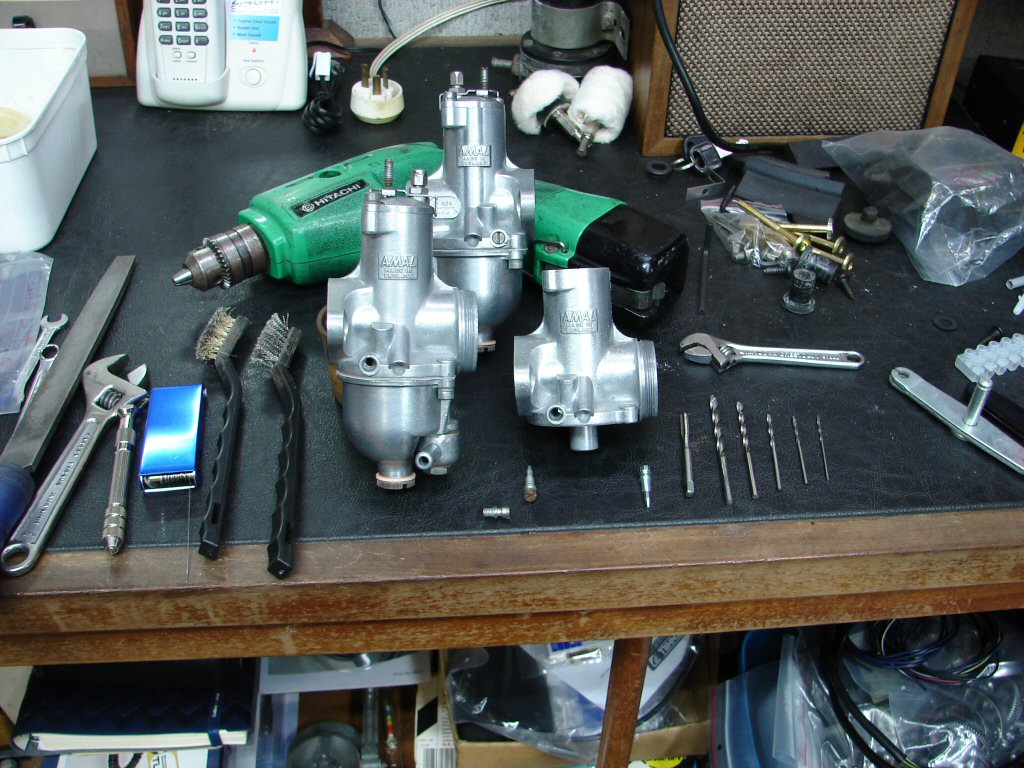
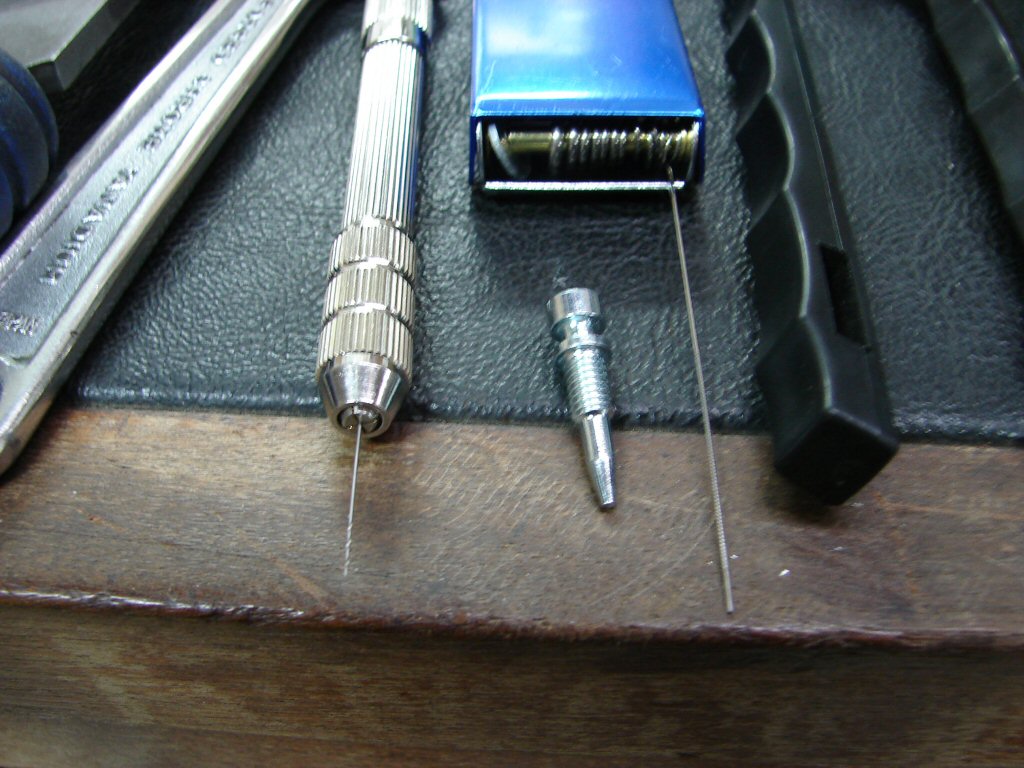
Because the idle jets are further toward the far side of the carb - that is - the side opposite the pilot air screw, it is necessary to drill through the alloy plug that exists on that side in order to more easily reach the jet. To do this I use the range of drill bits you can see to the right of the photo.
I do not have the drill sizes recorded, but they suggested themselves from the collection I had - especially the new ones as they would require less effort and do a cleaner job.
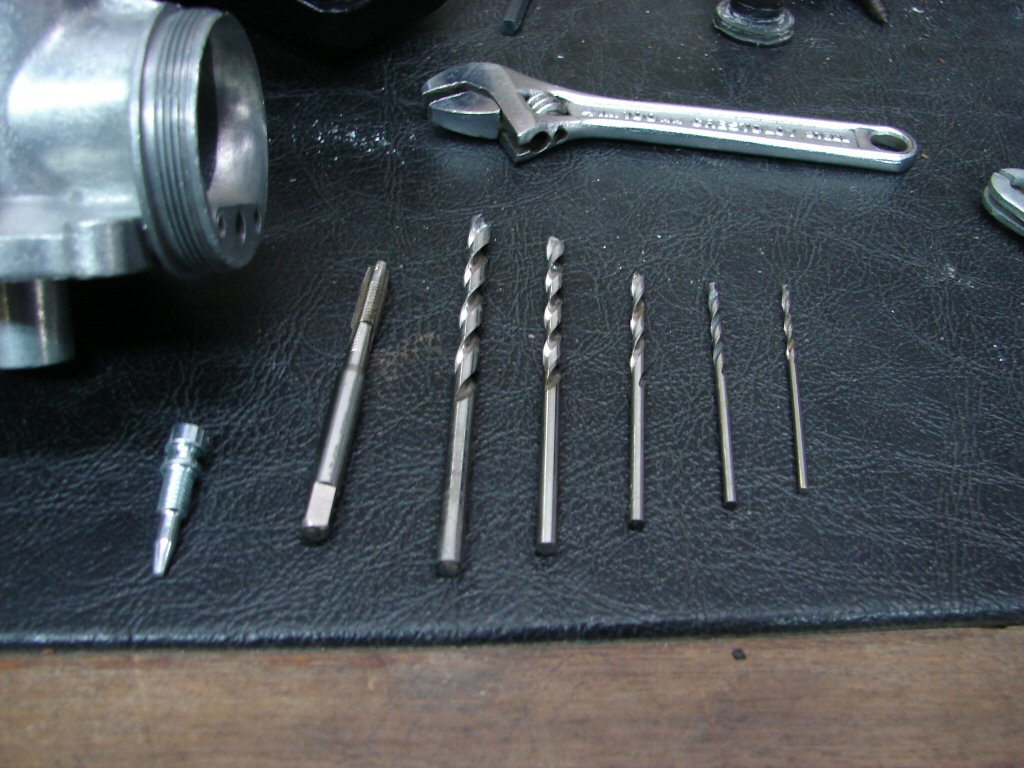
The tap in the photo is 10-32 which I believe equates to 3/16" UNF at 32 TPI. This is the thread that the pilot air screws use. Although there are the beginnings of these threads already in the carb body they require cleaning up after drilling the max size hole you can get to the back of the idle jet.
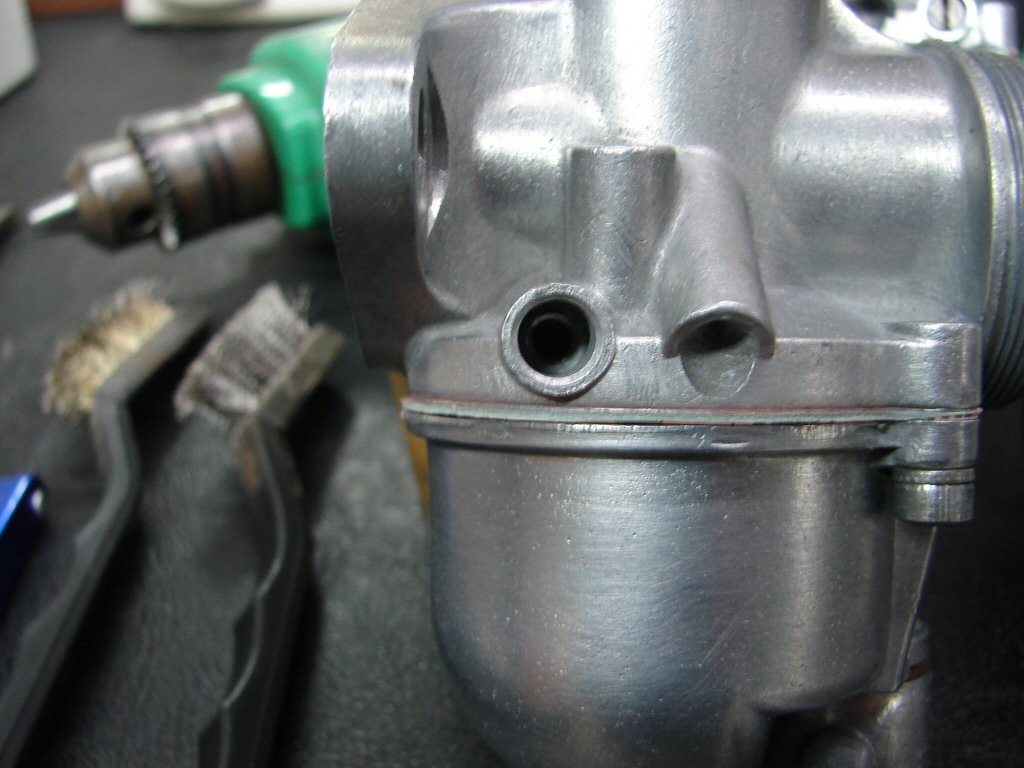
In this photo the alloy has been drilled out and the thread cleaned with a tap. Not that you can see much of the detail. The entry is identical to the real pilot air screw hole on the other side.
After this I was able to clear the idle jets using two devices I have only just purchased. The first is a range of cleaning tools for welding tips. The second is a range of micro drill bits. The size we are looking for is .016", or 1/64", or 0.4mm - in any book these are real tiny things. The problem with tiny drill bits is that they make them really short.
The drill bit on the left is .016", while the cleaning tool on the right is .019" and theoretically should not be able to pass through the jet. On one carb it did. That was rather fortunate because the tiny drill bit was too short to reach the idle jet which was somewhat further toward the proper air screw side than the first. It seems that quality control was rather lax when these Amals were assembled.
The main aim was that the idle jets were cleared, and so far, two out of three have been. The next step has been to clear all the various drillings of debris, which has been done with CO Contact Cleaner and then compressed air. The final step is to plug the hole that has been opened to make the cleaning possible. My method has been to clean the original threads and use a shortened version of the pilot air screw, which can always be removed in future should it be necessary. The original pilot air screws were rather weathered, so a new set was obtained for the original purpose. The old ones were the perfect sacrificial items for the plugging job.
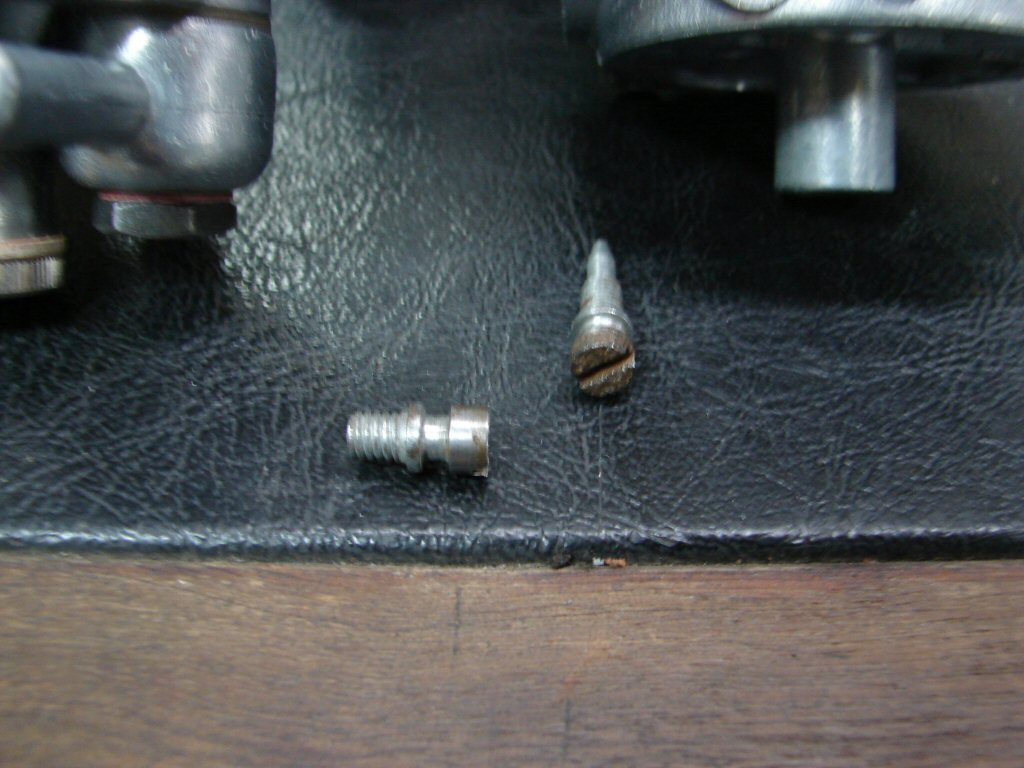
The measurement for the threaded component was established at 5.5mm, so the old screws were cut off at that length.
In a wonderful example of synchronicity the gaskets sets for the carbs came with two pilot air screw o rings, so one was used for the intended job and the other for this.
I also applied a smear of silicone sealant on the threads
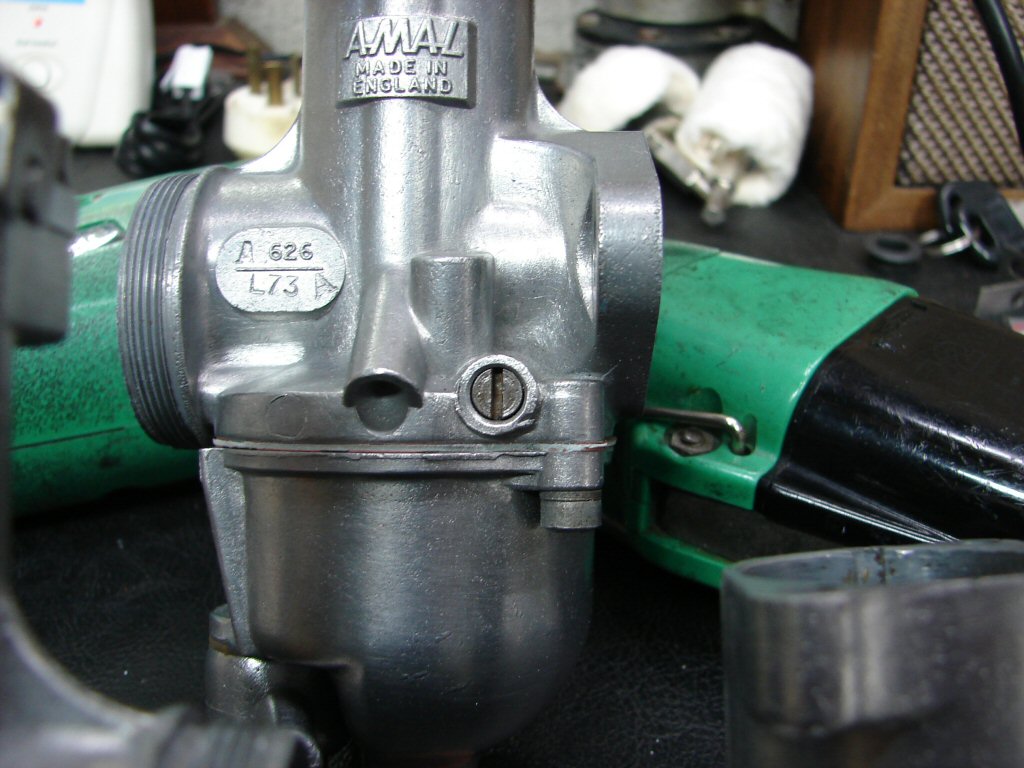
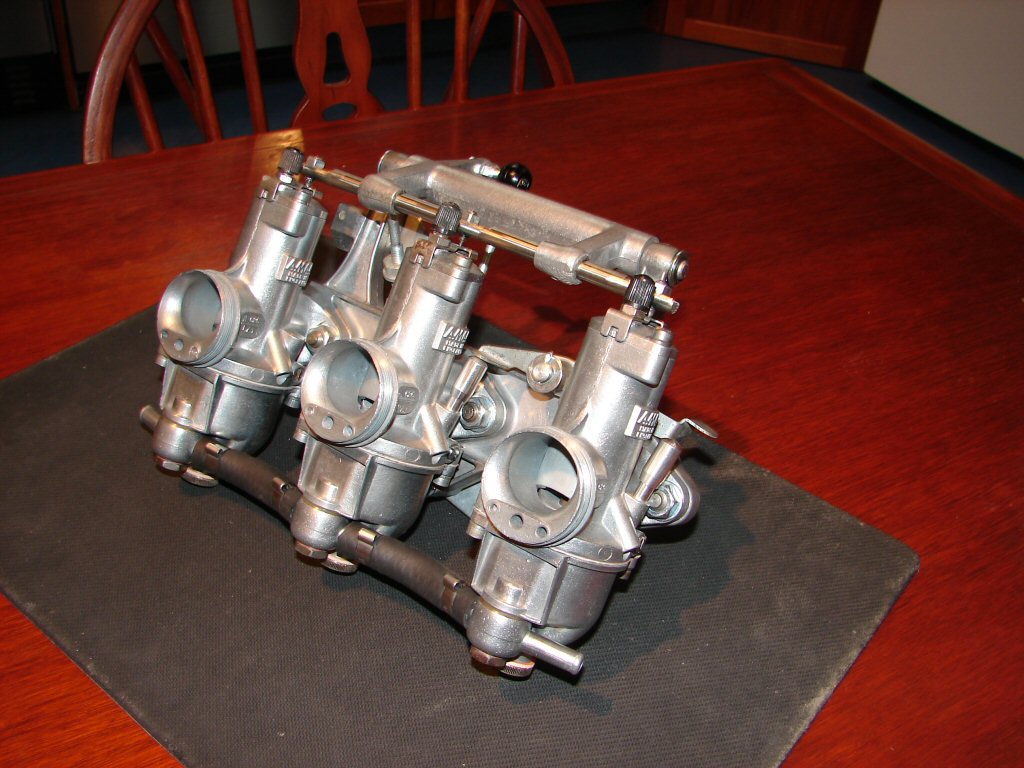
Finished article looks like this.
The head of the screw is actually several mm below the surface of the hole, so it is quite obviously not a proper pilot air screw. I could cover the entire head with silicone sealant, but I feel that it is wiser to leave it just like this so future owners will realise that it is removable.
Tonight I have completed the resurrection of all three carbs as well as having replaced the bushes in the adaptor. I have thus assembled the carbs on the adaptor prior to making up the fuel lines.
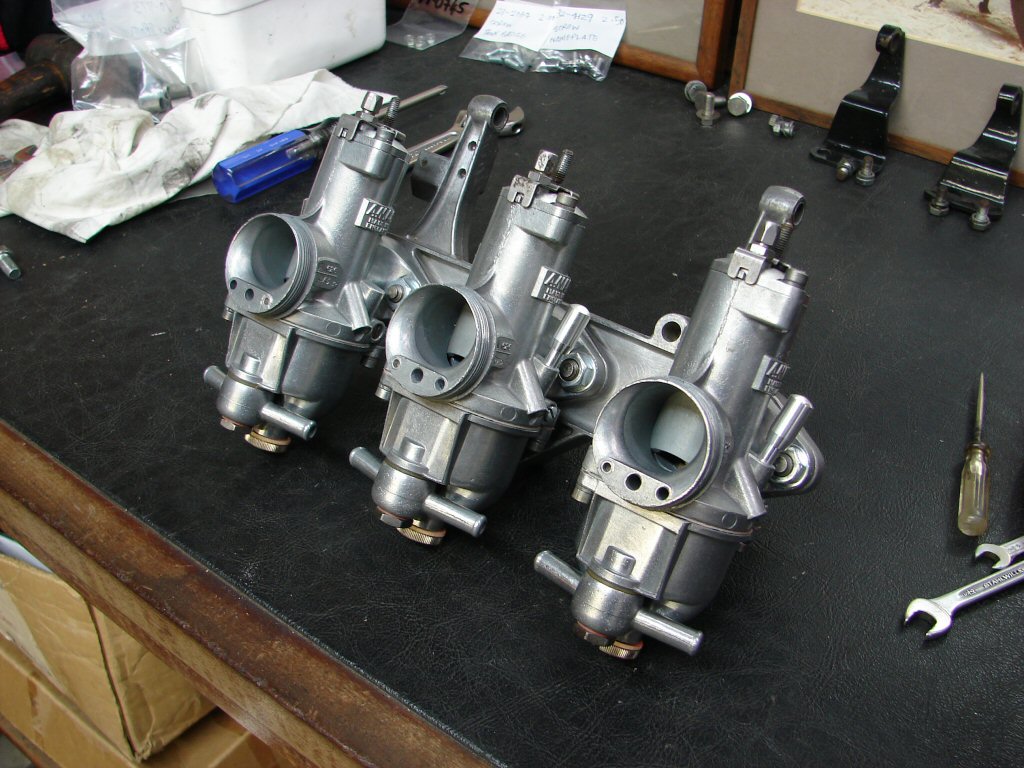
This feels like a pivotal point in the restoration of the T160 in question. It was in a shocking state when I acquired it - although I did not realise that at the time. If it can come this far it can become the machine it was always intended to be. I very much look forward to that..
Fait accompli.!
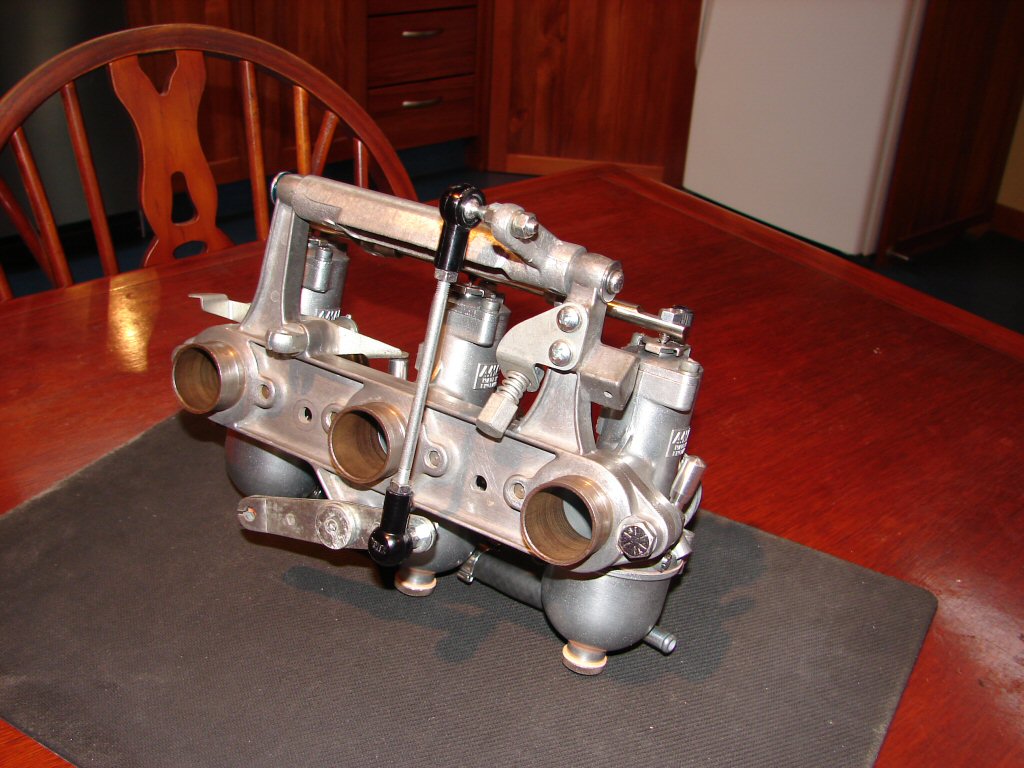
After two weeks of assorted manoeuvres I believe the carbs are finished. All the idle jets were cleared with some difficulty due to the obscure location they reside in, but at least whatever was blocking them gave way to persuasion. I did discover that the idle jet on the centre carb was definitely a few thousandths of an inch larger than the two outers. Whether this is by design or erosion I know not, but I figure it will be easily compensated for by the setting of the pilot air screw.
Externally, there are a lot of new parts in the linkage setup. The centre tickler arm with its pivot including the throttle cable termination etc are new, the operating bar to which the throttle rods of each carb attach is new and stainless, all new bushes in the operating arm plus new spindle - which is fortunately the later type without the extension for the extrernal spring that the bike had featured. The throttle link rod with its plastic ball joints and the throttle lever which attaches to it's lower end are both new, and finally the idle adjuster plus mounting plate and assorted bits were also replaced with new.
I was extremely lucky to be able to buy these parts from various sources as all the steel parts were well beyond recovery. I guess I would be too after a decade in the weather. Only the stubs through the adaptor were able to be cleaned as they still had the rubber connector tubes fitted when the bike was recovered, and they had kept the worst of the weather at bay.
There is obvious visible pitting of many of the surfaces but this will be far less apparent when the carbs are tucked away behind the engine.
Currently awaiting a few parts for attaching carbs to engine and airfilter to carbs, but otherwise I can consider what once seemed impossible task to be successfully beaten.
Sheesh.!
The missing airfliter parts duly arrived. I mounted all the airfilter bits to the carbs. There were virtually no problems. It then looked like this..
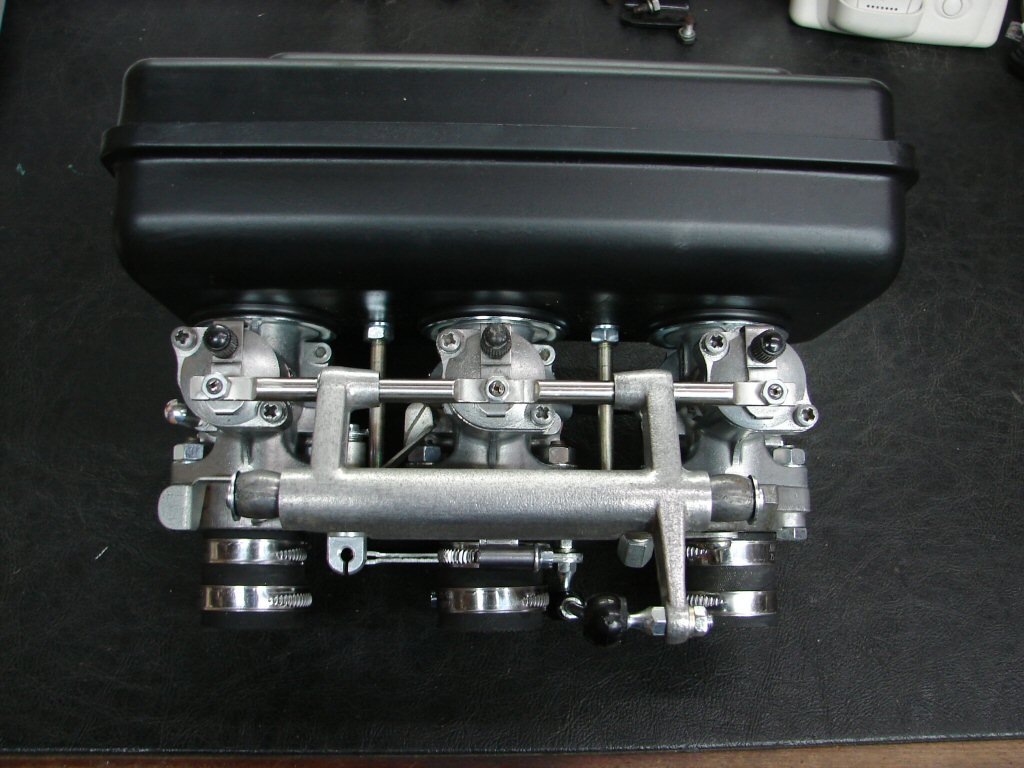
This is progress to 3 June 2018.
Kilroy