November 2019
1981 Triumph T140ES Bonneville Royal 750
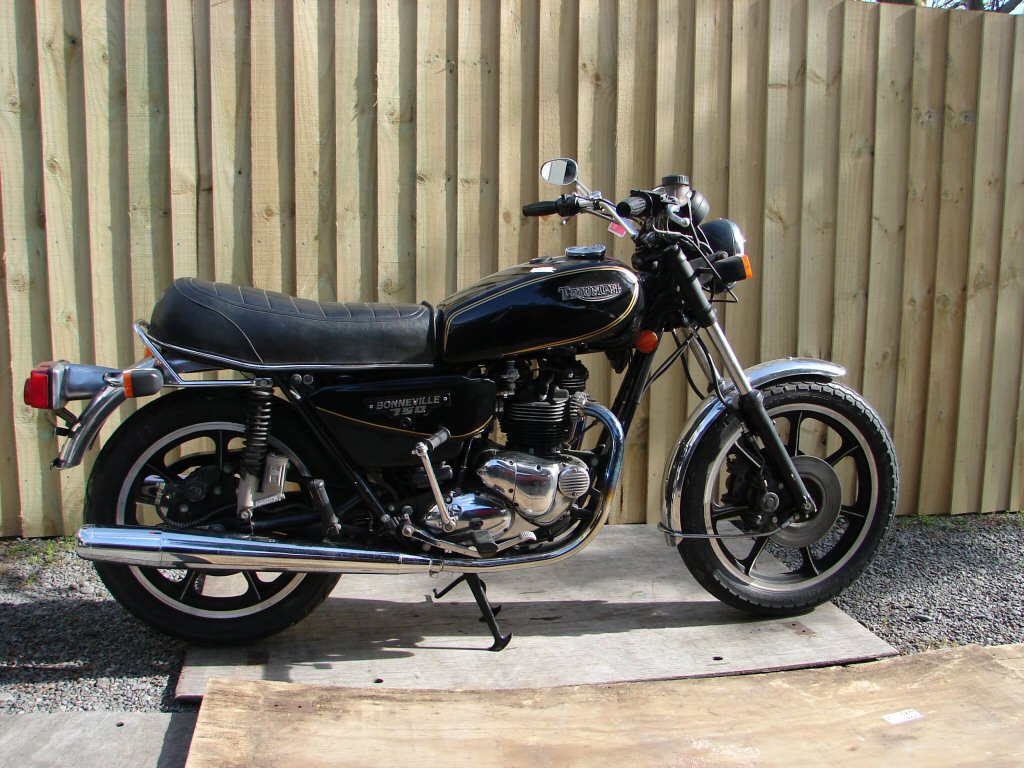
A quick tuning job on the T140 Special was completed and the owner collected it while delivering his latest US import, a 1981 T140ES Royal. This would have presumably been one of the 50 made for Triumph Motors America with black frames and livery, cast wheels, and the best bits that the other T140ES all got. I owned a new one for 3½ years but was unable to ride it in order to preserve its brand new status. I will be interested to see what this rides like after all the usual drama has been overcome.
Visually the bike shows signs of its long storage, plus a number of odd disfigurements that would puzzle one. One up, one down mufflers, Twisted rear mudguard and matching rear grabrail. Bent front mudguard stay and front of guard. Home made fasteners for the side panels which also bear the wrong badges. Rearward slanting indicators which appear to be due to abnormally large spacers on the headlight mounts that splay the indicator mounting points. Chrome on engine cases showing well developed pitting, and a few extra drilled holes in the rear mudguard whose purpose one can only wonder at.
These were top spec Bonnevilles and sold well in the USA, especially in this colour scheme. This one has only covered 4800 miles so it should be in better condition. I get the impression that it has been shipped a lot and ridden very little.
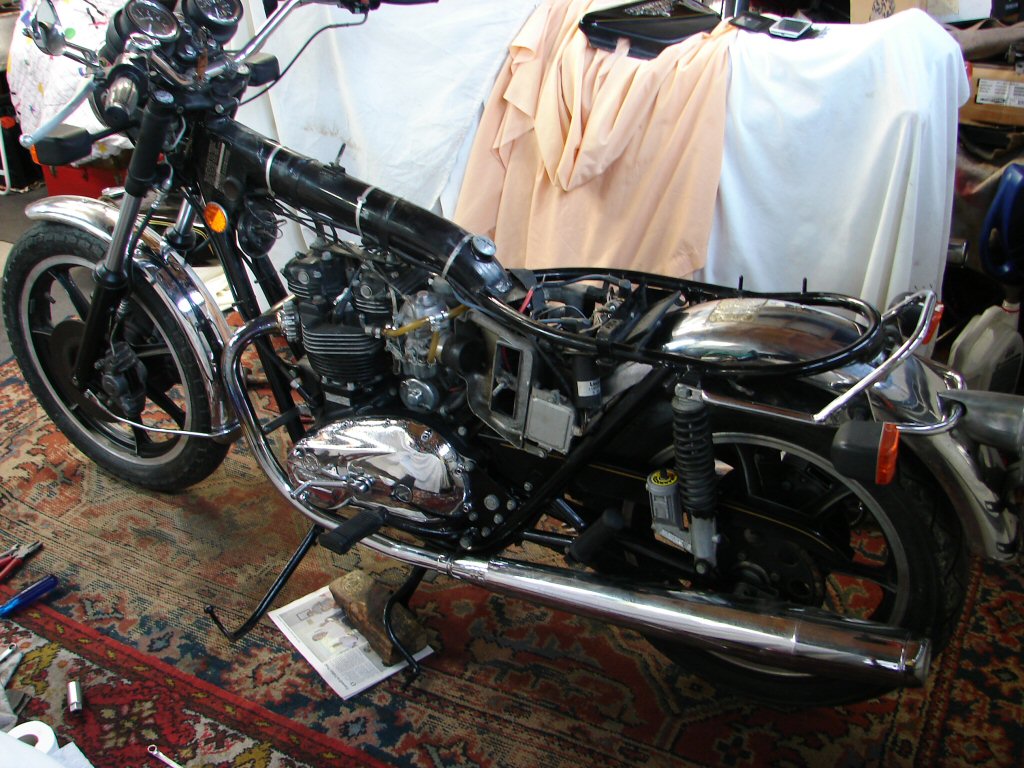
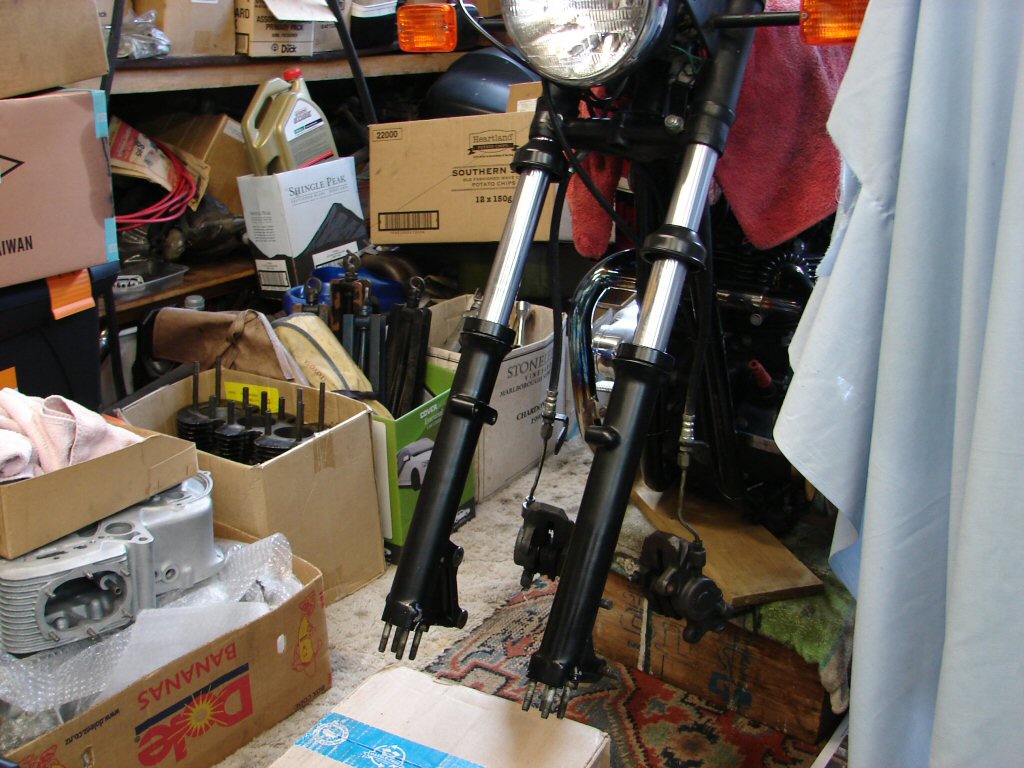
By the time I took this photo I had already drained the engine and primary oils and had a go at polishing some of the pitting from the primary cover. There had been an appreciable oil leak from the gearlever and when I removed it I found that the oil seal had popped right out, so I simply refitted it. I dropped one muffler and raised the other as far as the bracketry would allow, and this achieved a pretty even result. The rear grabrail mounts were already loose, and the left side was bent down badly, possibly by a tiedown in transit. A pinchbar through the frame above the tyre gave me the leverage to straighten it, and with a bit of jiggery pokery I got the mudguard and grabrail looking like they belonged on the same bike. The rear wheel was off to the right which exaggerated the look, but this was due to a larger than stock metric rear tyre which was nigh rubbing on the chainguard despite not quite being aligned correctly. The tyre may need replacement as there are age related fatigue cracks on the sidewall and it may not pass muster. Surprising again that a new tyre would have been needed after so few miles.

Next job was to bleed out and mop up the tomato soup that was pretending to be hydraulic fluid. I had found there to be very little clearance between the brake disks and the callipers on the right side of both, and it seemed the answer was that the front axle had been clamped up without positioning the wheel properly. The disk pads appeared to have been oiled, so I dragged out what stock I had to see if I could replace them.
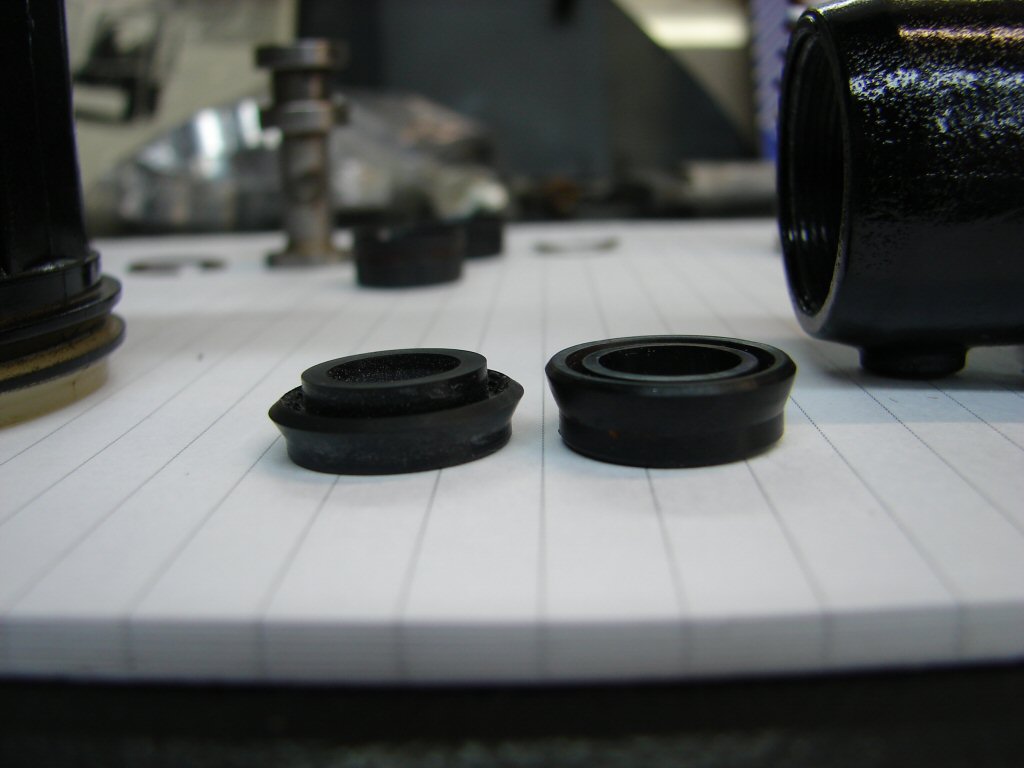
These calipers are the magnesium type which were popular for race bikes, so were quite sought after but pricey. I have a pair on my Trident and had found that they did not suit standard disk pads, as the pad material was in the wrong place on the backing plate to match the position of the disk. These are the pads I found I currently had.
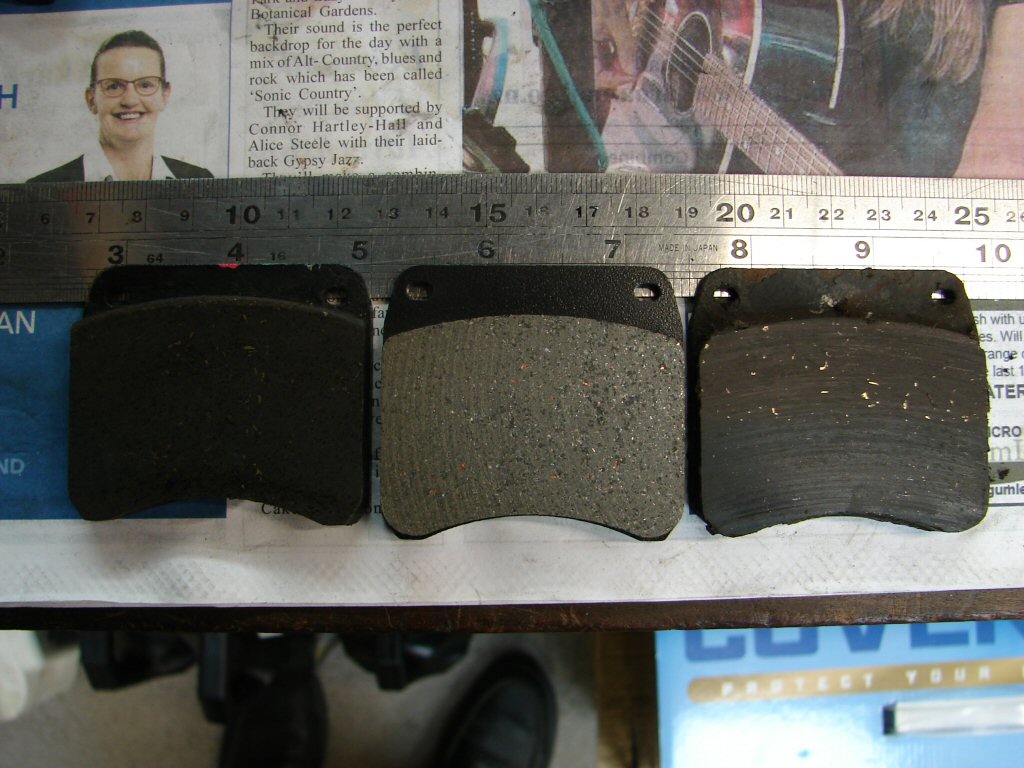
Left is a standard pad for the Lockheed cast iron calipers. Centre is a new 'standard' pad I bought, but as can be seen it is similar to the pad on the right from this bike and is thus designed for an alloy caliper and not a standard one at all. That would have worked out very well because I had two sets of them, but when I trial fitted one there was a clearance issue due to the new pads having slightly deeper base plates which fouled the fork leg mounting before going far enough into the caliper to allow the retaining pins to fit. I had a similar problem with my own bike when fitting the 'correct' pads for these type calipers, and I worked around it by grinding the base plates back a smidge.
This left me several options. See if I could grind these ones to suit, or buy some more suitable examples, or persevere with what was fitted. All the old pads had more than 5mm of material left, so I wire brushed them all and dosed them with brake cleaner. We shall see if they are good enough in use.
After refitting the pads I checked the mudguard stay and found it was bent on both sides, one in and one out, and this was forcing the guard to sit off to the left. I bent the two sides using blocks of wood and a ring spanner over the stay, and managed a nice even result at the rear. The front edge of the guard was still a bit cocked to the left though, so I gave it a series of twists which seemed to achieve nothing. I then released the mounting bracket from the fork sliders and retightened it while holding tension on the guard in the desired direction. That made a slight improvement so I left it there.
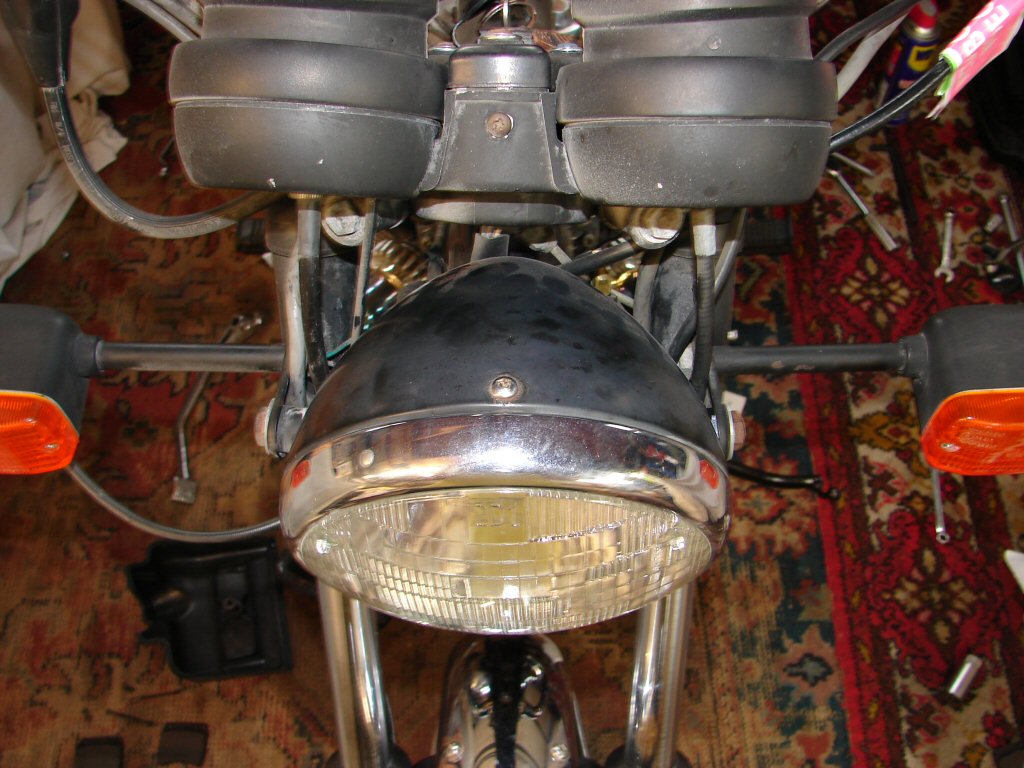
I also experimented with fitting a thinner spacer at the headlight mount to see what happened to the left indicator. It was greatly improved, so I shall proceed with that course of action. I also removed both the indicator lamps and tightened the internal clamps that will hopefully keep the lamps in a matching horizontal position.
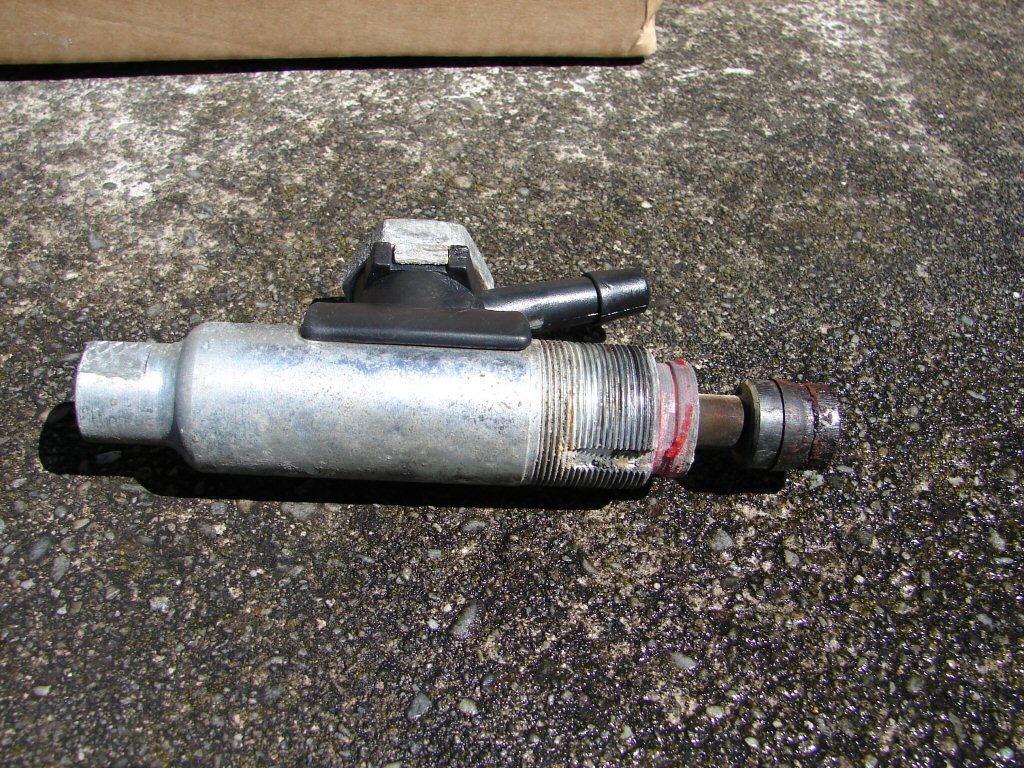
Next would be the first of two master cylinder rebuilds. Both are in trouble and have likely never had a fluid change in their lives. While the assembly can be removed from the bike fairly easily, and the fluid reservoir removed, getting the cylinder out of the alloy housing requires first removing a stubborn allen screw, then unscrewing the housing itself.
I have doused it all in penetrating oil and will leave it overnight to do its job. After that some boiling water may help persuade some movement.
The first application of boiling water, poured over the alloy housing, immediately released the grubscrew which had previously refused to move. I have in the past drilled these out of their housing before snapping an allen key off inside them. I do enjoy non-destructive methods.
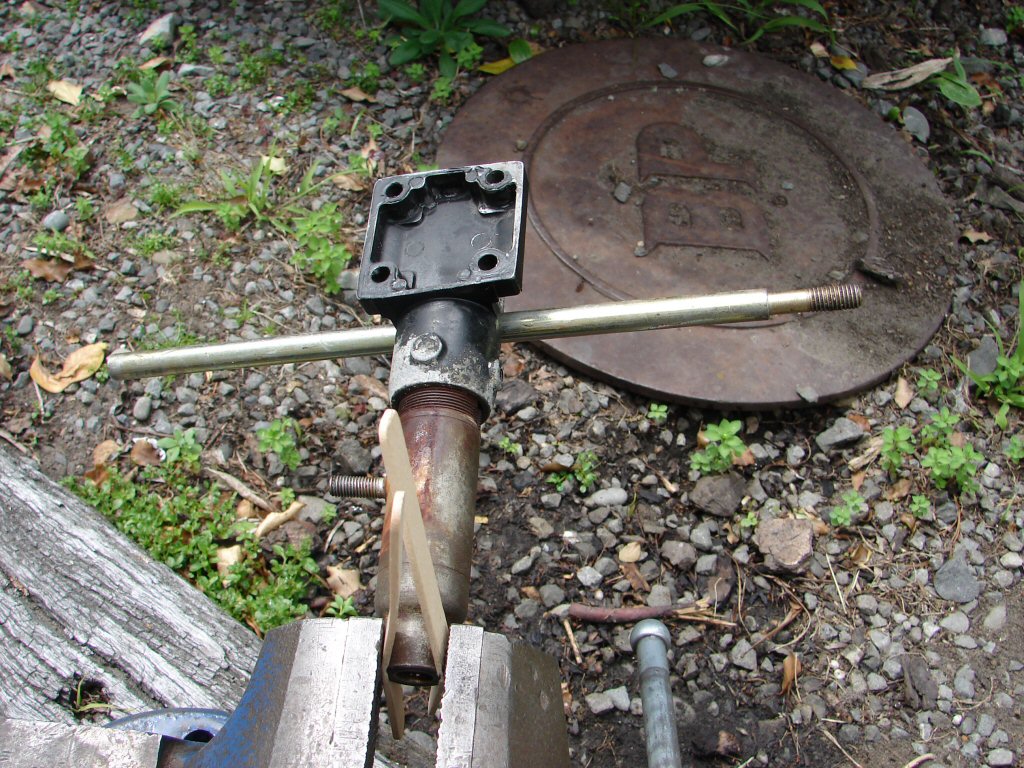
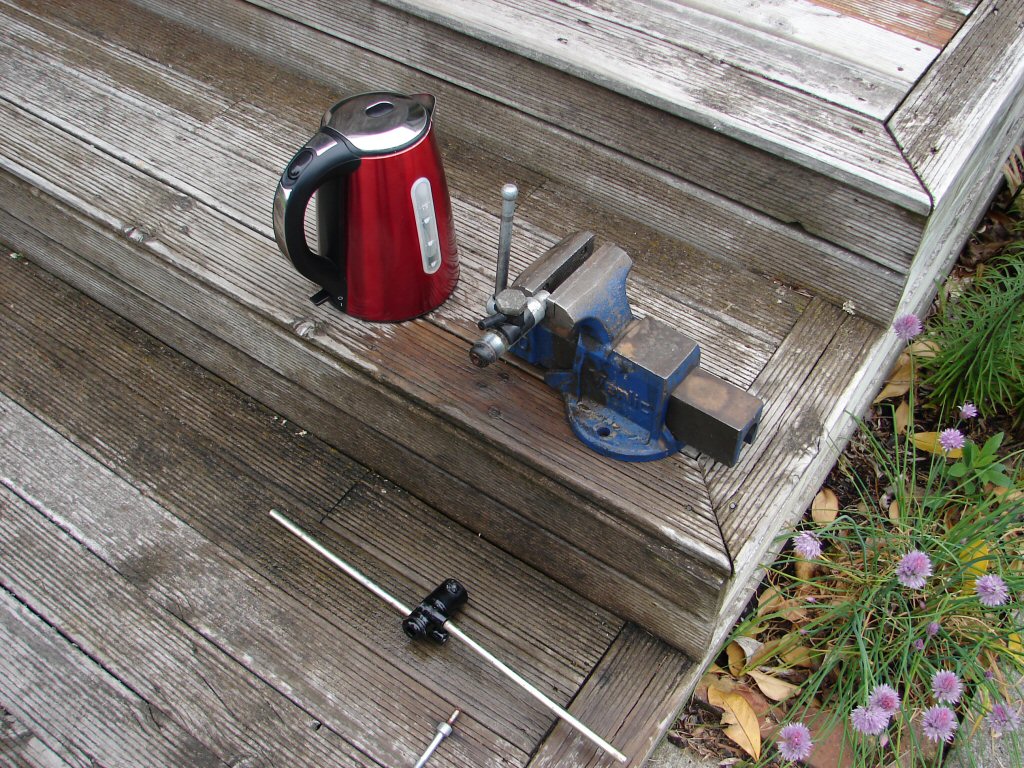
The next jug full of boiling water would be in aid of removing the alloy housing from the steel master cylinder. Here it is awaiting its fate.
That worked equally well, albeit requiring quite a bit of effort on that bar. The main thing is - these parts are now several steps closer to being restored to working condition, which would otherwise involve spending around $450 to purchase a new item whose quality could not be established. This is not a usual Triumph master cylinder as it was purpose built to operate twin front calipers, as it was anticipated that they would need a larger cylinder than normal. Having made such a modification myself I can attest to the fact that actually it doesn't, but this is a rare stock machine and we need to keep it that way.
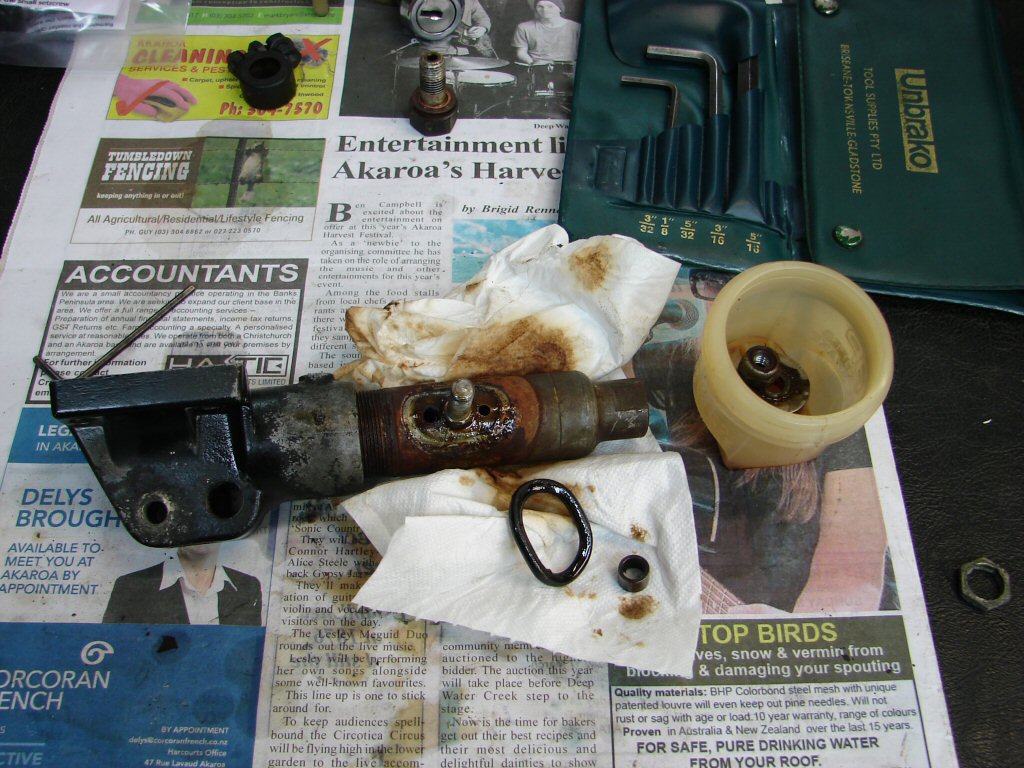
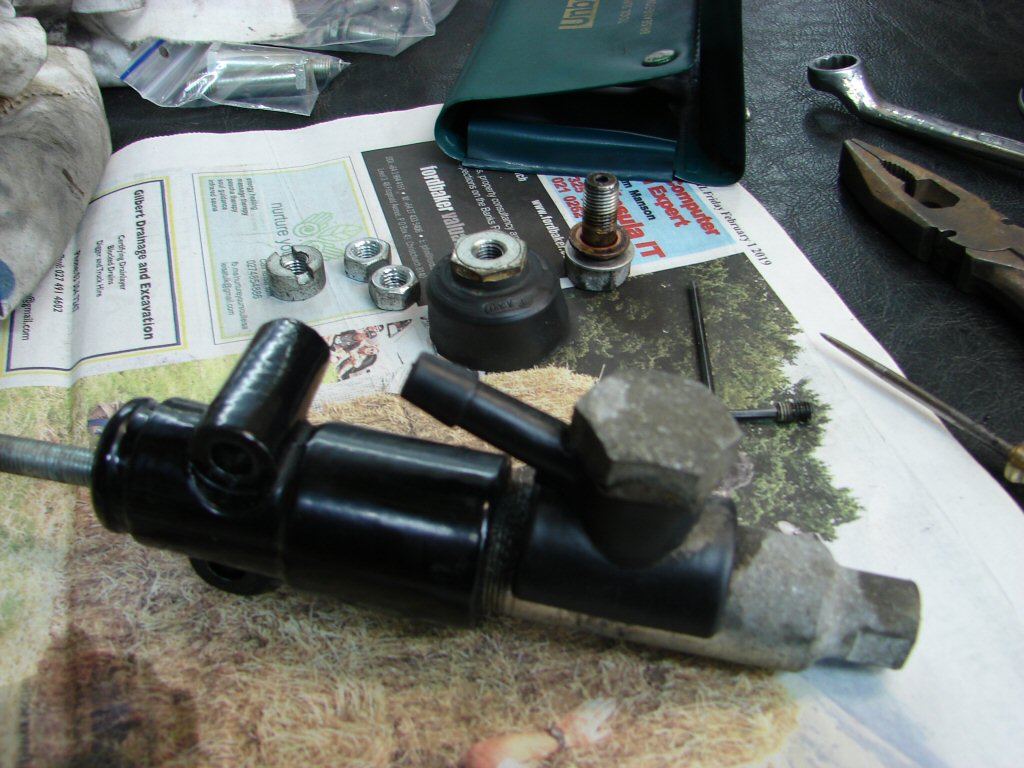
However, before I sound too cocky with progress, let me show you what we now had.
None of this fills one with optimism, but it is merely one more step in an ongoing process. I would now need to remove every single part from both assemblies, clean some very unpleasant crap off all the internals, then set about finding replacement seals in order to hopefully revive it.
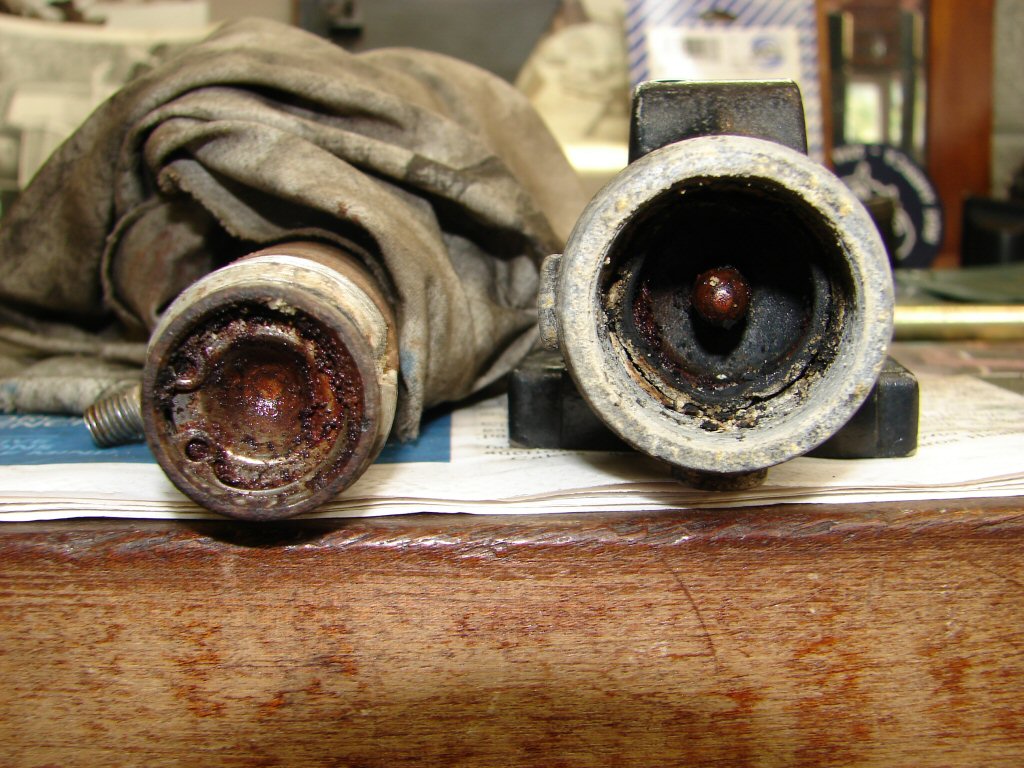
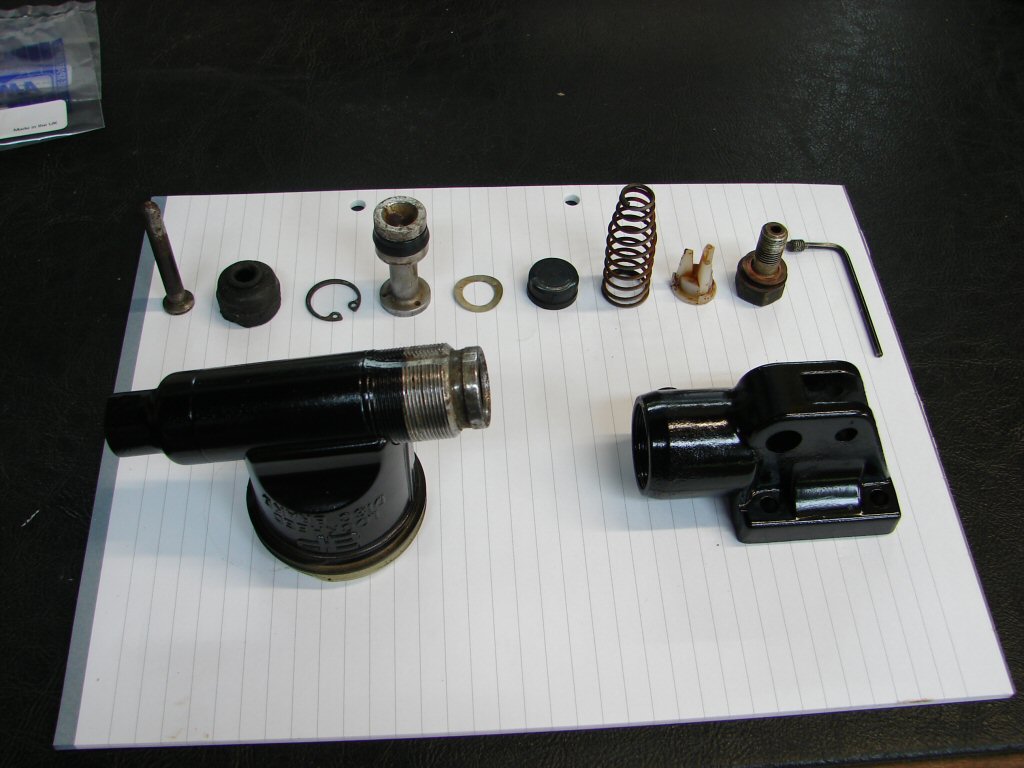
The alloy housing would require paint, and as the cylinder body was rusty perhaps it would benefit from same. At least the cylinder relinquished its internals without any extreme resistance, so that got us to here.
Only 50 of these machines were built for Triumph Motors America, and only a select few had black brake cylinders and fluid reservoirs.
Oh. Wait. No - only this one. As of now. Better black than rust, and the paint will prevent the onset of even more rust. I had already decided to paint the rusty headlight mounting bolts and washers black as well. We are just elaborating on a theme after all.
It transpired that this cylinder was somewhat larger than the single disk offering that most Triumphs of the era used, and because of this none of the rebuild kits available locally would be usable. I approached the local brake specialists and they were able to supply me with the two main seals. One delivers fluid pressure to the actual brake calipers, the other prevents fluid leaking out the end of the cylinder. That was where we ran into problems. The internal surface of the cylinder develops rust just outside the position where the outer seal comes to rest. This rust interferes with the fine edge of the seal and in time allows fluid to leak out. Cleaning the rust off the cylinder leaves a pitted surface which the seal will not be able to effectively cope with so the best idea is to alter the rest position of the seal. Unfortunately the replacement seal does this in entirely the wrong direction.
The new seal is on the left. The flared end of the seal points into the cylinder, so the new one has its flared edge further out than the original. This would place the sealing edge right in the area of rusted surface which has been exposed to the atmosphere for 38 years. This would never be successful. I chose instead to reuse the original outer seal, but by placing a thin washer between the piston and the retaining circlip I would effectively move the seal inwards by the thickness of the washer. As there had been no evidence of any overt leakage when removed I was hopeful that this situation could be encouraged to continue. At least there are rebuild kits available from the UK, so if it fails in service there will be another approach available.
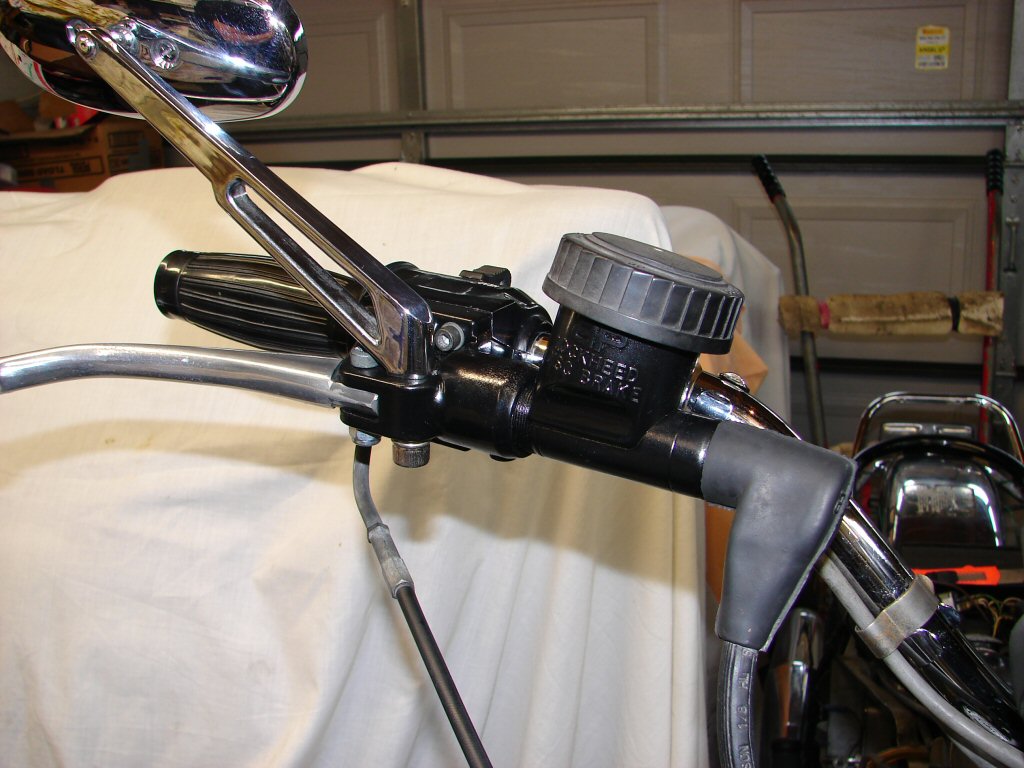
So here is the finished black on black masterpiece. Looks a whole lot better than flaky paint and rust did. Even better, it bled up well enough to be left overnight, and a final bleed today and the lever pressure felt perfect, as was the brake action. There was however a lot of free play in the lever at rest, despite me setting everything exactly where it had been before, so I wound the housing 1 turn further onto the cylinder and that gave me the result I was wanting. Not much travel and a firm lever pressure. The rest will be up to the operator.
Stands to reason that the rear brake will be in something of a similar state. Pedal had no pressure nor did the brake work. Reservoir had no fluid in it and the cylinder hardly any either. At least it came off the bike without too much of a fight. The piston appeared to be unable to return to its normal position. I poured boiling water over the alloy housing after which the grubscrew came out reasonably easily.
Removing the cylinder from the alloy housing always takes a lot more convincing. Several doses of boiling water and a pair of rods in the mounting holes and I was able to apply enough leverage to start it moving. After that it is simply a matter of applying continued force.
That got us to just the cylinder with a piston jammed in it. You guessed it - more boiling water and a bit of tapping the cylinder on a hard surface until the piston decided to pop out. No rust, only grease-like mud. The inside of the cylinder did not appear to have ever seen much fluid. I suspect that the entire assembly had been replaced at an earlier stage, but perhaps never bled up successfully.
I cleaned all the internals, replaced the seals, reassembled the whole thing and fitted it back on the bike. Filled the reservoir and was relieved to find there were no leaks anywhere as the fluid hose from reservoir to cylinder often becomes porous. Initially there were air bubbles in the fluid and progress being made, but that soon ceased to be fun and nothing more happened. I decided to leave that overnight after which I may need to disconnect the pressure line to the caliper and hold it vertical to let the trapped air out.
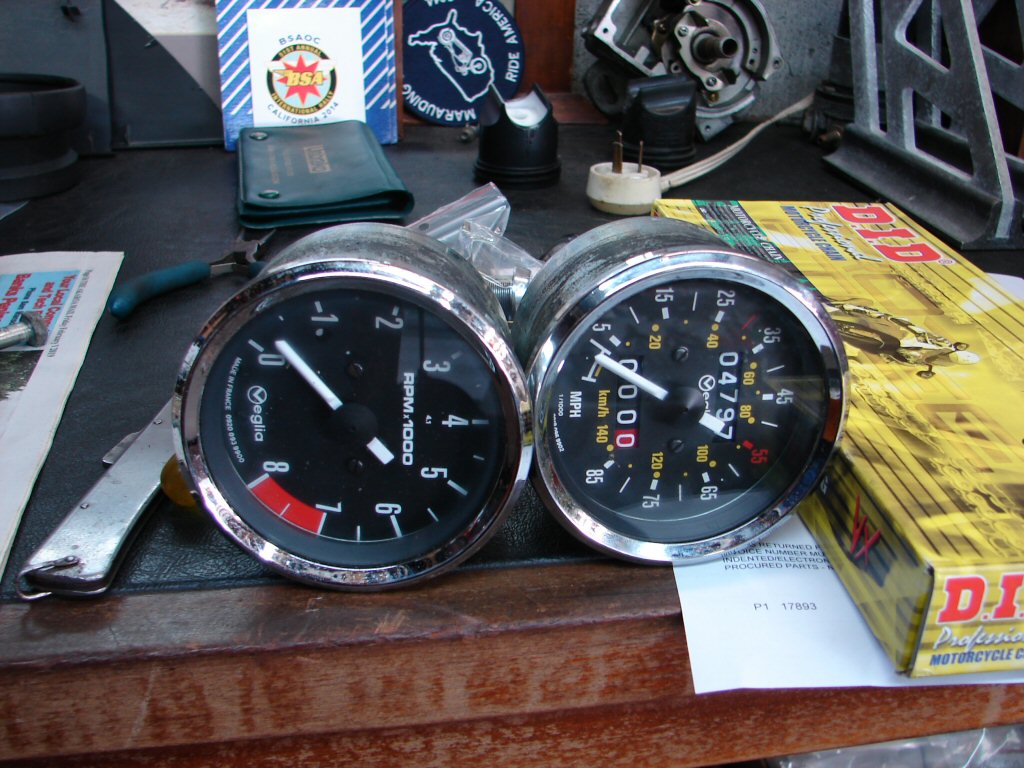
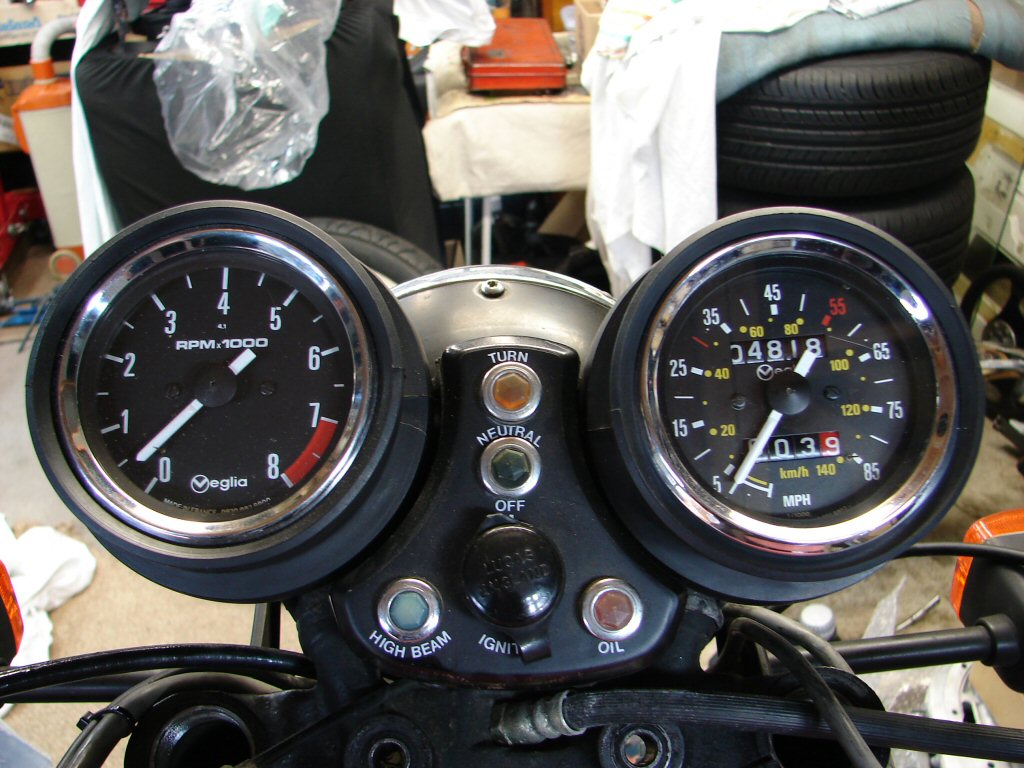
In other news it was a day of disappointing things mostly. I discovered that the speedo cable was fouling the rear chain due to the cable having been run badly. I rerouted the cable by disconnecting it from the speedo, but then found I could not get it back in. That lead to the discovery that the speedo was seized up. I thought I should then check the tacho and found the same. Darn. The Instrument people in Christchurch are under pressure and it could take some months to get them sorted.
While working up the sharp end I began testing the electrics and found the left indicators to be without signs of life. There was no power reaching the connectors in the headlight shell so I pulled the left switchgear apart and found things kinda seized up. A good clean and some WD40 got it working again and the headlight flasher was sorted at the same time.
The front indicator stems were both improved greatly by fitting two much thinner spacers between the headlight shell and the mounting ears, and all that remains to be done is to paint the rusty mounting bolt heads black.
While working on the speedo cable I had noticed that there were serious perish marks on the rear tyre. I am not sure how unsafe this makes tyres with tubes in them, but the problem is that they will fail the compliance test. Tyres and brakes seem to be a particularly sensitive area for safety concerns. Funny that...
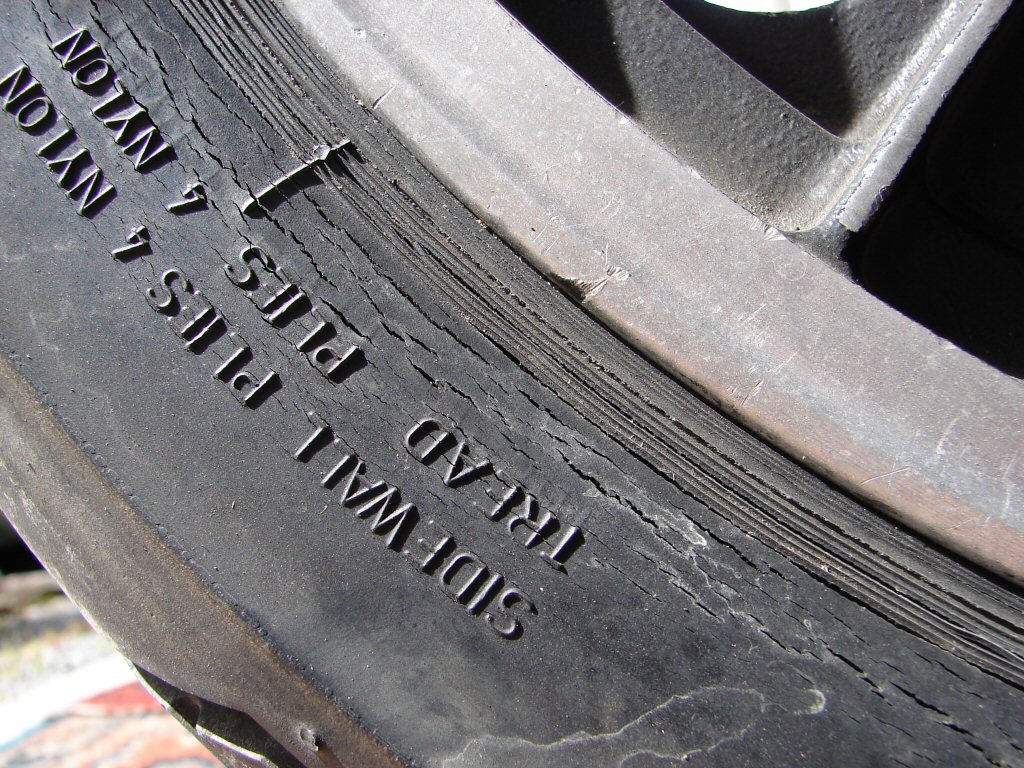
That will most likely mean that the front tyre is in a similar predicament.
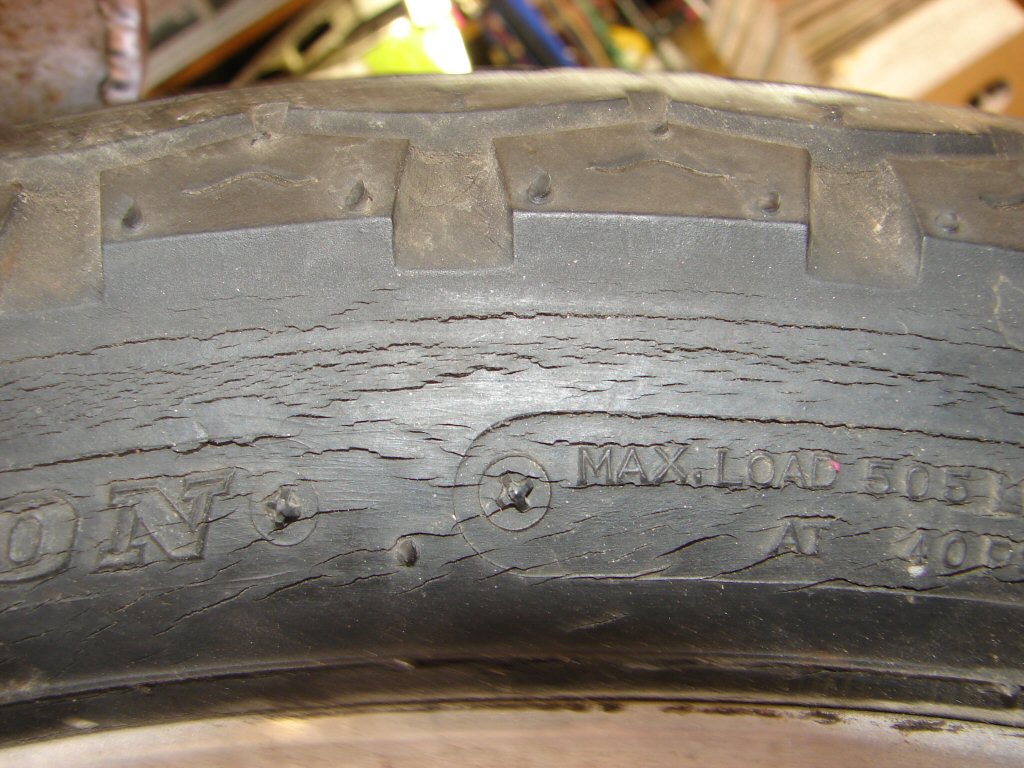
Nope - its worse.
Well bugger.
Both wheels now have to come out and decent tyres found and fitted. It seems to have been a day of going backwards or nowhere.
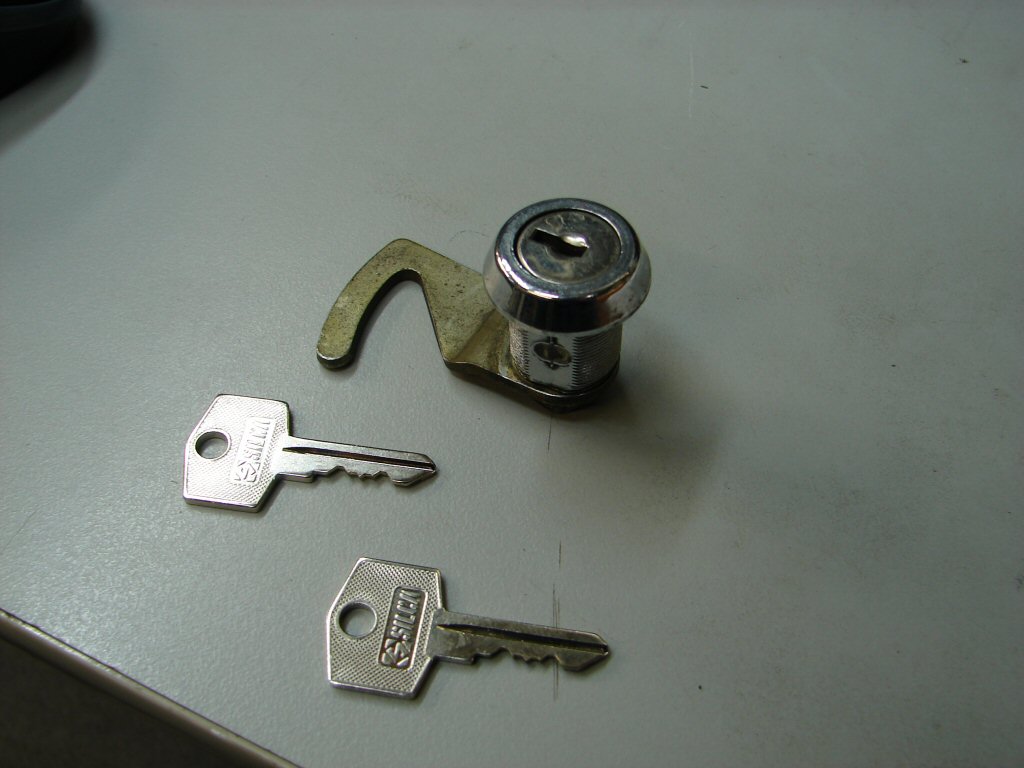
Desperate for some better news I took the extracted but non-functional seat lock to the locksmiths and they managed to ascertain a number from it and cut a couple of keys. That felt like a more positive outcome until I tried to fit it and found the grubscrew that holds it in the frame was seized up too, so that is currently soaking in penetrating oil.
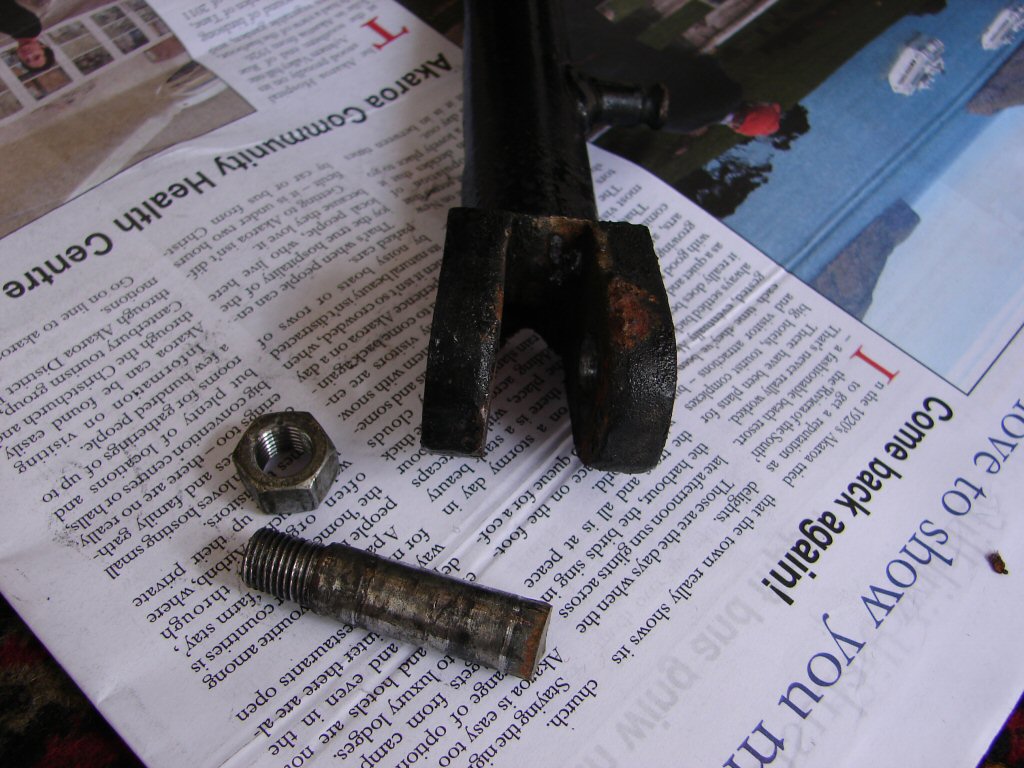
Perhaps I could get the sidestand off its headless bolt which I had been studiously ignoring because it looked like a bitch. The nut was stuck on the outer threads but what used to be the head of the bolt was not proud enough of the boss for me to grab it with anything. By careful applications of WD40 and applying forward force to the extended stand to try to lock the bolt in place I was finally able to move the nut up and off the thread, after which the broken bolt fell out by itself.
Unfortunately the boss itself was spread badly and would need some serious attention to make it a good fit, or it would soon result in the lug breaking off the frame. I stuck it in the vice and gave it a dose of lockjaw until further notice.
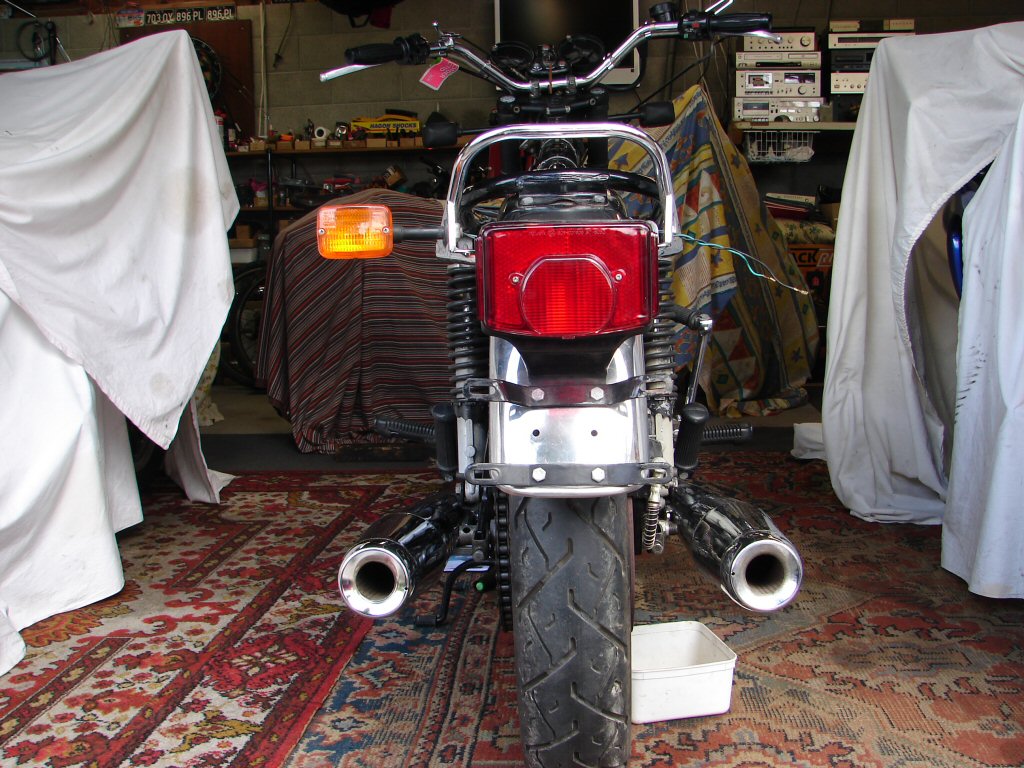
But not everything failed I suppose. I managed a second attempt at getting the muffler heights even, bending the final bend in the header pipe down a fraction by sticking a car jack under it and using the muffler as a lever. They ended up pretty well perfect, so I celebrated by adding a new tail light lens in between the bent rear indicators.
Another day. Began with the rear brake. Loosened various pipes but no fluid from cylinder. Removed fluid hose from reservoir and no fluid despite reservoir being full. Removed the assembly from the bike and found that I could not blow through the hose at all. Stripped the reservoir from the mounting bar and all was revealed.
This is what 38 year old brake fluid turns into.
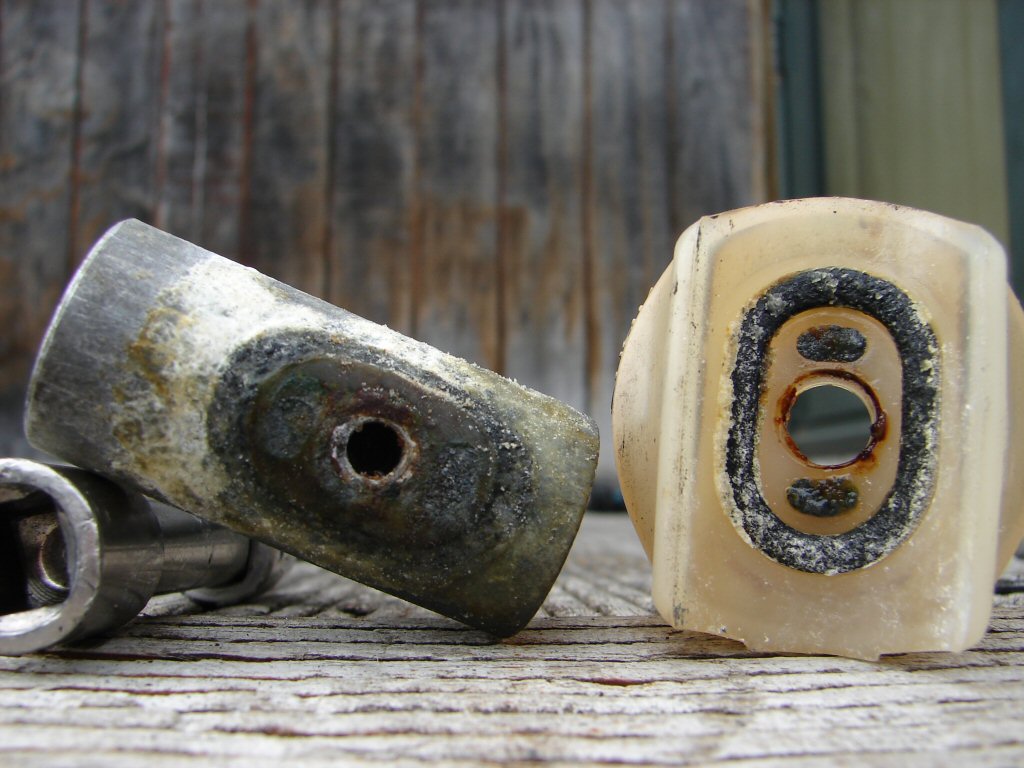
No wonder the cylinder had not had any fluid in it.
That mounting bar should have one hole placed either side of the centre threaded hole through which fluid from the blocked holes in the reservoir should pass. No chance here then. I used a drill bit to clear the small holes in the bar, as well as the centre hole, as all of these converge. Took a lot of blowing and spraying with cleaners to get the thing perfectly clean and working happily again, as did the reservoir itself. The disk pads were badly worn and their edges were breaking up for no reason I could see. I fitted a new pair to avoid any issues. After this the brakes bled up without problems and we finally had brakes at both ends.
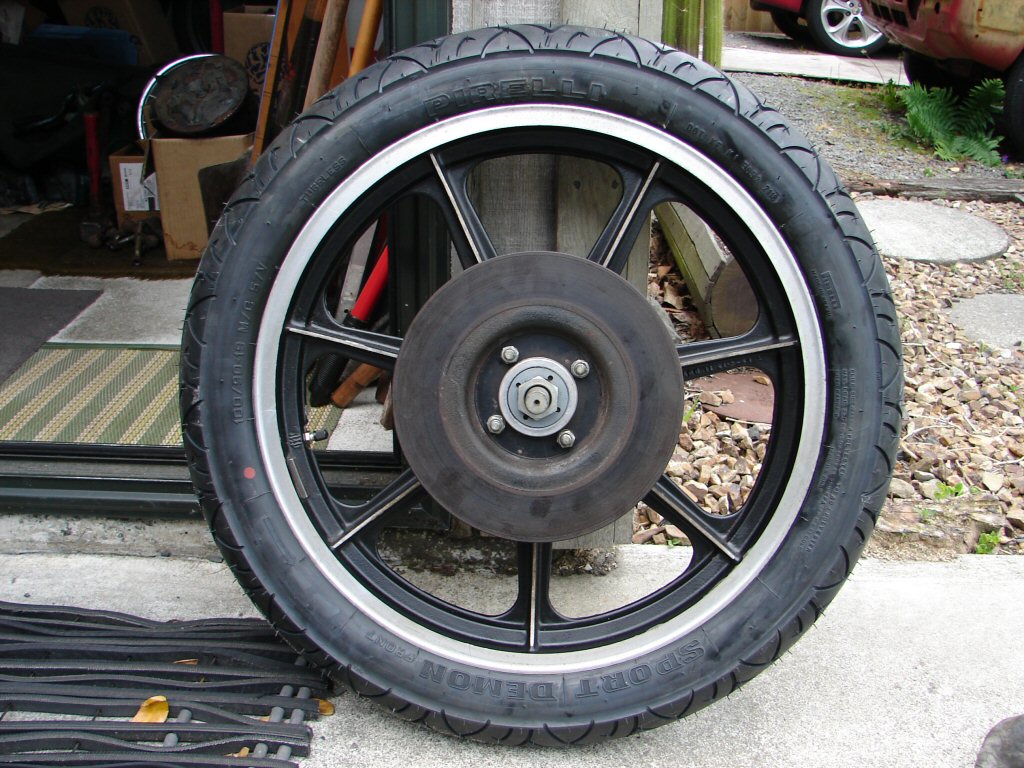
After this I removed the front wheel and took the disks off prior to fitting the new front tyre. I chose a Pirelli Sport Demon as I have been very impressed with one on my Trident. I was astounded at the improvement in both cornering and the general feel of the bike when I first fitted a modern profile tyre on my bike, and now do the same when working on other bikes. Unless you had tried it you might stick with the old TT100.
Cleaned the wheel and the disks then wire brushed all the nuts and bolts prior to assembling the lot and refitting it to the bike. The cleaning of the whole bike seems to be taking place simply as a function of having to strip everything.
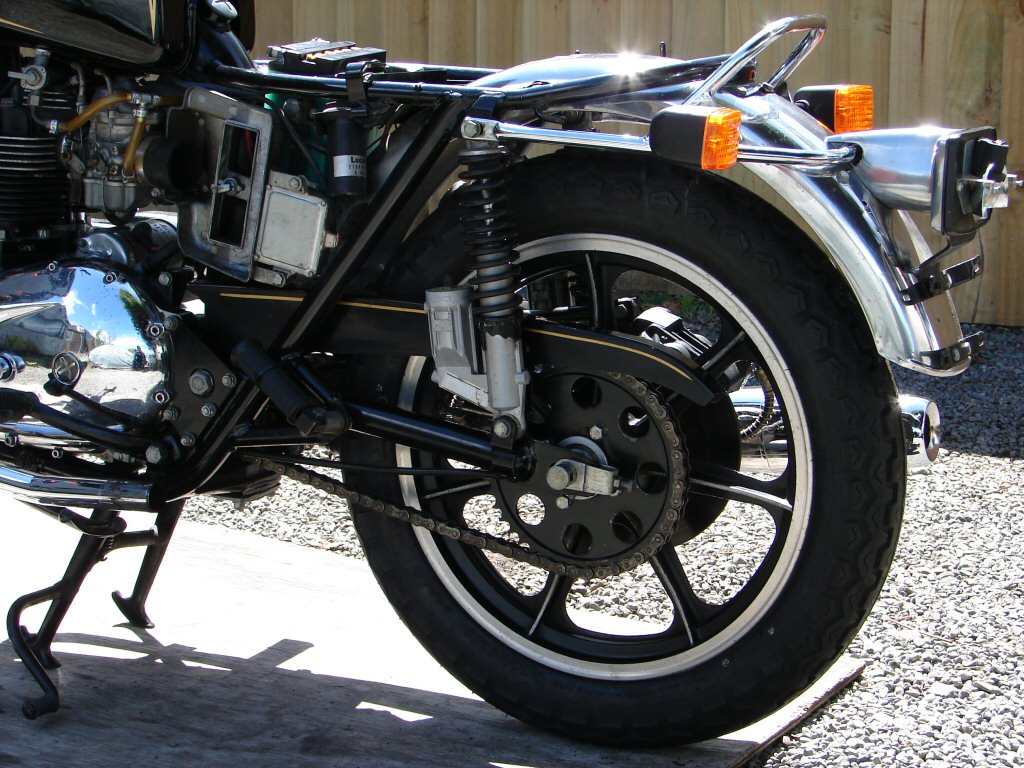
And then another day. Removed the rear wheel and repeated the process. The tyre on it had been a 120/90 metric size, but when the shop suggested same I declined in favour of the 'proper' size which is 4.25 of which they had a TT100 on hand. I have no problem with these on the rear and their fairly hard compound promotes a pretty good life expectancy.
There is another advantage which I was more interested in though. The narrower profile meant I was now able to align the front and rear wheels properly and not have any contact with the chainguard. Thats always fun.
Tomorrow I will wire brush the chain. How much fun can I stand.?
Well - I survived the fun fest and the chain seems happily to be in good enough condition to do another tour of duty. A good dose of chain lube encouraged it greatly.
Now looks like this.
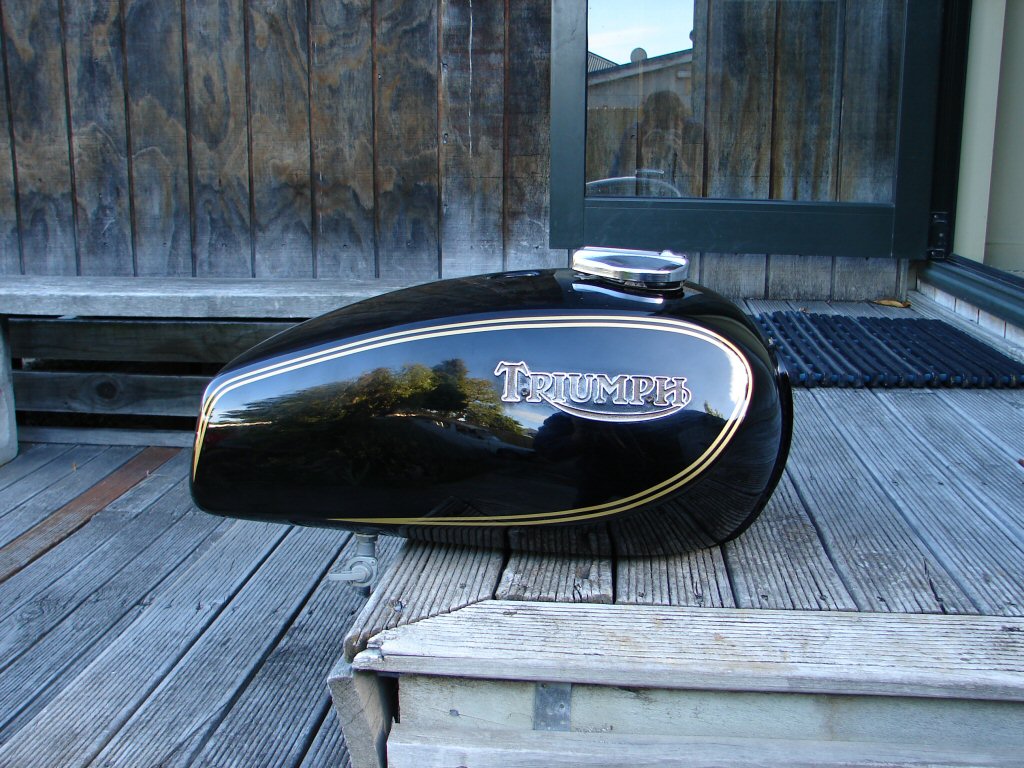
And then - more good news. Today I poured some fuel into the tank to see if/where it might come out. Best of all, none came out, so the tank seems intact. I had already blown through the fuel taps so I knew they were mostly doing what they should, but now I also know that they both flow fuel and shut it off. Two rather necessary functions, and exactly what they are there for. During a prolonged saga like this bike has produced you get to trust nothing at all, so this is a most positive step.
Yay.!
Next trick would be to find out why the engine had no oil pressure. Despite kicking it over lots and even spinning it over on the starter - pleasing to find that working - the oil light would not go out. I had filled the oil tank and primary drive and was sure the problem was related to the oil pump not self-priming. It had been sitting for several decades after all. I read something on an owner's forum suggesting that removing the oil pressure relief valve might help, so I did that. Sure enough, after four or five kicks oil began trickling out of the opening, so I put the valve back in and gave it a spin on the starter. Oil light went out in no time at all, and remained out for more than 30 seconds. A good sign indeed. I continued to turn the engine over until oil began to return to the oil tank, so now we had both sides of the pump in business. I would never attempt to start any engine without first knowing it had oil pressure, so this was an entirely necessary step. And a great result.
As it was late in the day I decided to attend to two other small items, being the rear indicators and the tail light. The indicators were at an odd angle and could not be prevented from rotating, which they surely would with the vibrations caused while the bike was in use. The rubber mountings are not available in NZ so I decided to try using a pair of washing machine hose rubber seals to pack the mountings. This worked a treat, and now the stems were firm I was able to apply some force and get them to something approaching horizontal.
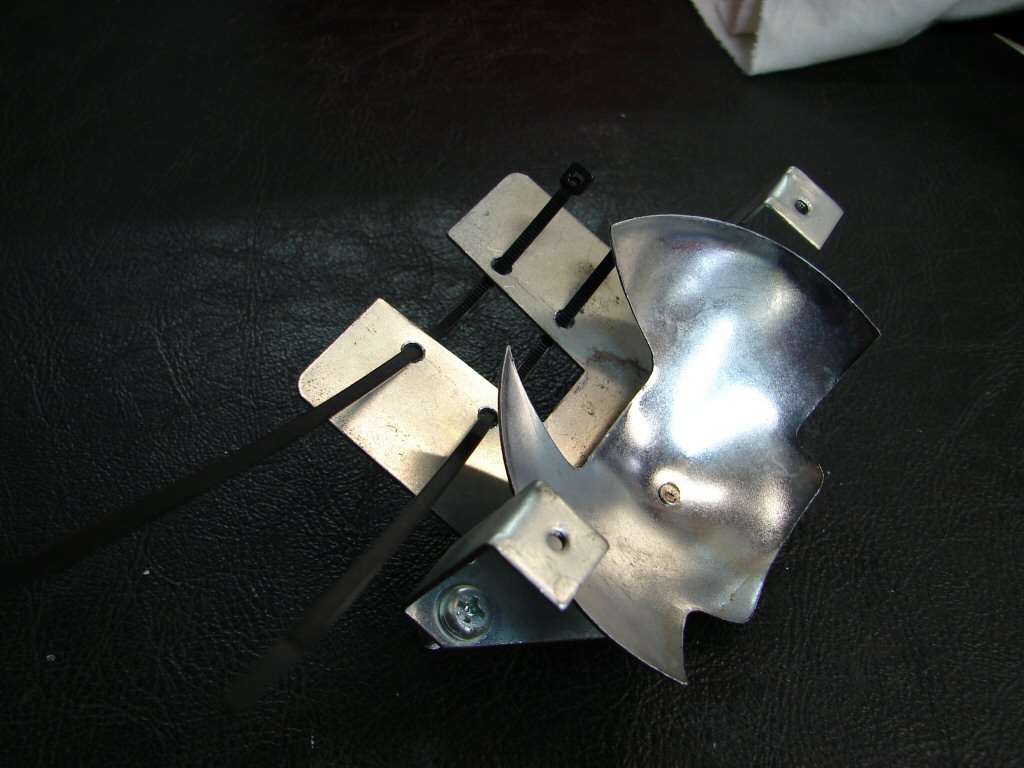
The tail light had suffered a common problem with this type, whereby the rubber lampholder will not remain in its slot in the backing plate, so the whole thing drops to the bottom of the lens until the lamp fails, or the wires break, or all 3. Solution is to drill 4 holes in the backing plate and use some very thin cable ties to prevent the rubber from leaving town. It is important that the rubber can still move enough to absorb vibrations or the lamp will fail on a weekly basis. More importantly - it will fail on the way to the compliance test.
Holes drilled and cable ties in place.
Assembly refitted and job complete.

So today there was nothing for it but to see if I could coax any life out of this machine after more than 30 years.
So that was nice.
A couple of things became evident during the test run. The right side carb was leaking fuel and the chokes were not working at all. This explained the prolonged start at least. By chance a friend who is an expert on BMW's saw the video and asked if the bike had Bing carbs - which it does. He had come across a couple of Triumphs so fitted which had their choke assemblies mixed up because Triumph had reversed the carbs relative to the BMW setup, but the choke assemblies had still been fitted according to their stamped identifiers showing 'L' and 'R'. I removed the choke assembly from the right side and sure enough it was stamped 'R', so the choke was in reality upside down and back to front. Dechoked carb..
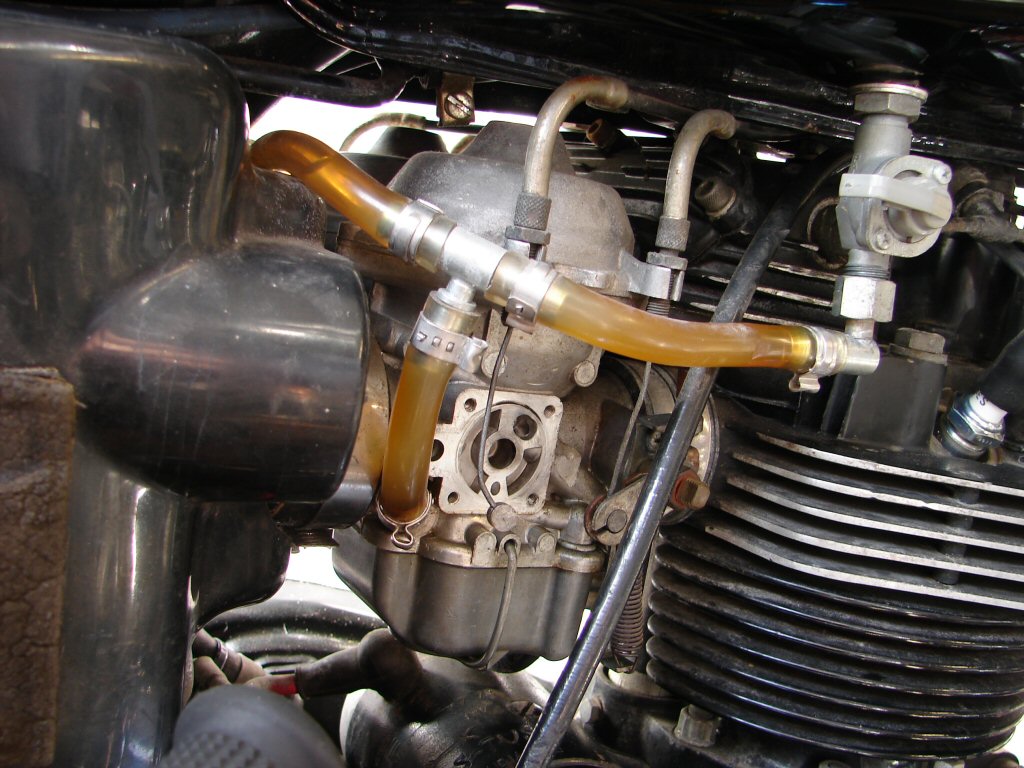
So this is how the choke had been fitted against the carb body. None of the holes were in a place where they did anything.
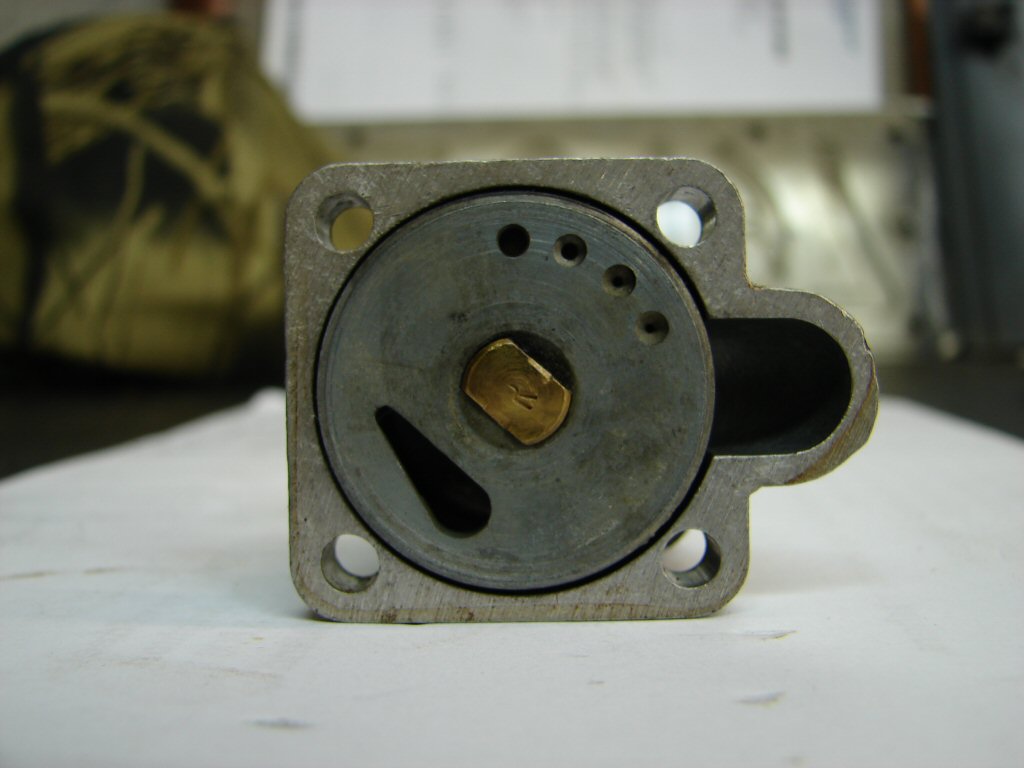
Here they are ready to be refitted in their correct orientation.
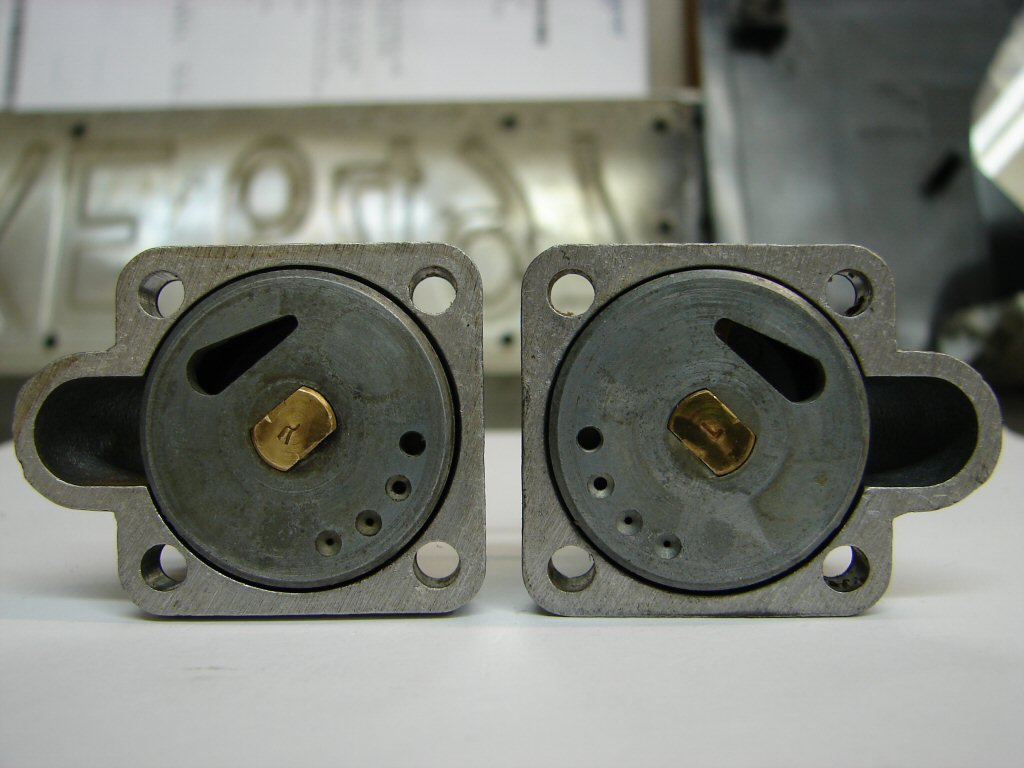
Swapping the assemblies around resulted in the second start being a much easier affair, and with a nicely controllable fast idle.
My friend was probably the only person on the planet who could have known that. Apparently Triumph Motors America ordered 50 examples of this bike in this colour scheme and trim, and they sold very well mostly due to a degree of patriotism attached to the event they were made to honour. It seems highly likely that all of them, and any other Bing carbed models such as the 'TSX' all had their chokes incorrectly fitted, and to this day that situation still exists for most likely a very high percentage of them. Seems unbelievable. BMW people are well versed in Bing carb folklore and happily one of them imparted some valuable skills to me. Hardly the first conclusion one might have come to when looking for the problem. Used intelligently the internet is a wonderful tool.!
We were now at a point where the bike could be test ridden, as the clutch had come free after the first run. The engine was slow to warm so I rode off with about half choke still on. This was to address rough running while riding down the drive, as it seemed reluctant to pull cleanly. As the engine warmed I reduced the choke until it was completely off, and the engine continued to run smoother for about a mile, after which it was very agreeable indeed. The gearchanges were clean and the controls all felt to be setup pretty much as you would want, although the rear brake pedal was too low to allow easy braking due to the amount of travel.
Because the clocks were absent it became rather obvious that the pilot lamps were both lighting up every time I braked. This indicates an earthing problem within the tail light, so that would require further attention. Otherwise indicators and headlight were all doing the right things, and the electric start was reliable and quick to elicit life. Good start. On my return I made my first attempt at tuning. Running on one cylinder at a time showed that the left cylinder was not pulling its weight, so I cranked the idle speed up a bit on that side.
Stripping the tail light proved that this was indeed a replica unit, and the wire colours bore no resemblance to those in the wiring loom. Whoever installed it had swapped the earth and tail light connections, so the brake light was earthing via the normal lighting circuit. Easy fix to swap the two connections, and all working normally now.
I removed the float bowl from the right carb but found nothing untoward, so flushed some fuel through the float needle valve and hoped for the best.
Second test ride was also brief, and mostly to warm the engine prior to a more serious tuning episode. Some odd behaviour at low throttle was still evident so this was definitely needed. Once again each cylinder was tuned with the other not running, although I leave the spark plugs in place, and fit another plug on top of the engine so that the spark can dissipate in the normal way and not risk upsetting the electronic ignition. The left carb responded immediately to altering the pilot screw, and I got almost a full turn before finding the happiest spot, with corresponding reduction needed to idle speed adjustment. The right carb was spot on and nothing needed there, but now we had a much more balanced sounding idle, and throttle response was immediate without any sign of hesitation.
This got us to test ride No3 which would be a little bolder, and include a reasonably long downhill section where the brakes could be heated up adequately enough to get their attention. The bike was now running close to fault-free as far as idling, accelerating, decelerating and gear changing, and the braking was improving. The handling was joyous thanks to the nice match of tyres, the Pirelli clinging well at the front and the rear tracking perfectly and handling the rear brake in a predictable manner. I do not usually make this many comments about test ride performance but I was most impressed with the bike. My BMW friend had noted that a similarly kitted Triumph from this model year had impressed him by being the fastest Bonneville derivative he had sampled, and I was getting the same impression. However there was something more. Often with 750 Bonnevilles I get the feeling that the engine is unhappy with higher revs, as the vibrations build up to a fairly serious level which I find disturbing, as it feels like a 'thrash'. This engine felt lighter, smoother, and seemed to get better as the revs built up. I had heard somewhere that this engine uses the later TSS crankshaft, which was reputedly stronger yet lighter. Perhaps that is the explanation, but it flies through the gears and is a delightful ride. This bike has just ousted the T140 Special as my preferred choice of T140s, and it is all down to the sum total of its parts.
The only negative on this ride proved to be the suspension. It was too soft at both ends, with the front forks diving excessively and failing to handle bad bumps, while the rear felt both undersprung and underdamped. On my return I decided it was time to investigate the Marzocchi shocks, which are both oil and air. There is an air valve and a label stating correct inflation pressure to be 28psi. The reservoirs are tiny so a hand pump would be safest. I did not have one with a gauge, so instead I dumped the pressure off my compressor until it only had 34psi. Both air valves immediately leaked out any air I put in, so I removed the valves and cleaned them. Now they both held air, and I found that inflating them to 34 resulted in very close to 28 after the small loss that occurs as the pressure line is removed. The spring preload was set one notch below max, so I cranked that up.
The front forks had leaked an amount of fluid in the past which I had cleaned up, likely down to over enthusiastic tie downs. I drained the fork legs and found what looked like the remains of the original transmission fluid used by the factory. I replaced it with the correct amount of 15W fork oil and found that there had been no further leaking from either fork seal, which bodes well for the compliance test. That is where we are at tonight.
After months of nothing happening with the clocks, a chance conversation with the repairers revealed that the stumbling block was a lack of parts for the tripmeter. Previously they had said it was the odometer, so I told them not to worry, we could make do without it. It is only a 'modern' invention after all. Sheesh. Two weeks later they were ready, so I grabbed them immediately and slotted them in place.
A new discovery was that the end of the tacho cable had been chewed off, presumably because the tacho itself had partially seized. I promptly ordered one, but deliveries are sporadic during this current time of pandemic lockdown. At least I could test ride to check the speedo. I did that after greasing the cable inner, and it proved to be seemingly accurate and smooth in operation, so whoopee. Lo and behold, the tripmeter is operating, although perhaps it cannot be reset. Who cares.
Unfortunately the brief test ride revealed another problem. The fork seals were indeed in trouble, and the rough piece of road that marks the start of my test circuit quickly had fluid weeping from both dust covers. This is a no-no for the compliance test, as it can result in oil finding its way to the disc pads, and as such is a "safety" issue. Red flags and all that.
These forks are the later type with a circlip retaining what were later marketed as "leakproof" seals. This pair have decided not to play. A new pair were not far away, and arrived within the week. Consequently I had to move a bit of other stuff to get enough access so I would be able to pull the fork sliders off. The weather precludes moving bikes outdoors just now, so its a case of working anywhere I can.
Pleasingly they are coming apart easily. The new fluid was already rather discoloured, obviously there was still a bit of ancient grunge within the spring coils and the damper, so great opportunity to ditch it and give it a second lot on reassembly.
The fork sliders cleaned up nicely and the seals went in without complaint. Once reassembled I took it out for a buzz along the bumpy route and it returned oil free. I gave it a quick test of all lights and electrics as a final precaution, to find that the horn had ceased working. A quick check showed no power arriving at the horn. I removed the left switch cluster and pulled it apart, but all appeared fine. It now worked, but when I reassembled it the problem returned. A more complete strip revealed that the main power feed to the horn button and headlight flasher had lost its solder connection. Easy solved. Now both the horn button and the flasher worked, so that had been lurking for a while.
Done.!
Time to arrange the compliance test. My friendly testing officer was going to be on duty on Wednesday and Thursday, so I chose early Wednesday. It was kind of chilly at 8am heading through town, but the bike ran sweet enough. The girl at the counter took all the paperwork and attempted to find the customs entry online. It could not be found. Not the best start, but she decided to let the testing officer be the judge and I wandered off for a coffee. I got a call an hour later to say all was well. The bike had its wof and the customs dept had incorrectly logged the bike's VIN number on their records. What hope for the average bloke we wonder. Final move was to buy the plate and 6 months rego, which is the minimum requirement, and as this bike is not yet 40 years old one pays the full rate. Ouch.
A great ride home with the new plate under my jacket - this is always a happy time - the last hurdle cleared. Drilled holes in the new plate and mounted it up.
Good to go.