February 2025
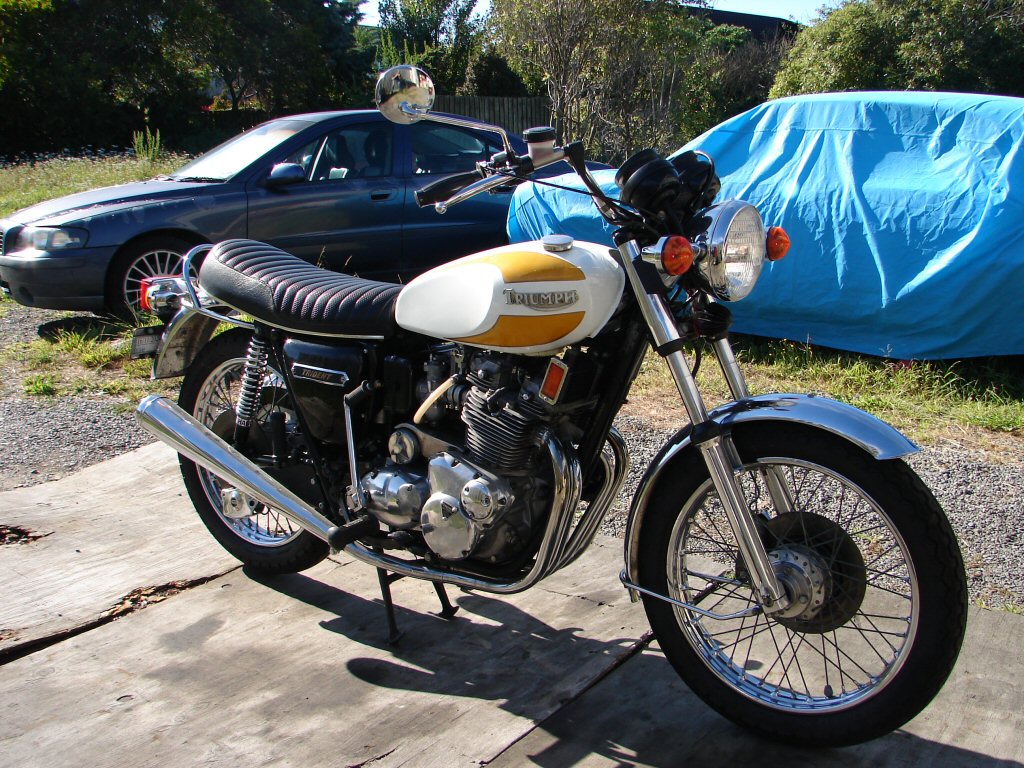
1975 T160 Trident 750
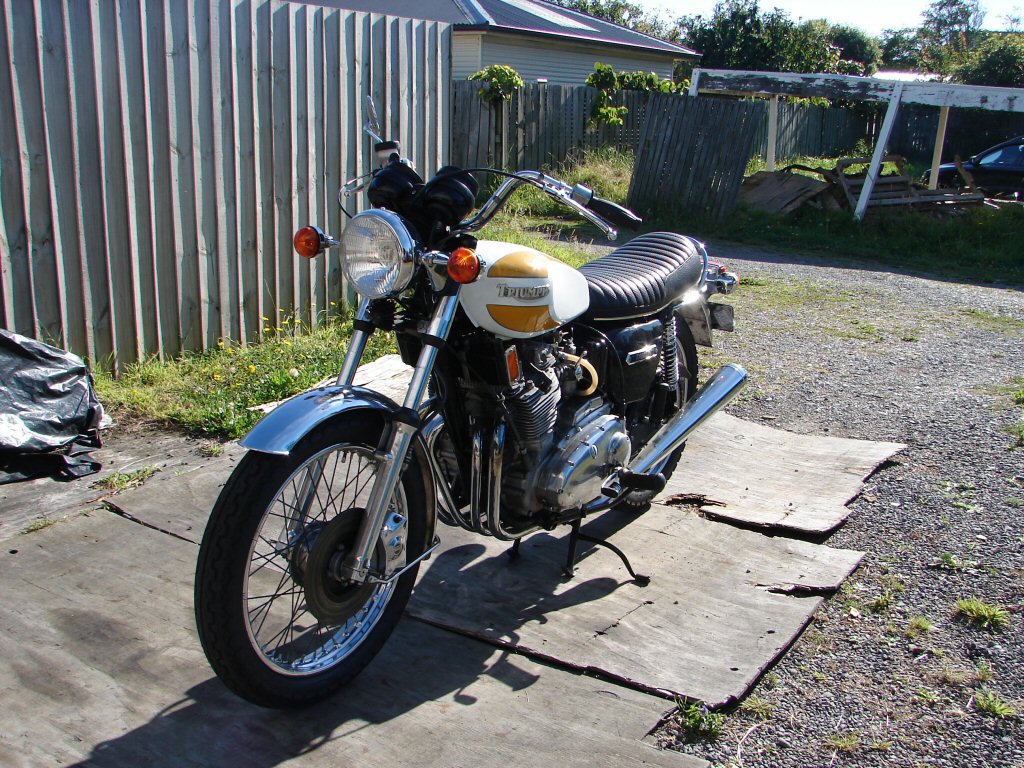
This bike was one of a pair shipped down from the t'other island and the story was that it was rejecting its Trispark transplant. The bike had suffered a mild accident, although even mild ones cause a lot of expensive damage, and was now repaired and otherwise fit for service, although it had overall spent quite a long time out of action.
Wheeling it from the transporter to my shed revealed that the rear brake was semi seized and complaining loudly, and the extra effort required to push it revealed that the handlebars were a bit loose in the mounting bush arrangement in the triple clamp. I could also see a bit of brake fluid sitting on the nut which secures the fluid pipe in the front caliper, so we had a few quality issues to attend to besides the ignition.
Otherwise looking great.
Sometimes a bit of grunge can form in the master cylinder during a layup, and this can cause fluid pressure to be held rather than bleeding off. I gave the rear caliper a trial bleed but it made no difference, which hopefully means the cylinder will not require stripping. So, I figured that I would just spread the caliper pistons a bit meantime to ease pushing the bike around.
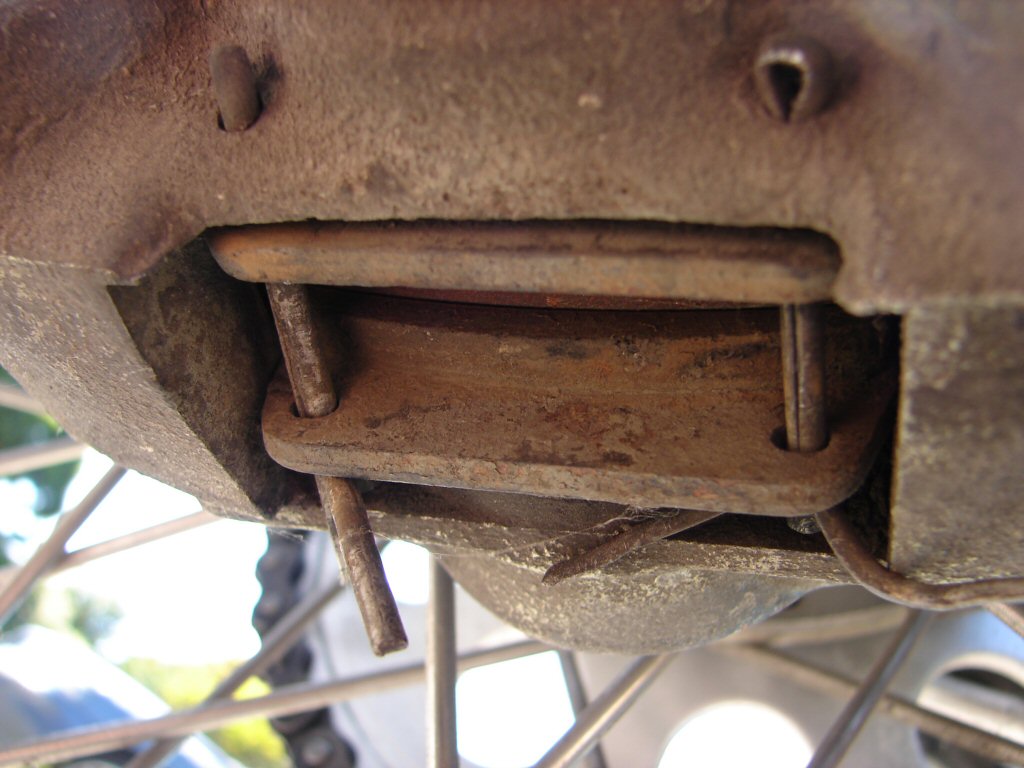
What I found may provide the answer to the problem. The two retaining split pins have been folded against the inner disk pad rather than passing through the far side of the caliper body first, so are effectively holding the brake on.
I think we can improve on this.
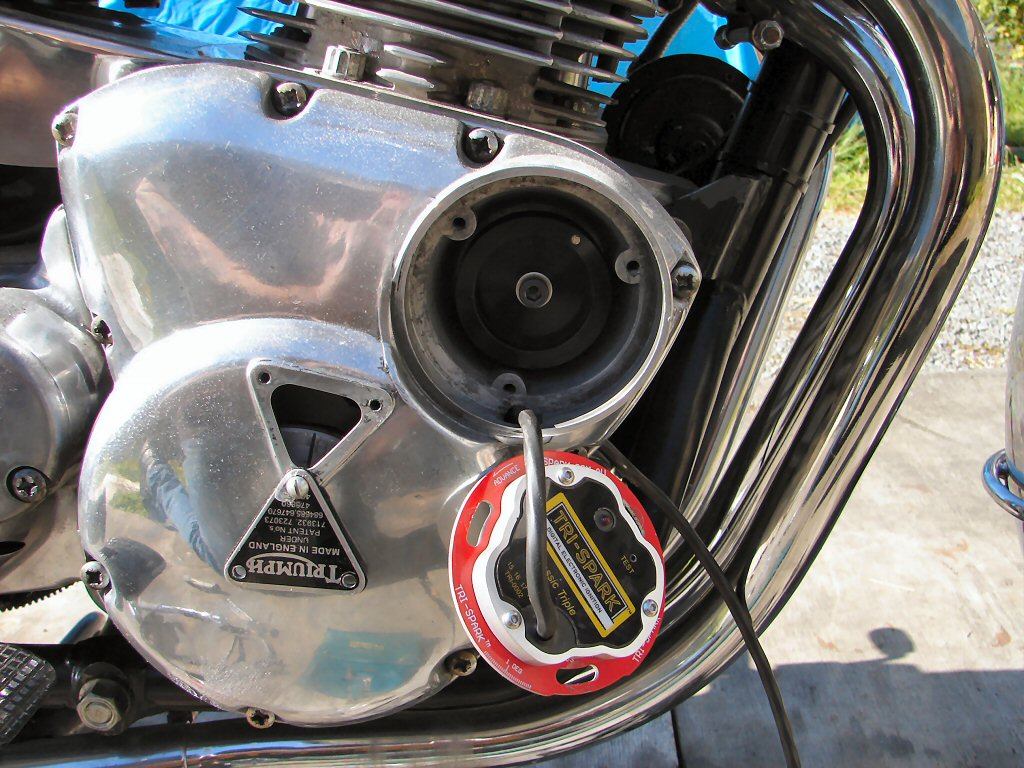
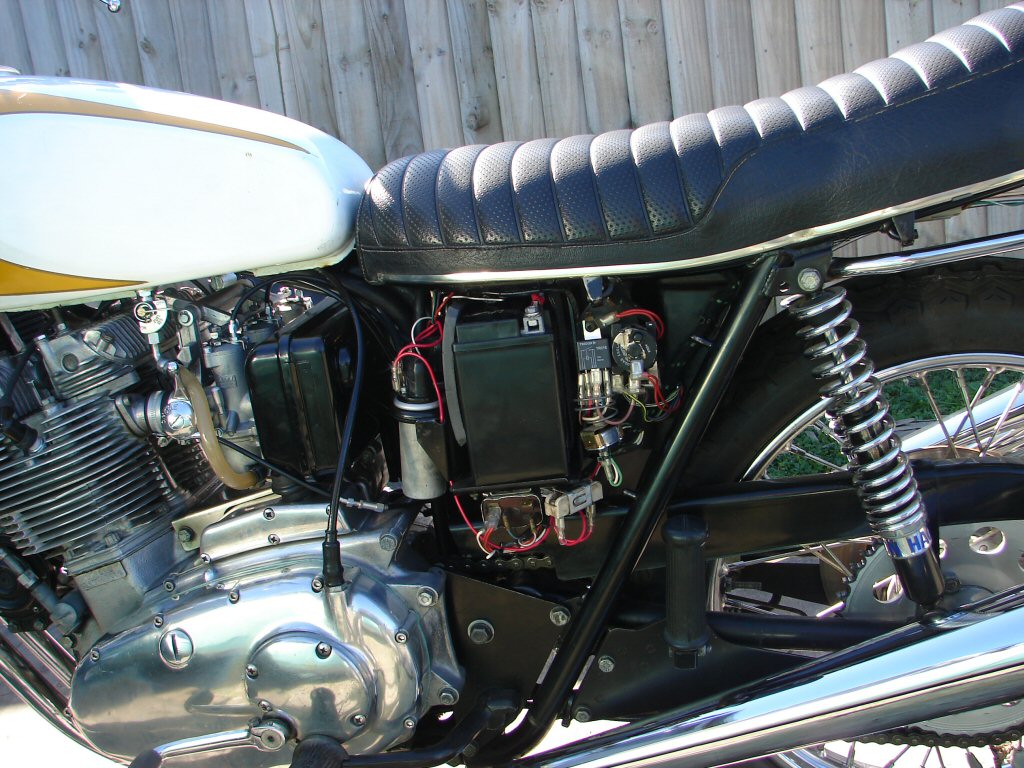
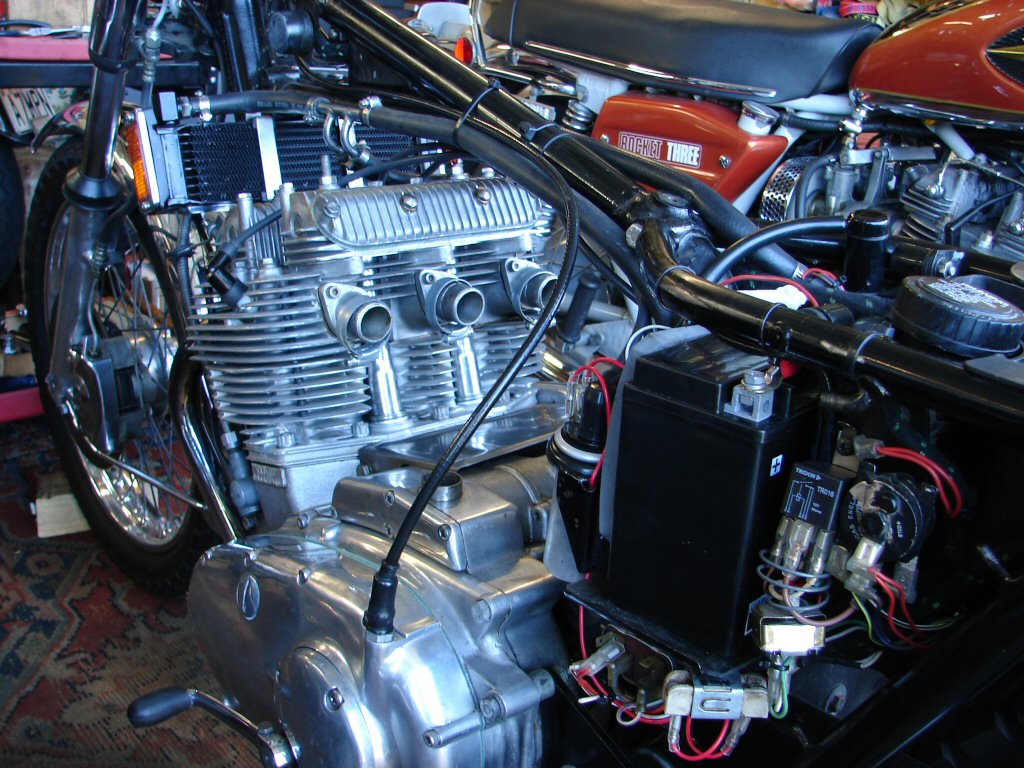
Meanwhile - on with the brief. The 4 volt coils came out and a set of 6 volt that came with the bike went in. The Boyer black box and associated wiring also came out so we can concentrate on just the wiring that needs to be here.
Next step - Boyer pickup coming out..
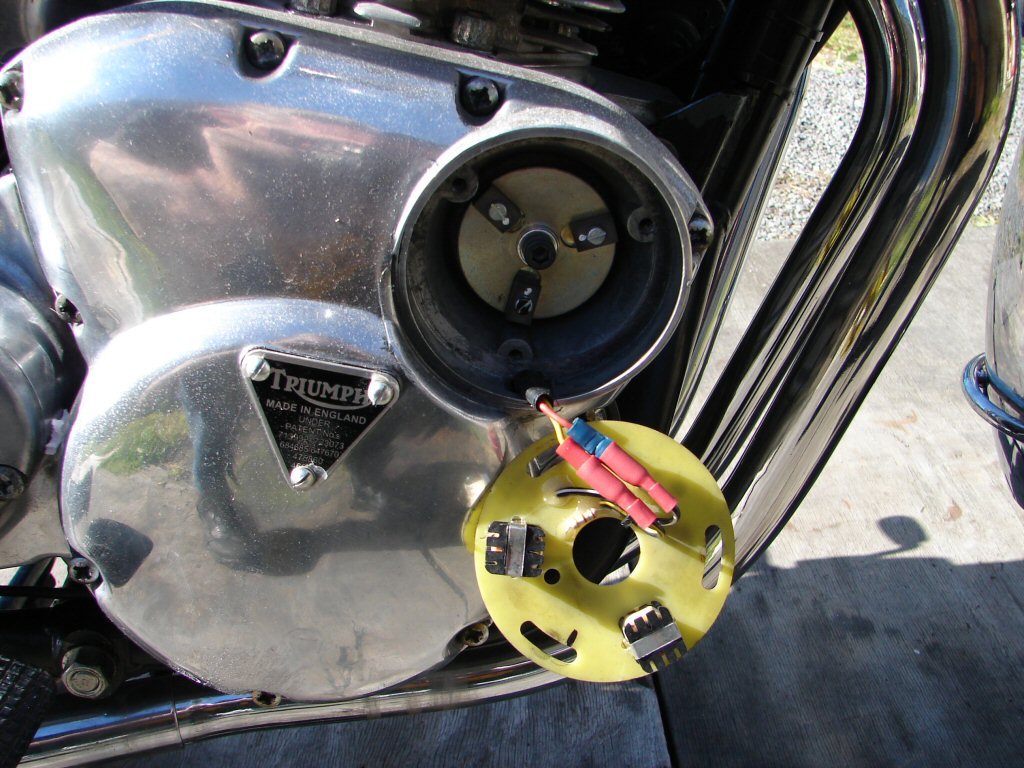
.. and Trispark unit going in having set the crankshaft at TDC timing side piston then backed up until the crank drilling and the timing mark agreed that we were on the firing line.
As the Trispark has its own wiring loom attached, that gets run all the way to the coils and the rehash of the general wiring in that area comes together, including new earth wires for all coils via the reinstated original ballast resistor, and a relay which I consider a necessity, especially on electric start engines. The Trispark loom is none too generous and a few wires had to be extended.
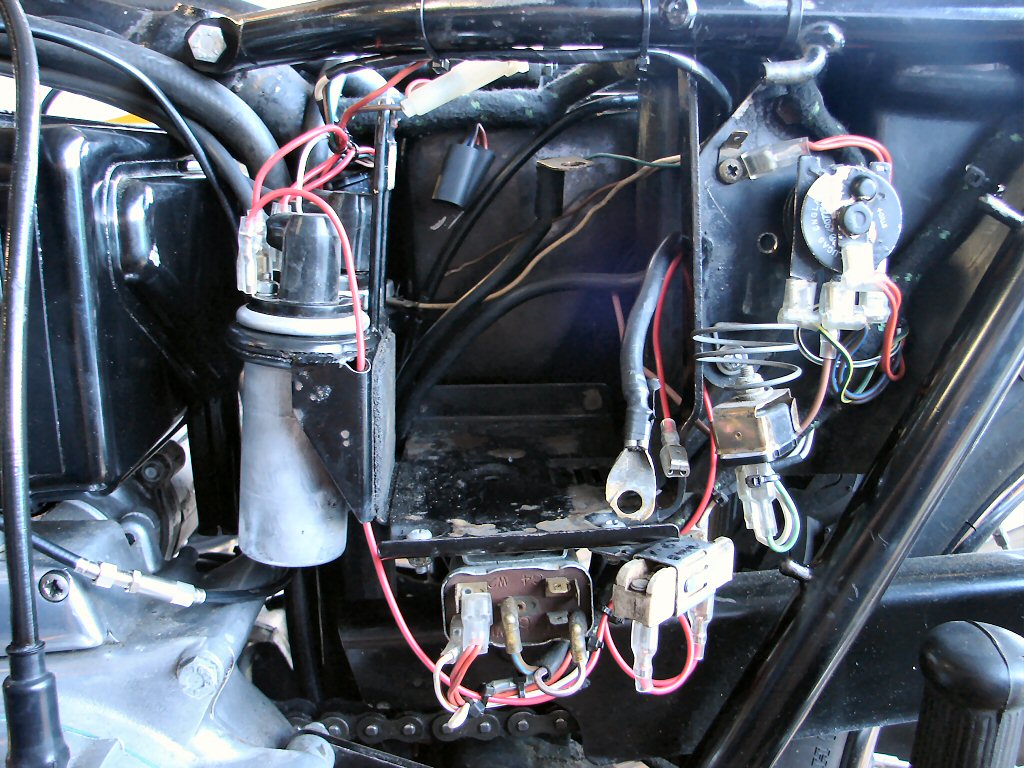
There happens to be a hole in just the right place to mount the relay behind the accessory plate. Most British bikes of this era are suffering corrosion in joints and switches which translates to volt drop loss in the circuit, so the electronic ignition can be faced with trying to operate on only 9 or 10 volts. The circuitry will be only too pleased to now need to deliver only a few milliamps with which to operate a relay, which in turn delivers everything the battery can muster straight to the electronic ignition, with dramatic results in many cases.
This is most beneficial when a starter is cranking away, which is absolutely worst case scenario for the battery.
I did a bit of remedial on the rectifier and flasher unit connections in order to straighten various bent bits, and to give all of it the best chance of functioning happily for a long time.
With a more highly evolved electronic ignition joining the mix it is wise to check the viability of the entire circuit from pickup to spark plug, so I checked the nearest plug lead and found a commendable zero ohms between coil and plug. I had already noted that the plugs themselves were NGK B8ES, being a direct swap for Champion N3 in most respects, but I then had a sudden thought.
That this Trispark had been fitted previously but not worked successfully was a concern in that it could be a faulty unit - they are not unknown - or that some other condition may exist that would foil it. Such as there being no RF suppression, whereby the crude charging system can feed electrical noise into the Trispark which confuses it. As there is no form of suppression present here by leads or caps - which I prefer - there need to be 'R' type plugs, which have an internal resistor. Whether this would completely stuff the Trispark's ability to work I do not know, but it is one possibility.
Hopefully we are soon to find out.
Before we get to even look for signs of life however, there is a leaking fuel tap which I was warned of, and it needs to visit its supplier who is local, so that will be the next thing.
Meantime we are beginning to look shipshape.
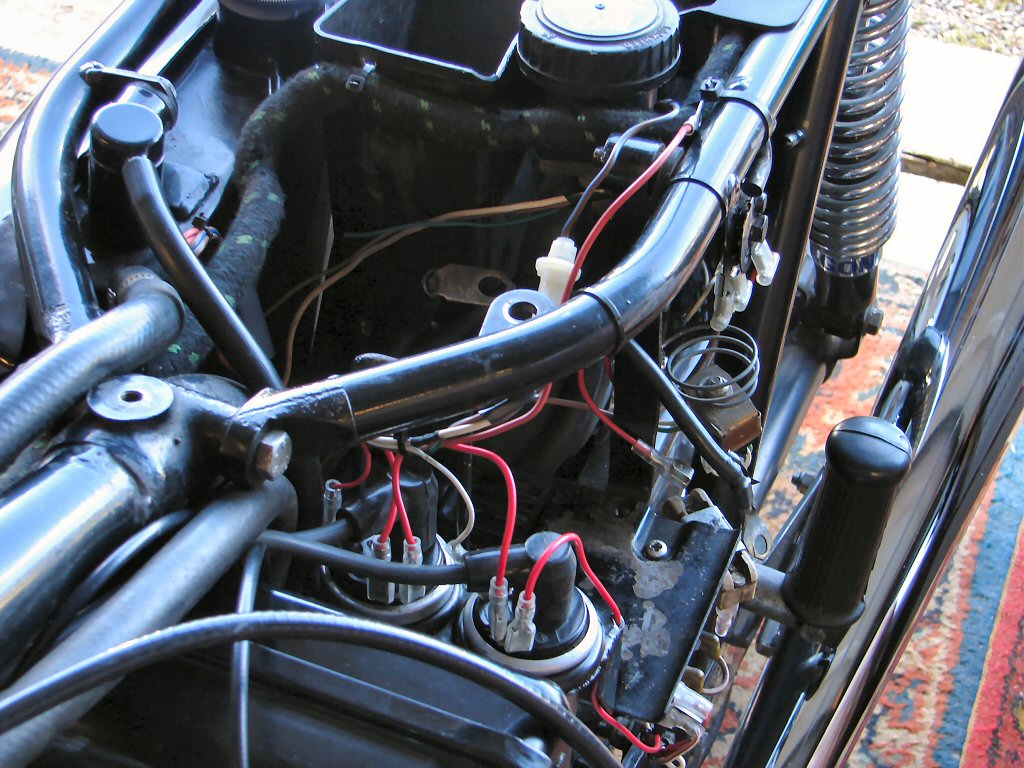
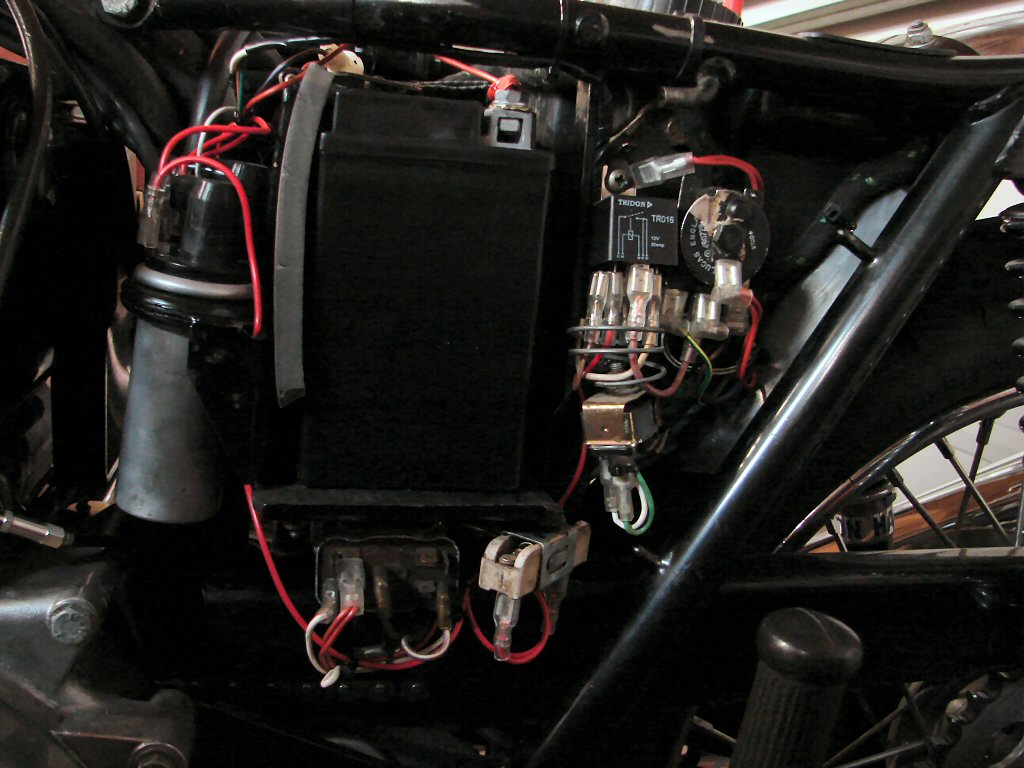
In a stroke of luck I found that the relay would neatly fit on the outside of the accessory plate, and as things that are easy to get at seldom give trouble I figured it was a good omen. So that got mounted and wired, and then the new supplied battery got fitted so we could check everything out. I usually put red tape on the positive heavy current battery lead just to make it more obvious which lead goes where, but this time I also taped the only wiring loom earth under the red tape, and the fused negative supply got black taped to the negative starter heavy current lead, which makes things much less fussy and almost impossible to connect the wrong way round.
Turning the ignition on now gives an audible click from the relay - a good faultfinding aid - and the Trispark LED lit up after I gave the unit the slightest rotation in the advance direction, so everything is making sense. I have the new plugs lying on the head with their respective leads attached so tomorrow I will hopefully get time to kick the engine over and see that we have our three well timed sparks.
Yes - we have three sparks at separate intervals, so the unit appears healthy. I find with most electronic ignitions that the static timing will get you an engine that runs, but usually they are a bit retarded from optimum, so I give them a fraction more than suggested. Getting a strobe light on the job is critical though, and I try to do that on the first run.
The fuel tap is still being repaired so I cannot do that yet, so being sunny today I took the bike outside and attended to the brakes. The rear brake responded to having the pistons pushed right back, then fitting the pads and pins, pumping it up and bleeding it. I also bled the front brake and we have made an improvement at both ends.
I had also undone the handlebar clamps and lifted the bars far enough to remove a couple of naff rubber washers and plain washers instead of the hemispherical type, then fitted it all back together in the order I use and now we have some nice firm bars which can move but do not until pushed pretty hard. You notice such things when pushing bikes in and out of the shed mostly.
Working in a confined space I brushed past the left side muffler several times and noticed it was kinda loose compared to the other side. The problem turned out to be the muffler clamp, and I took the opportunity to rotate it slightly when I tightened it fully. When the clamping bolt is directly beneath the pipe it can contact the road under boisterous cornering, so I always set them slightly angled inwards to prevent them getting ground down. I made the same adjustment to the good side.
While working at floor level I had noticed that the primary chain adjuster was so far out that there was a half inch of thread exposed above the dust cover. I removed the inspection cap and checked the chain, which felt maybe a bit on the slack side. I wound the adjuster up a good half inch before I felt the chain tighten up, whereupon I locked the adjuster up at the correct tension of the chain. It would seem that there had been zero tension on the blade until now, and the dust cover now rests where I would expect it with no exposed thread. No great deal really, but it would equate to some jerks during gearchanges as the chain went from one extreme of slack to the other.
A good random find.
The fuel tap returned, so the tank and seat went back on prior to attempting a first start. Apparently there was some rust found in the tap which was causing it not to seal, and when I turned the fuel on the first time the right side carb immediately flooded, so perhaps it got to the float needle as well. I removed the tank and gave it a swill, but could see nothing in there that might have been a problem. It had smelled like rather old fuel, so I added a good amount of new and no troubles since.
The start was successful although the bike was not happy at all, which I now attribute to the degraded fuel. Because I was not getting results I decided to check the valve clearances, and before doing that I always retension the head, during which I found quite a variance in tightness, and as most studs went down further than I loosened them I discovered that all the valves were too tight now.
Having discovered that, I did a quick compression test which showed everything to be in top order.
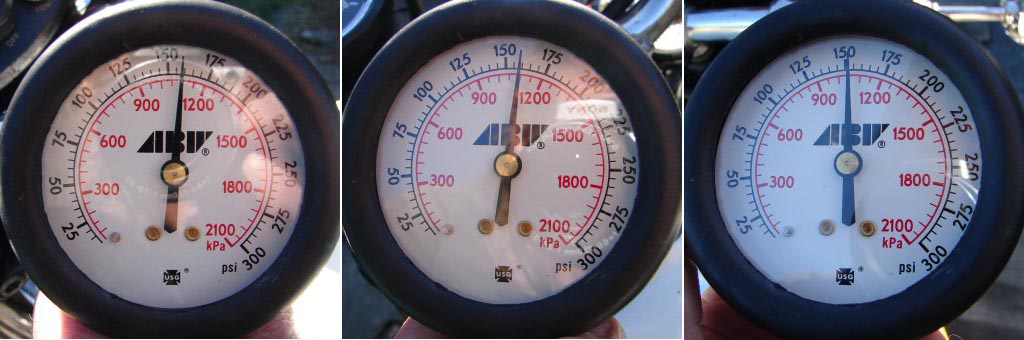
Seldom get three compressions as close as these, but as the gasket responded to a retighten, I will check it again after a test ride.
It took quite a while to get the carbs all breathing the same amount of air, and the plugs were looking quite sooty, but I finally got a good idle so I took a ride across the ponds to the nearest gas and put a gallon or two in the tank.
On the return run the bike continued to improve and that would be down to the volume of new fuel reviving the old to the point where we were happy. Sure enough the plugs were looking much better when I got home, so only an idle and pilot screw adjust completed the operation.
A phone call later I remembered that the plan had been to replace the rocker box gaskets while the bike was here, and some aluminium ones had come down with the bike, so that will incorporate the head retightening as well. It also suggests that the old rocker box gaskets were probably the weetbix packet type, which is why the head had lost tension, and the aluminium items will ensure that doesn't happen again.
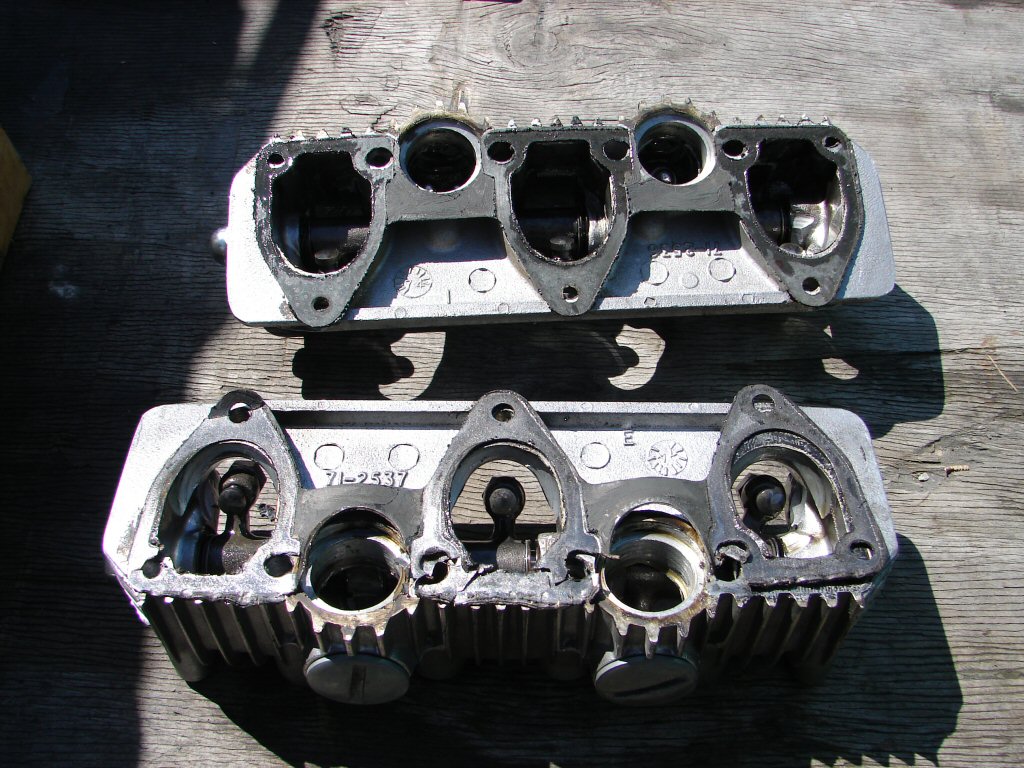
Sure enough, the weetbox packet had squashed and broken up. As the head bolts go through these gaskets as well as the solid copper head gasket, the degrading of these loosens the head studs and allows both leaking of oil and compression.
It is a total waste of time installing any of the rocker box base gaskets that come with any gasket set, as they all end up looking like this and causing lots of grief on the way. The reason Triumph adopted a solid copper head gasket was in part to improve the stability of the joint, but unless an equally resilient gasket is used here, the game is bound to end badly.
There are both solid copper and solid aluminium gaskets in circulation, but the aluminium items have more accurate placement of all the holes so they get my vote. With these installed there is usually only one head retighten and valve adjustment required after assembly. I always release head bolts by 1/4 of a turn so that I can tell if they tighten further, as if not there is no need to check if the valve clearances have altered.
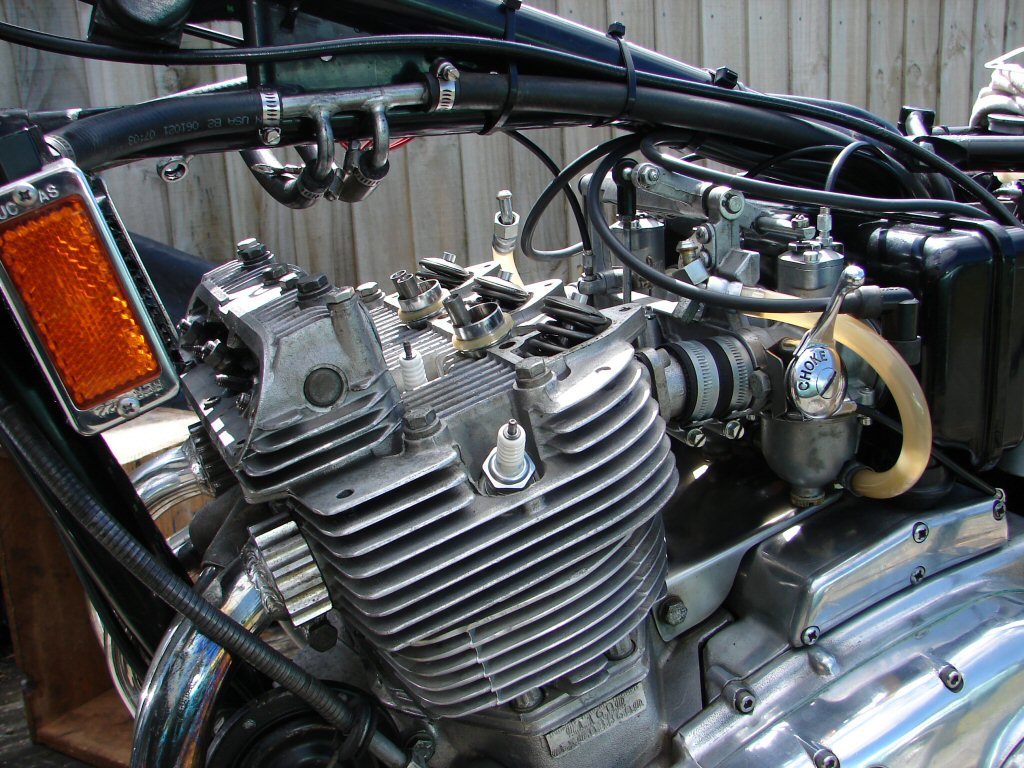
I always fit the exhaust rocker box first, as on Rocket 3 and more so T160's the pushrods fall away from the inspection hole and need to be fished back to engage with the rocker arms, so best done if there is not another rocker box in the way. The inlet ones fall towards the inspection hole and are a doddle to deal with.
There is a stay bracket for the tacho cable fitted to the left side of the rocker box inspection cover. When I went to refit it I noticed that the tacho drive unit was wobbling around and quite loose. Normally that would result in a decent gusher of oil as a telltale, but this one not so. To tighten it the inpection cover in the pic comes off and the drive gear has to be fished out with a sharply bent end of stiff wire. Behind that is a hollow bolt which tightens into the crankcase, but it is a left hand thread and requires a rather thin walled socket as everything in there is using minimal space.

Easy done, but I am beginning to spend more time on incidentals than I would like.
But reading on. With head bolted down and valves all happy again it was time to fire it up. The idea is to heat it up while tuning carbs, then when it has all cooled down we check the head tension for hopefully the last time ever. While it started compliantly it did not want to run happily until I tried the choke, whereupon it became much happier. It is unusual to find a triple that prefers choke, and this is likely due to the fact that the carbs are pretty new. With a bit of toing and froing I improved the idle but it still seemed that the three carbs all needed slightly different settings, despite having balanced them pretty well last time. Perhaps the results last time were compensating for the iffy gaskets causing some compression loss, but it seemed that there might be some extra air getting into the plot requiring all the pilot screws to have different needs.
There was also the flooding right carb issue to sort, so it was beginning to look like we needed to go backwards again. So off came the carbs.
I had noticed that some carbs would tickle quicker than others, which often suggests that there is a bit of difference in float heights, which there was, but also the aluminium float needles had some tiny burrs on their 3 ridges which were catching in the jets and probably causing the flooding problem, so they got the lightest buff on some emery paper. The floats were equalised and everything else checked out fine so the bowls went back on.
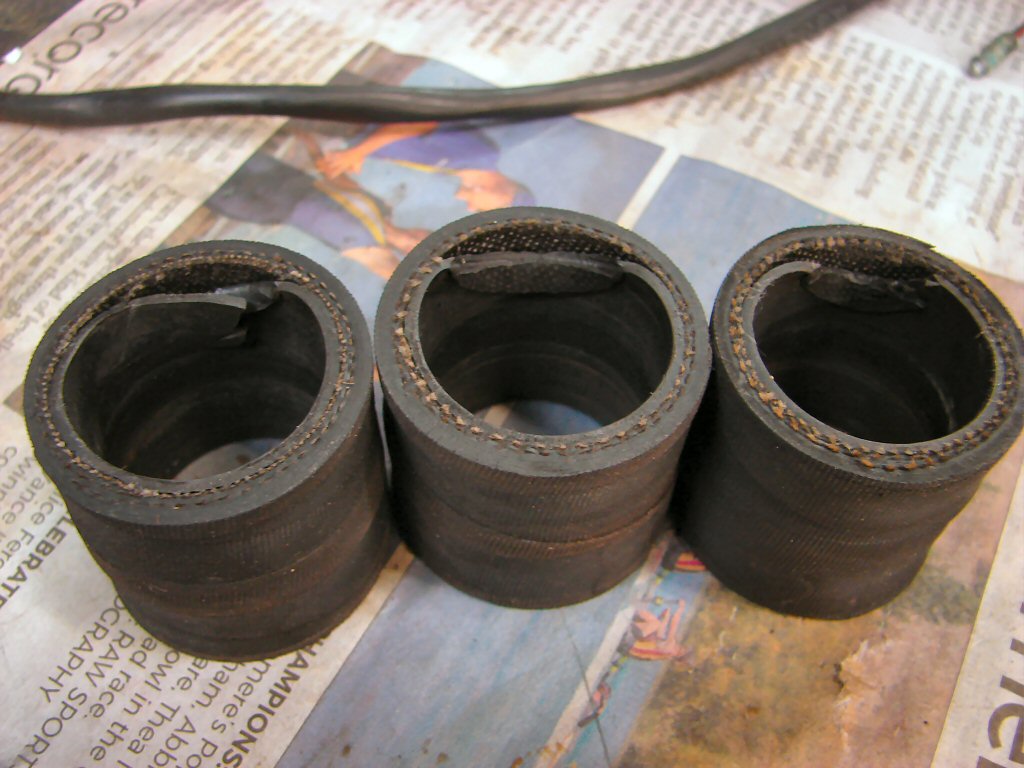
However, it was on the other side that I found what I think I was looking for. The inlet manifold rubbers are made from multi-layered hose, and these ones had decided to de-laminate and were in the process of breaking up. This usually allows tiny amounts of air to be sucked into the inlet tracts and makes it very difficult to balance the carbs.
Fancy that...
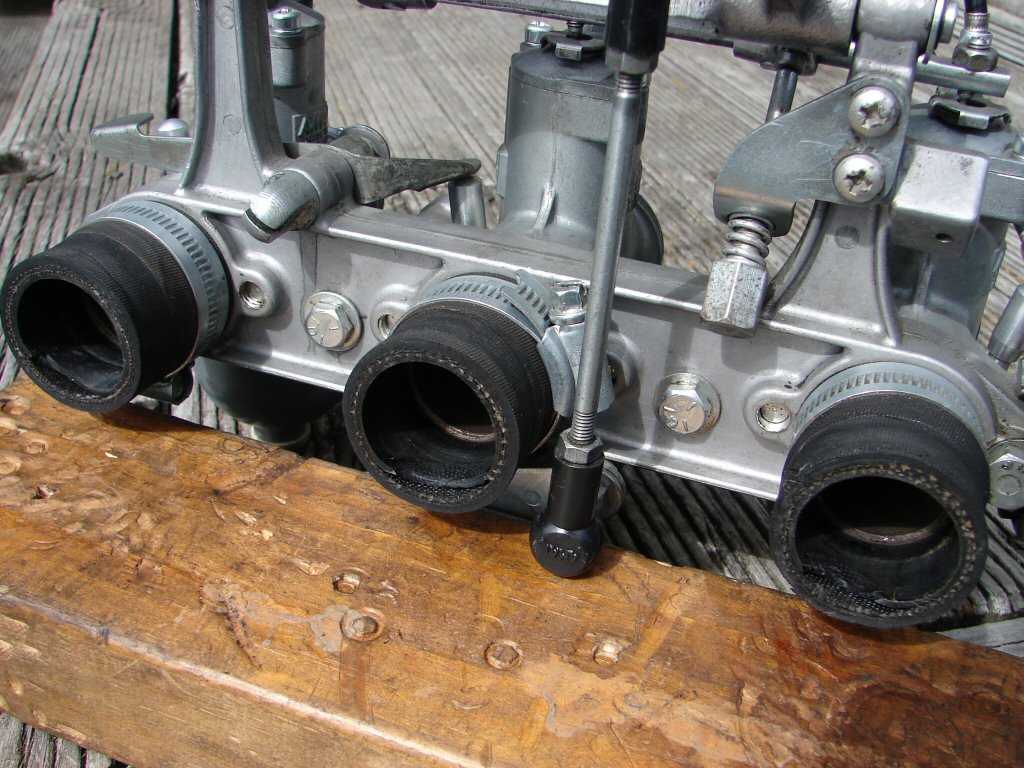
I also removed one of the pilot jets to see what size it actually was. The usual fitment is #17, which happens to be what the original Amal carbs had pressed into the alloy body. There are also some optional #19 removable jets available, which used to be supplied with the carbs when purchased, but whether for cost reasons or because nobody needed them are not now included. I have some should they be needed, but as the pilot air screws on this bike are all around the standard setting of 1½ turns out I am pretty happy that there is enough fuel getting through these ones.
As it happens I do not have a set of manifold rubbers on hand, so they are now ordered along with various other parts I have used on the 5 bikes currently in progress, so we will now await their arrival.
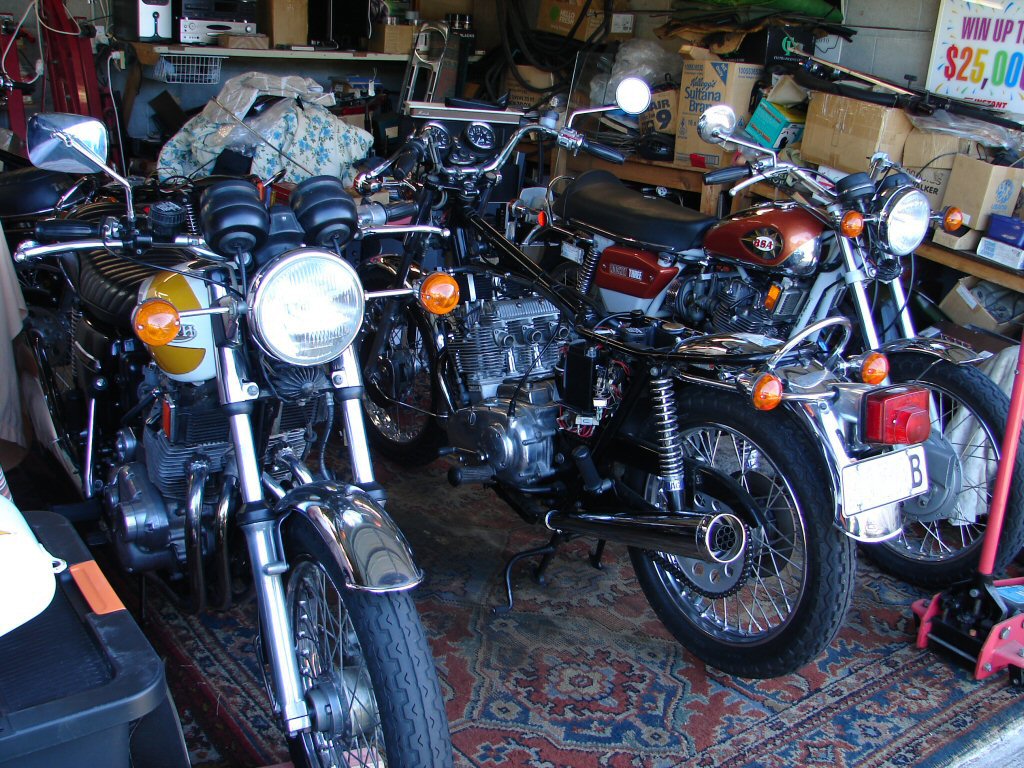
Meanwhile I imagine this T160 is enjoying the present company...
This morning I loosened then retorqued the cylinder head. None of the bolts went down any further than were backed off. A very good sign and this means another valve adjustment is not needed. I use .008 and .010 as clearances rather than the factory .006 and .008, as this was recommended by Doug Hele as helping to keep more oil film on the cam followers. It also means that there is no danger of having them over tight when doing this very manoeuvre.
Well, the new rubbers arrived today, so I quickly replaced the manky ones with the new ones and fitted the whole shooting match back on the bike. It was an easier job than some of the new manifold rubbers I have gotten in the past. The bike started without choke, but was obviously happier with it on. I warmed it a little then removed the airfilter and used my vacuum gauge to check how much air was going in each hole. The previously weaker left cylinder was now pulling the most, so after backing that off I was able to get sensible results with the pilots, and we had a nice idle again. Time for a test ride.
I rode off with the choke fully on, and after about a mile was able to reduce it to half. A few miles later it was fully off and the bike was idling around 1500rpm at the lights at each stop. I figured I would slow the idle once I returned home as this was only a brief ride to make sure it was all doing what it should. It was. I made the necessary adjustment when I got home and we had a steady 1000rpm idle.
I pushed it into the shed and proceeded to tighten the folding kickstart lever, which had been loose enough to bruise my shins on the footpeg a few times during starts. I checked the amount each pilot screw was out from fully in, and blow me down, each one is exactly 1½ turns, even though I had tuned them by ear for fastest idle. I don't think I have ever had all three exactly the same on any bike before, let alone at the factory recommended setting.!
It looks like these guys were the culprits then. They were beginning to break down and folded internally when being fitted at some stage, allowing at least one air leak.
Then I had a thought. While the bike had cooled a bit, it was still warm to the touch, so I decided to give it the acid test. I consider that when tuned correctly, these bikes should start and idle hands-off when warm, so I pushed it back outside to see.
What do you think of this.
I feel pretty happy with how it has turned out, and a lot of details have been attended to which will hopefully improve the fun factor.
Very nice ride.
I decided for peace of mind that as the bike has previously had a top end overhaul but not a full rebuild I should check the oil pressure. So I did. 90psi at cold idle so it should remain happy for a good long stint.