August 2023
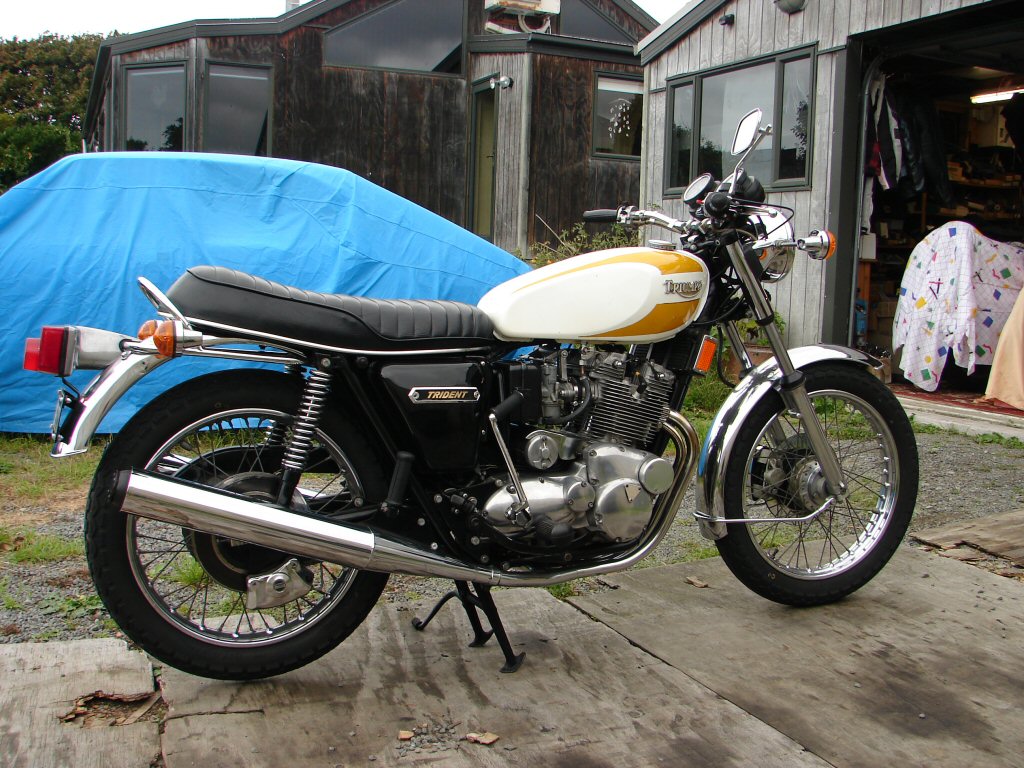
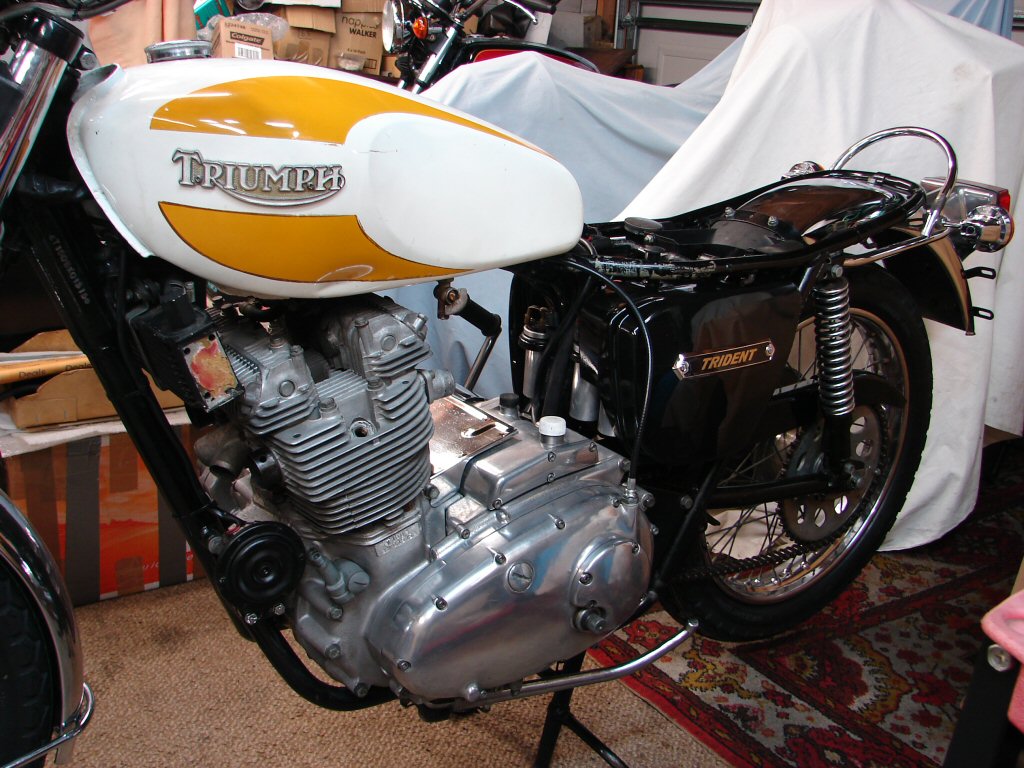
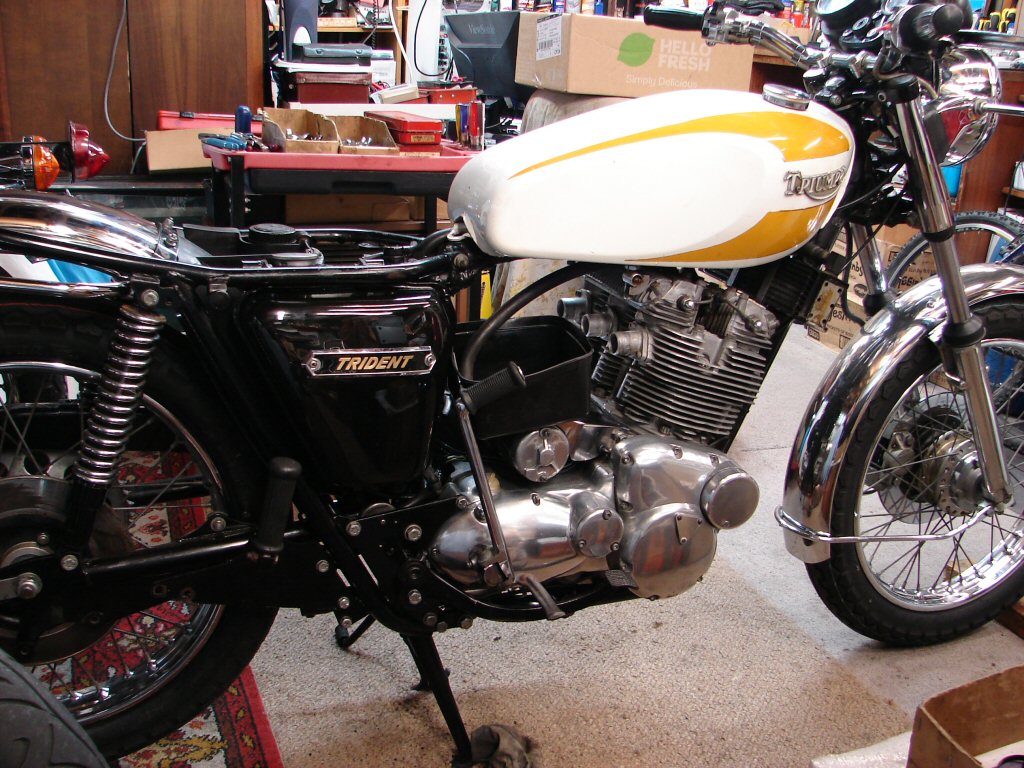
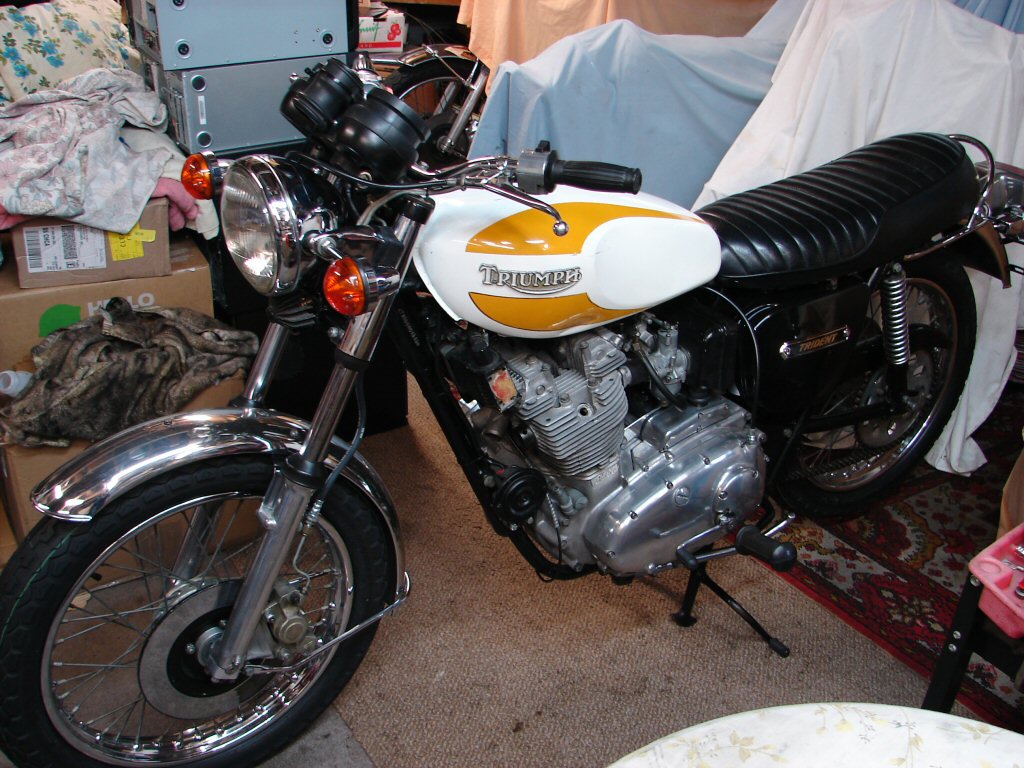
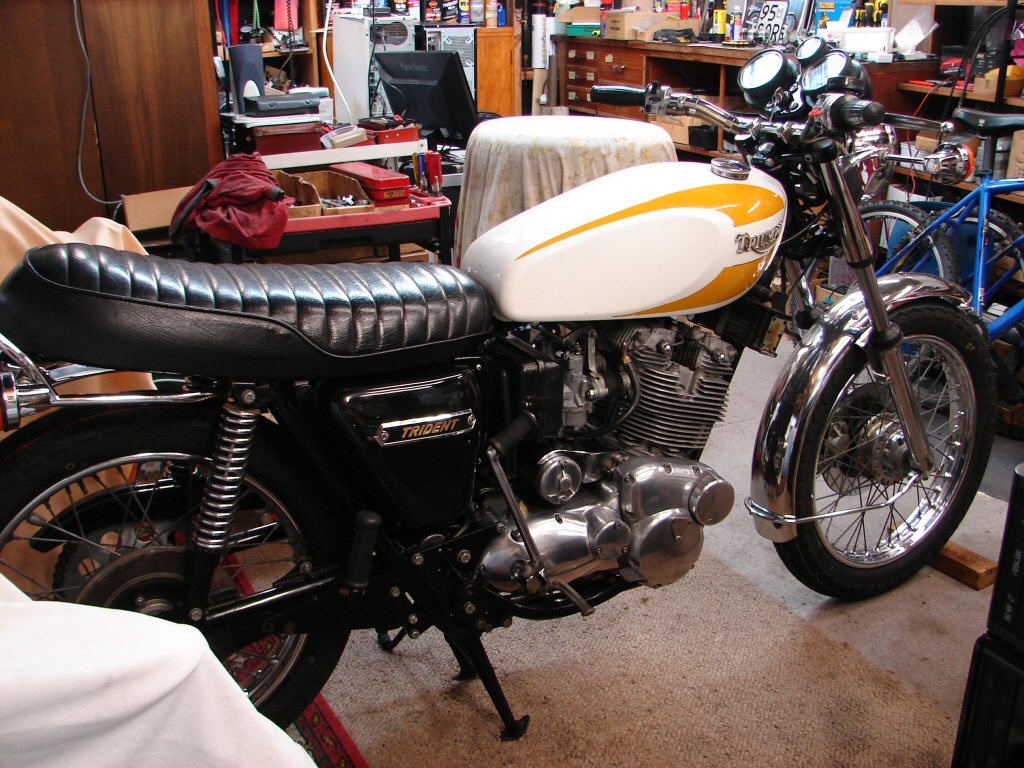
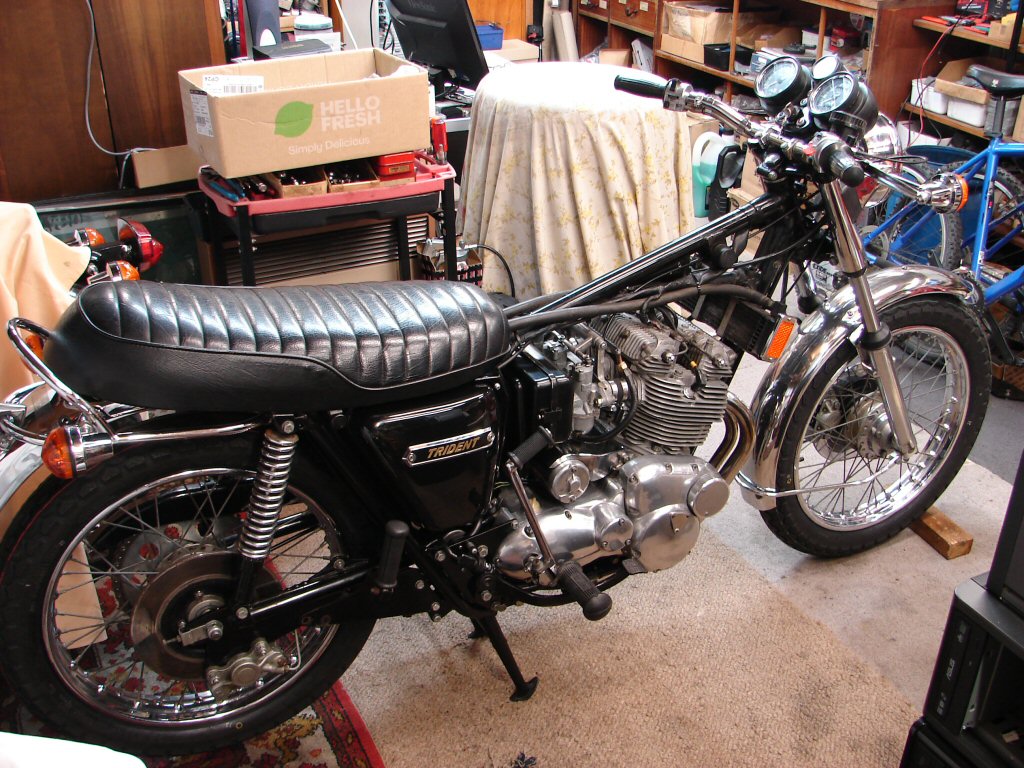
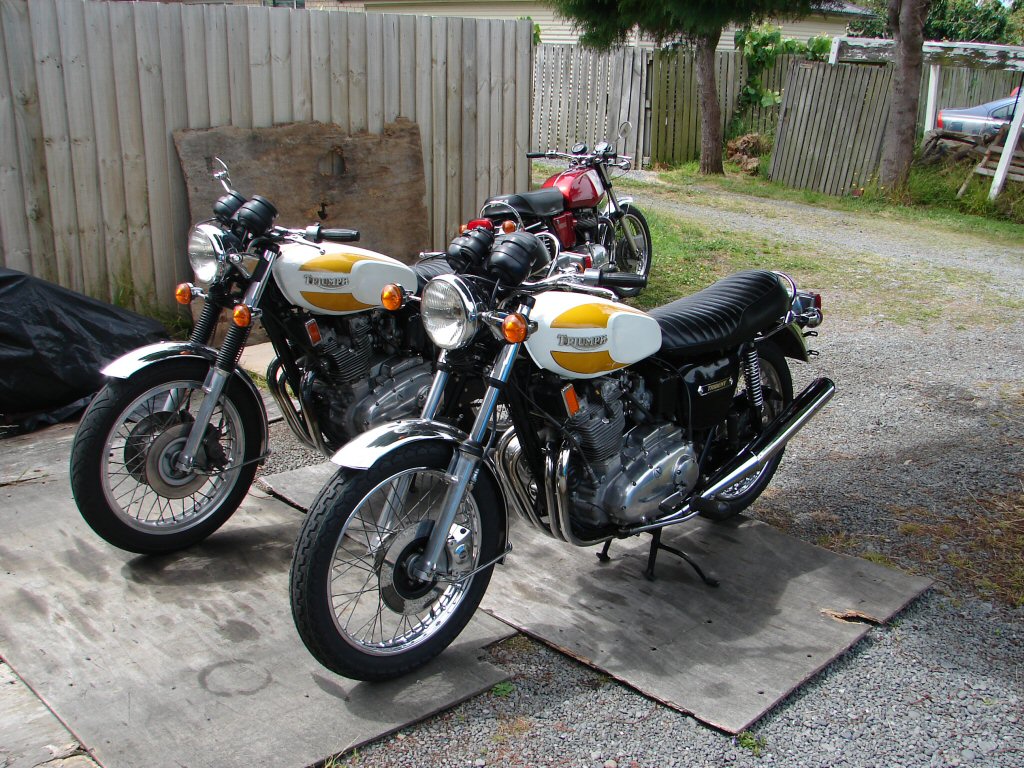
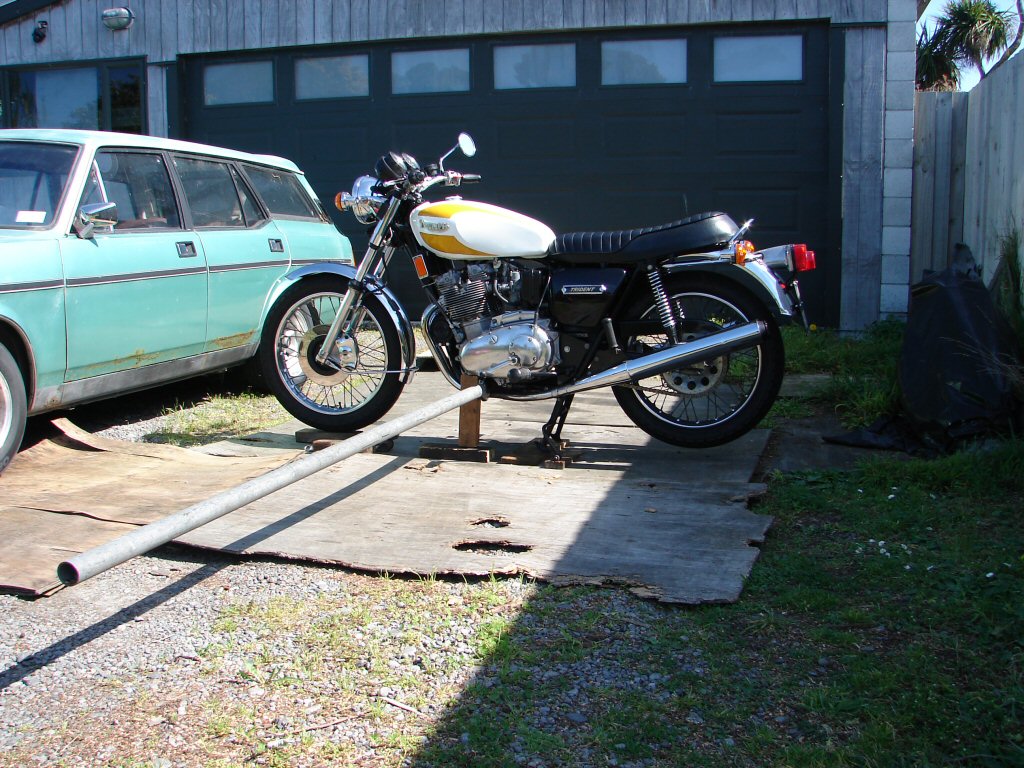
1975 Triumph T160 Trident 750
Allan bought this T160 by wire from the USA in 2012. It arrived just prior to xmas, and he brought it around to show me after collecting it from Lyttelton. It was in the back of a Hiace van, and the plan was to squeeze the grey frame Rocket 3 in with it for the trip to Blenheim, but it wouldn't fit, so the Rocket stayed.
The following day we had a big quake, the Rocket fell over in the shed and broke a number of things. Bugger.
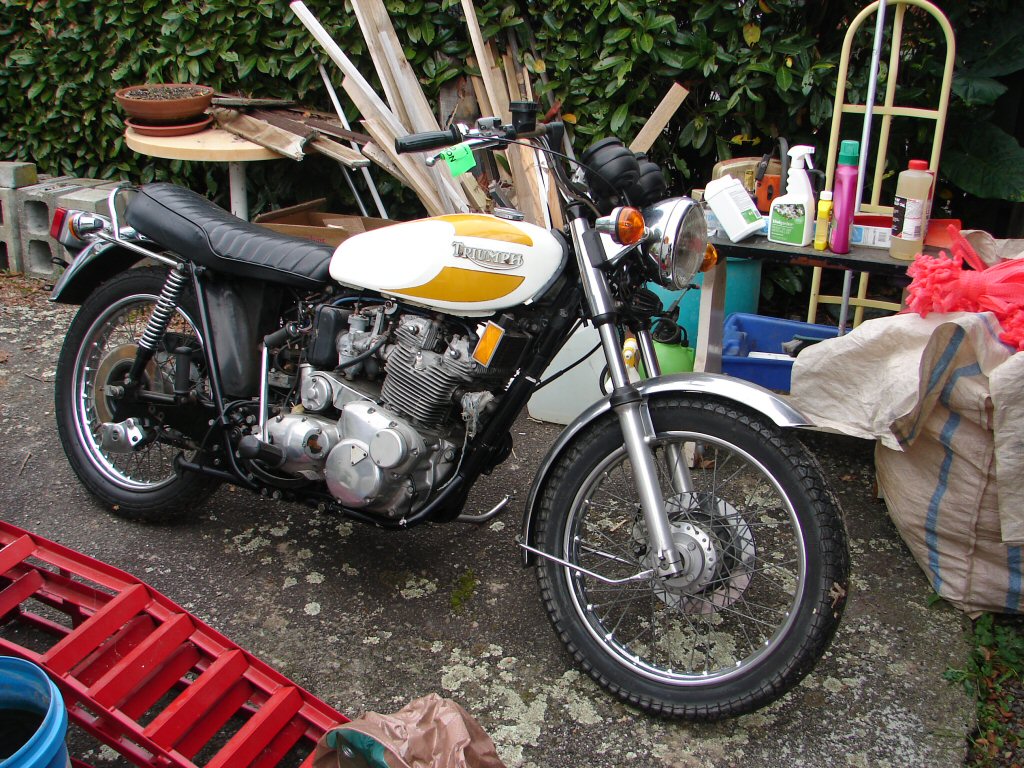
Despite much encouragement, the T160 sat for some years, during which the oil tank was removed for repairs, the exhausts came off, then it was relegated to the back shed and progress stopped.
During one of my recent forays into the back shed I liberated a number of bikes, and this was one. I found all the parts that had been stashed in various boxes, and it came down to my shed a few weeks ago to take its place in the queue.
I soon had it looking much worse.
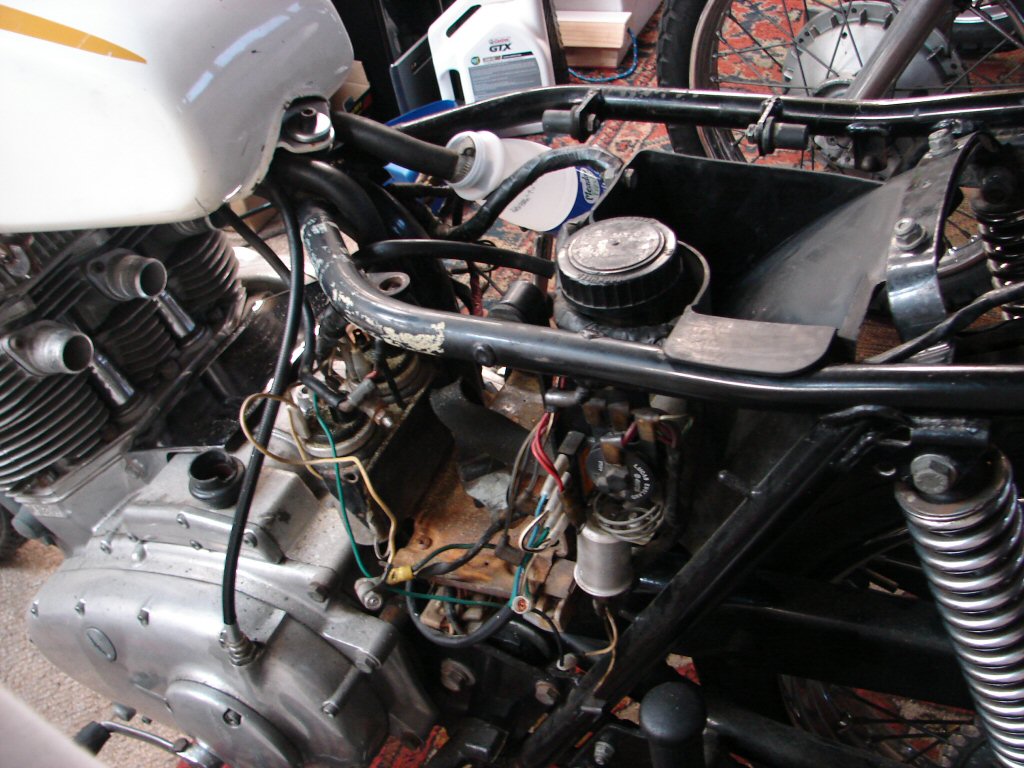
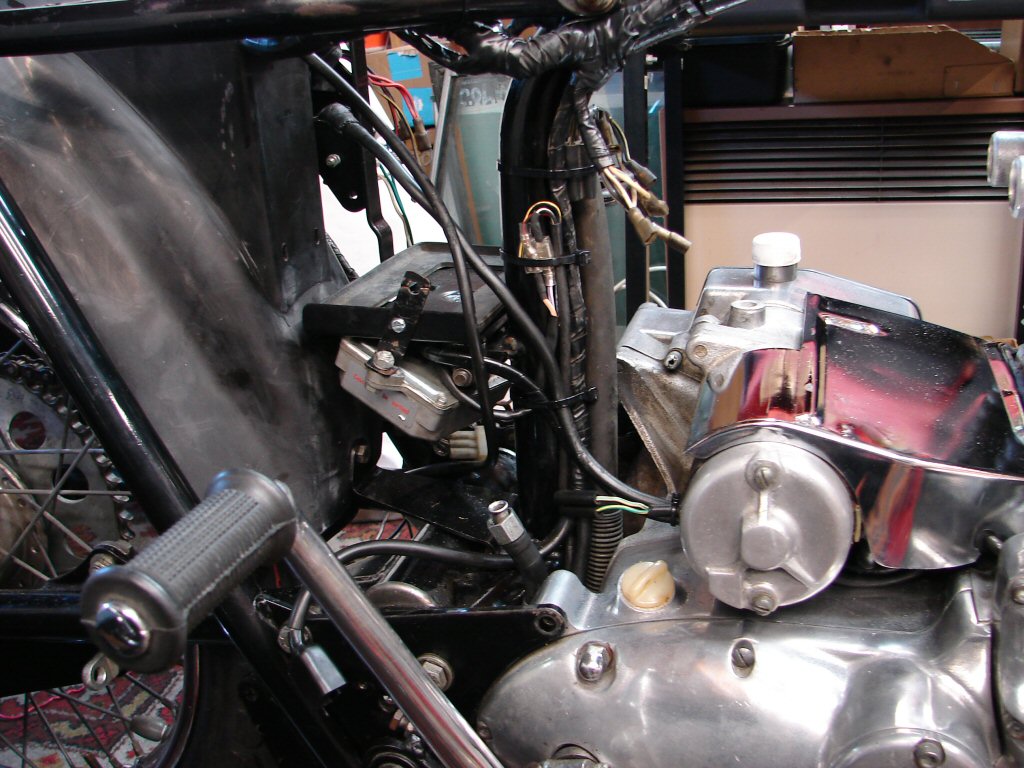
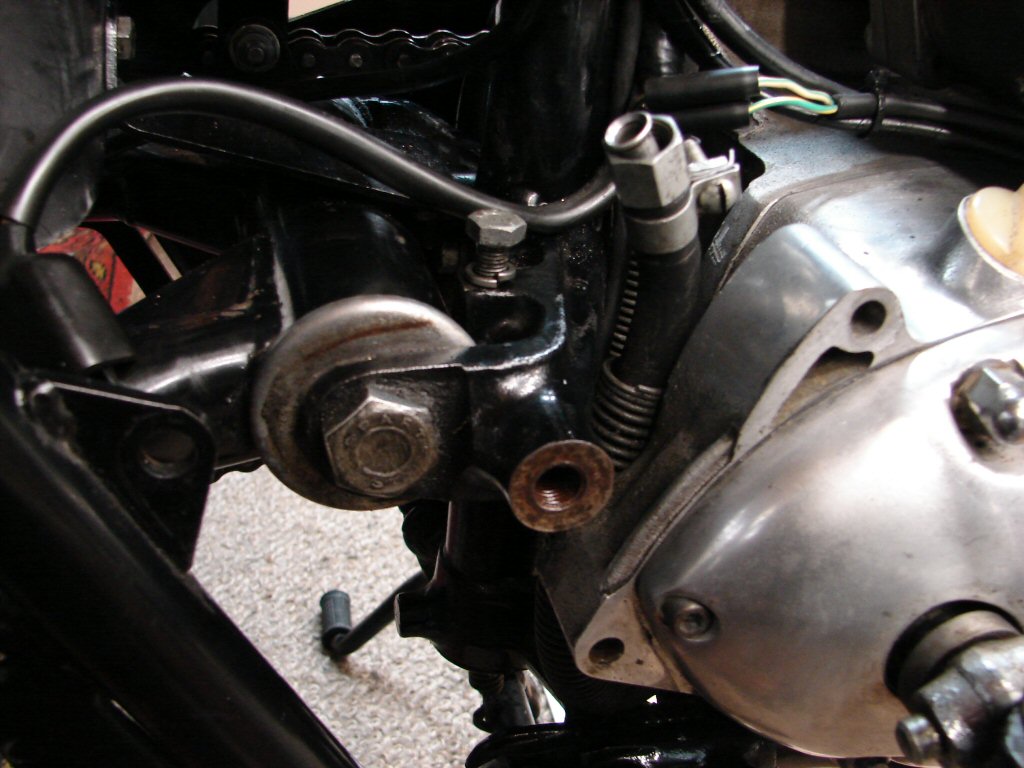
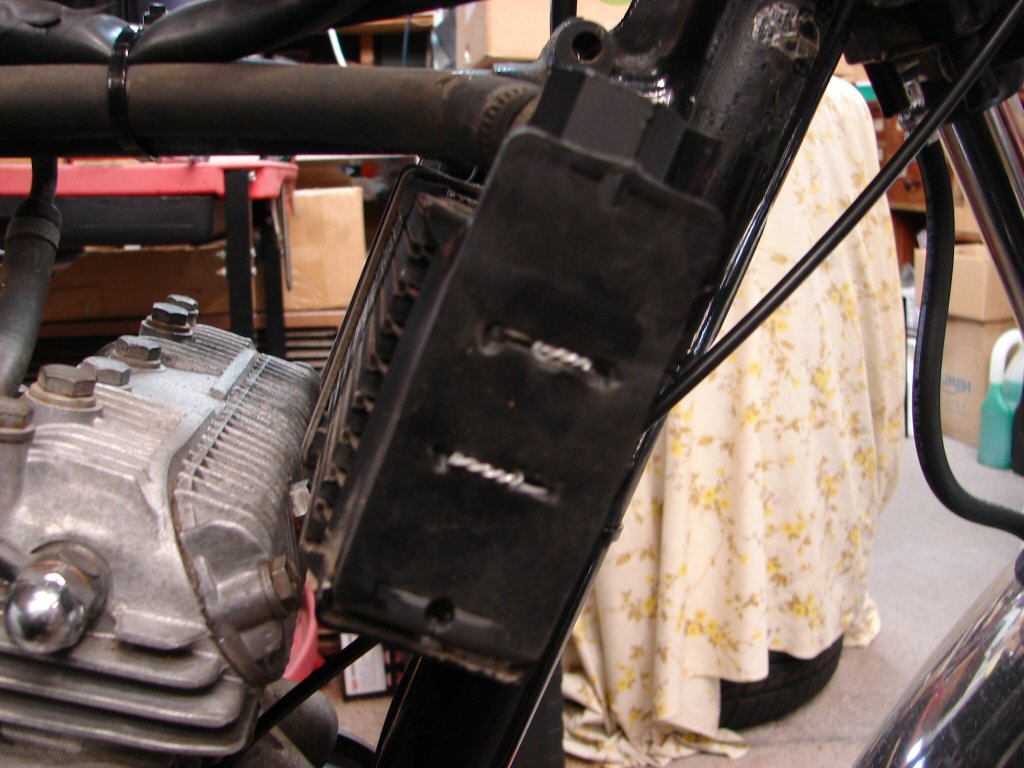
The battery tray needed to come out as it was quite badly corroded, plus the wiring was looking terminally bewildered, the rear brake was seized solid, blah blah blah. The rear wheel would be coming out for a tyre, so I decided to pluck all the rear mudguard assembly out so as to make everything accessible for a major tidy up.
This led to removal of the seized carb assembly as well as anything else that dared to get in my way.
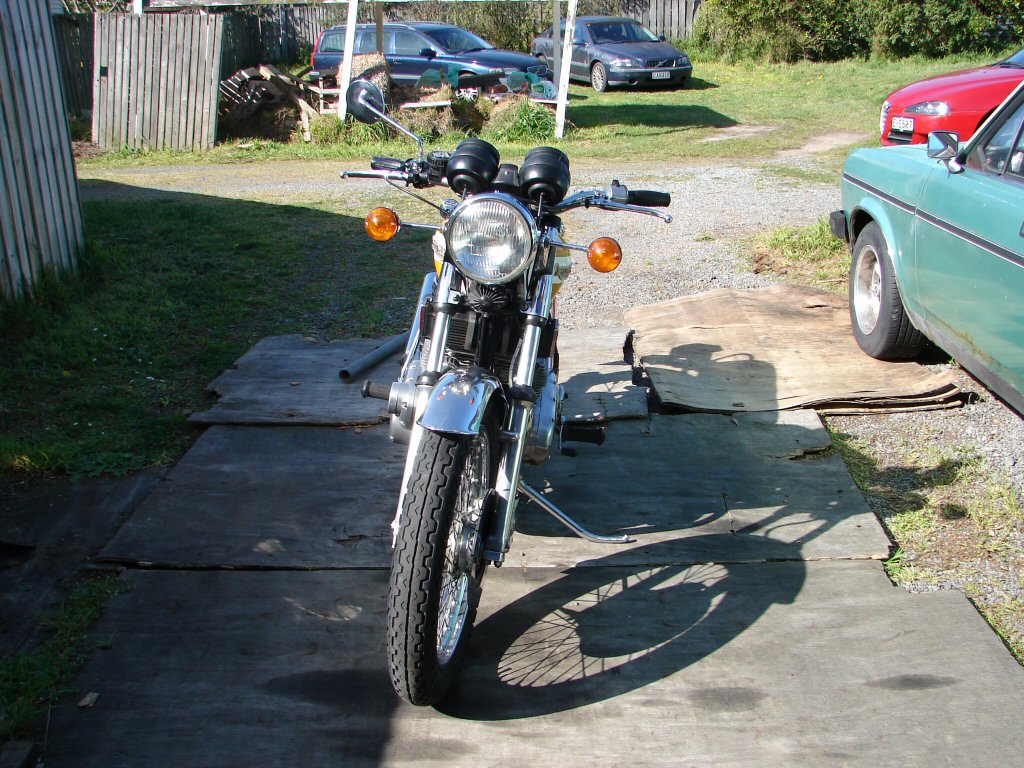
Looking ahead I could see that the US bars would have to go. They tend to make the rider into something resembling a sail...
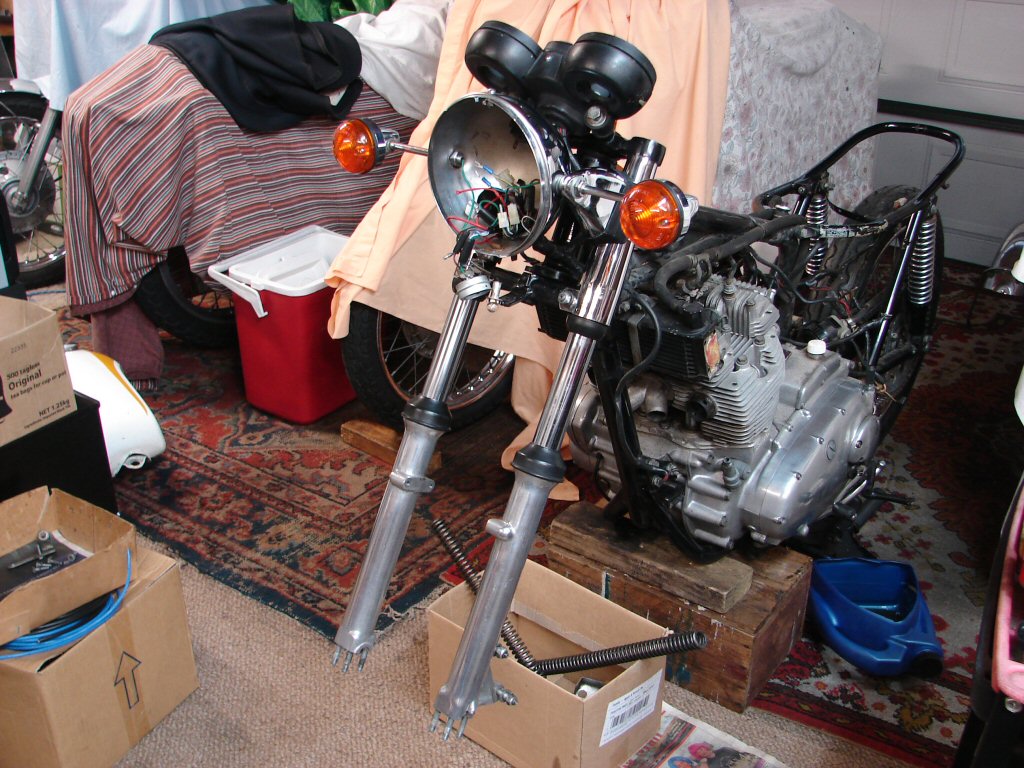
So my attention was diverted to the front of the bike. It has been my usual practice to work my way from the front to the back as far as cycle parts go, and the front end had a number of observable problems.
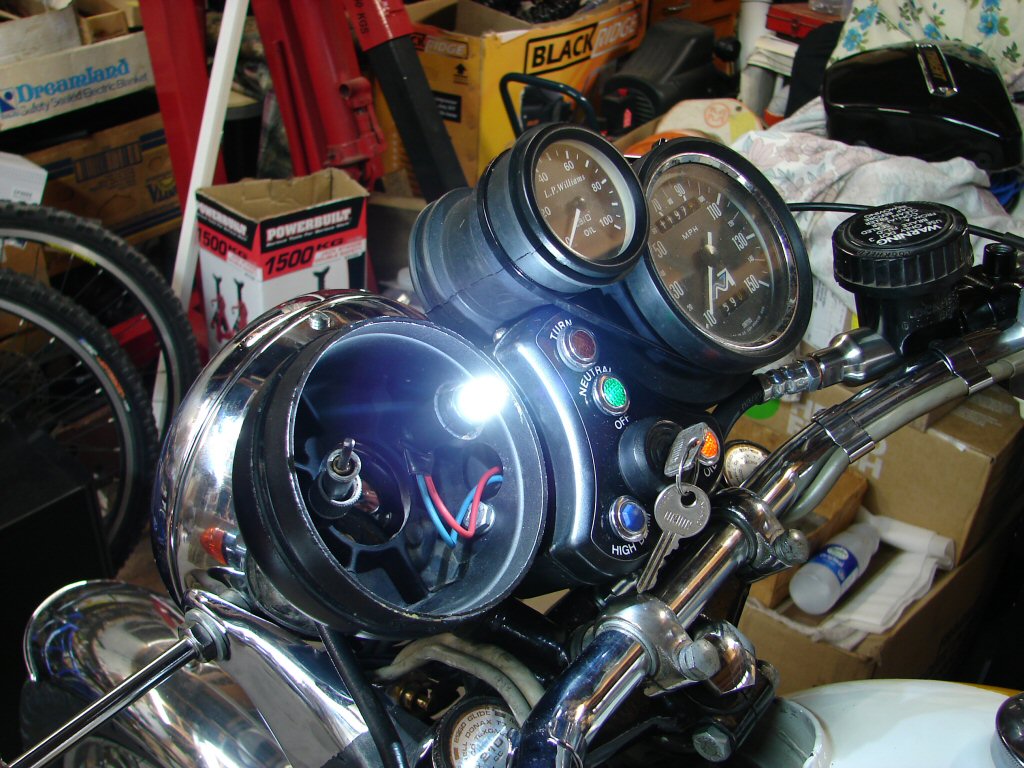
A peek inside the headlight revealed it to have the north american headlight relay still fitted. This is a solid state thingie whose purpose is to make the headlight permanently on when the bike is in use. I suspect that this is what led to everyone fitting high power alternators, as the headlight drained off too much of the meagre charging current to allow the electric start to establish a good reputation.
My T160 was an Australian export and had the home market wiring. As I don't ride with my headlight on, I have never found the original electrics to be wanting. Of more recent times I have been fitting LED parklight lamps in the headlight, and they double as a daytime riding light of the annoying variety for oncoming traffic.
Headlight wiring mostly unmolested.
Front brake was also in trouble, as all the flexible hoses were shot. While the brake did actually function, the master cylinder was looking well past its best-by date, so my planned approach would be to fit a new front master cylinder and relegate a refurbed old front unit to the rear where it is out of sight.
With the bars removed it was easy to remove the headlight and give it a ten year overdue polish. The indicators needed repairing, and the headlight brackets required a bit of panel-beating, as the bike had obviously been dropped on the right side at some time.
I could not resist fitting a pair of used bars to see how they would feel. I also replaced some rubbers in the bar clamps, so they no longer wobbled about as the originals had. This led to two discoveries. There was something amiss with the steering head bearings, and there was a mysterious 'click' from the lower front forks when turning the bars left and right. It turned out to be some massive play in the front wheel bearings, so they are naff.
I backed off the tension on the steering head, but it still feels ropey.
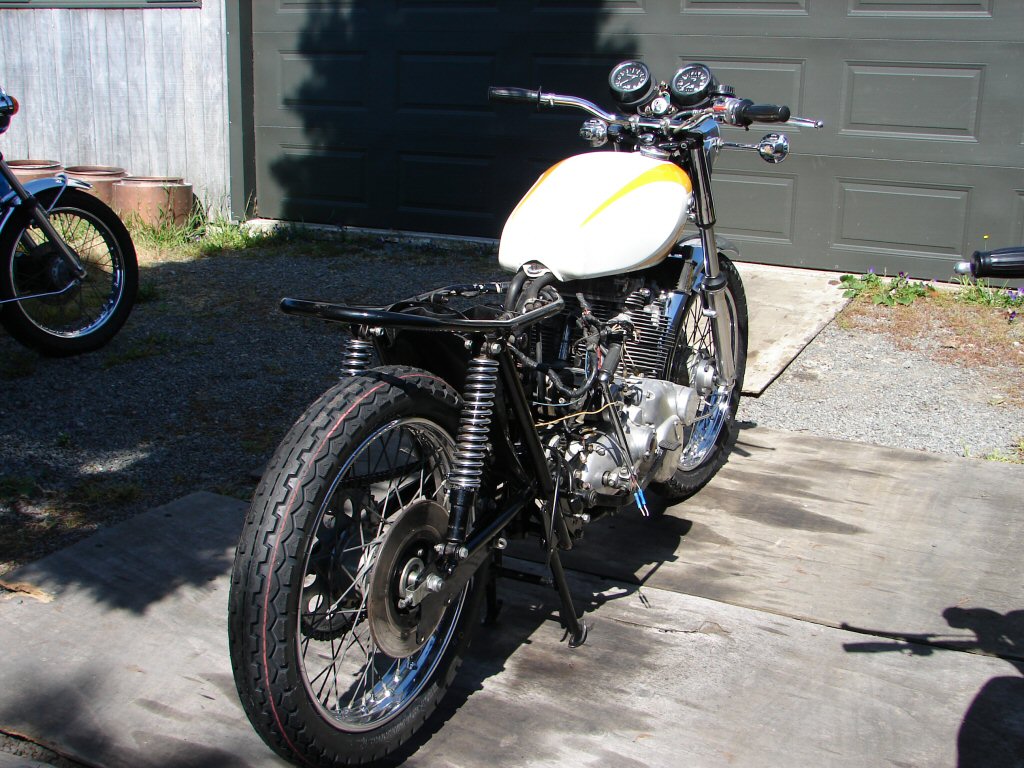
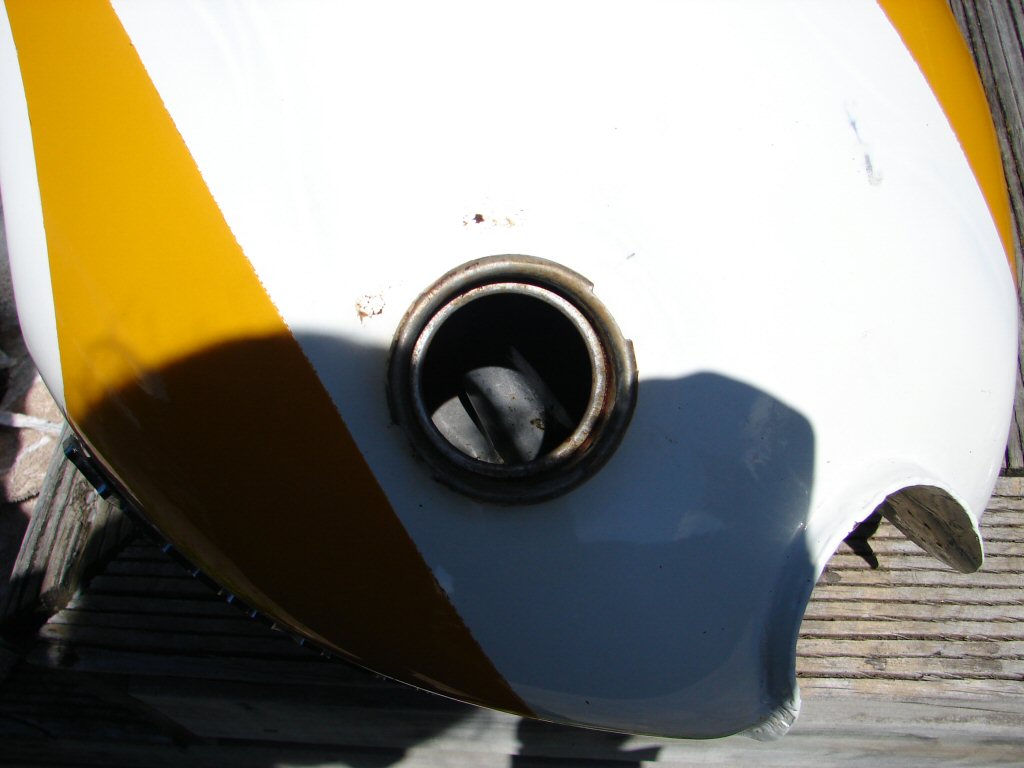
Tank appears to have had some recent paint before leaving the US, though they never got to the pinstriping.
The front forks had been set protruding above the top triple clamp so needed lowering, the fok oil needed changing, the brakes needed fully rebuilding and the front wheel had to come out for bearings and tyre, so that got the front end stripped.
Everything behaved itself and as the fork seals were not leaking I left them alone. I did replace the O rings on the damper valves.
The wheel bearings eventually complied, as did the new TT100 GP, but it put up a hell of a fight. I had to inflate to 60psi about 6 times over 24 hours to get the last section of the bead to pop out.

While messing with the forks I got the impression that the steering head bearings were still too tight, even though I had already backed them off some. I undid them further and was rewarded with a happy steering action at last. Must have been interesting dropping this thing into corners..!
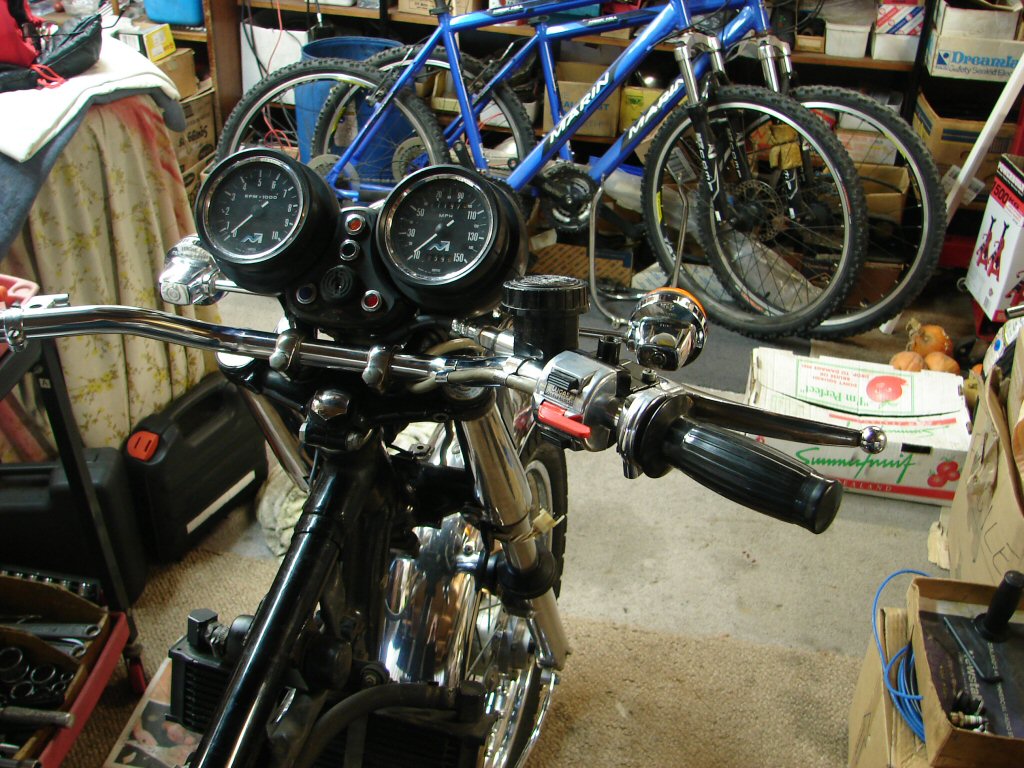
The 'bars I had trial fitted were what I wanted, but they were too narrow for the brake cylinder to get along with the speedo, so I got a set of stock T160 'bars instead and fitted them up. With the new brake hoses and some paint on the housing, it all has started to look a bit fresher.
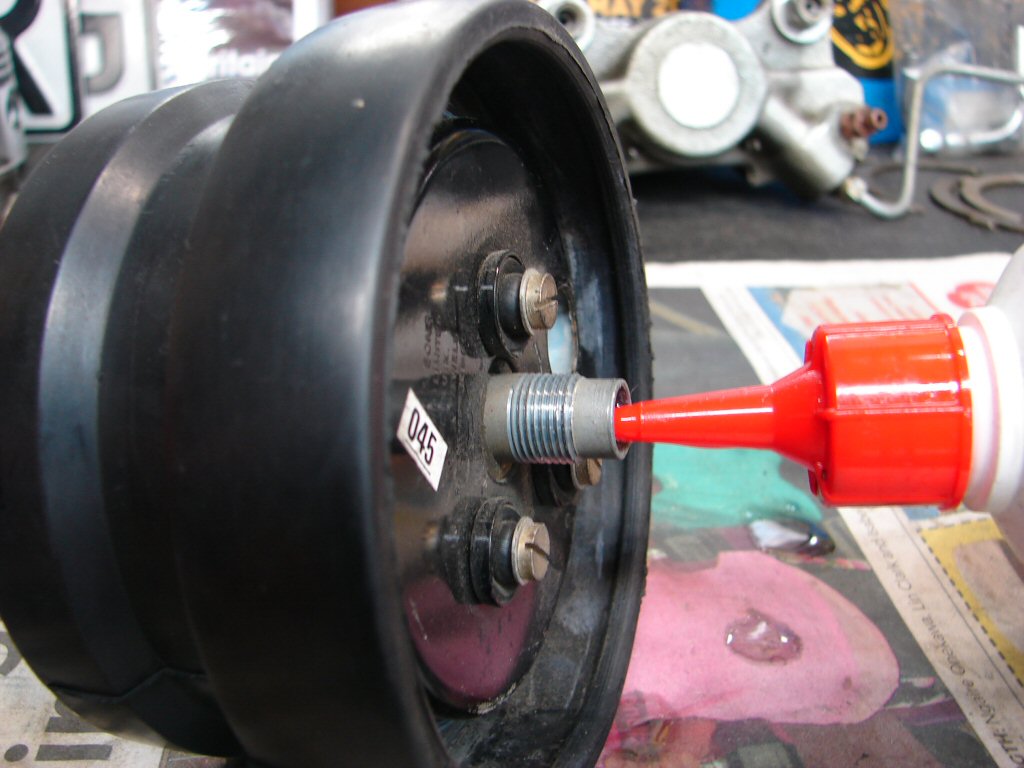
As I had the rear wheel bearings on hand I decided to pluck the wheel for bearings and tyre replacement. This led to much cleaning of frame and swingarm, plus some relieving of the crushed alloy of the speedo drive, where they always get forced inwards and grip the rear axle very tightly, making axle removal a bitch.
All of that work was completed happily enough, and I chose to refit the inner tube as it looked unscathed. The following day I found the tyre to have lost pressure, and rued my decision about the tube, but thought I should check the valve in desperate hope it might be the culprit. Now I looked at the valve in a suspicious light it was indeed shifty, as its return spring was way compressed and relying solely on air pressure to seat. I fitted one I found, a short type with no spring and a much more youthful appearance. To my delight the tyre has remained inflated since.
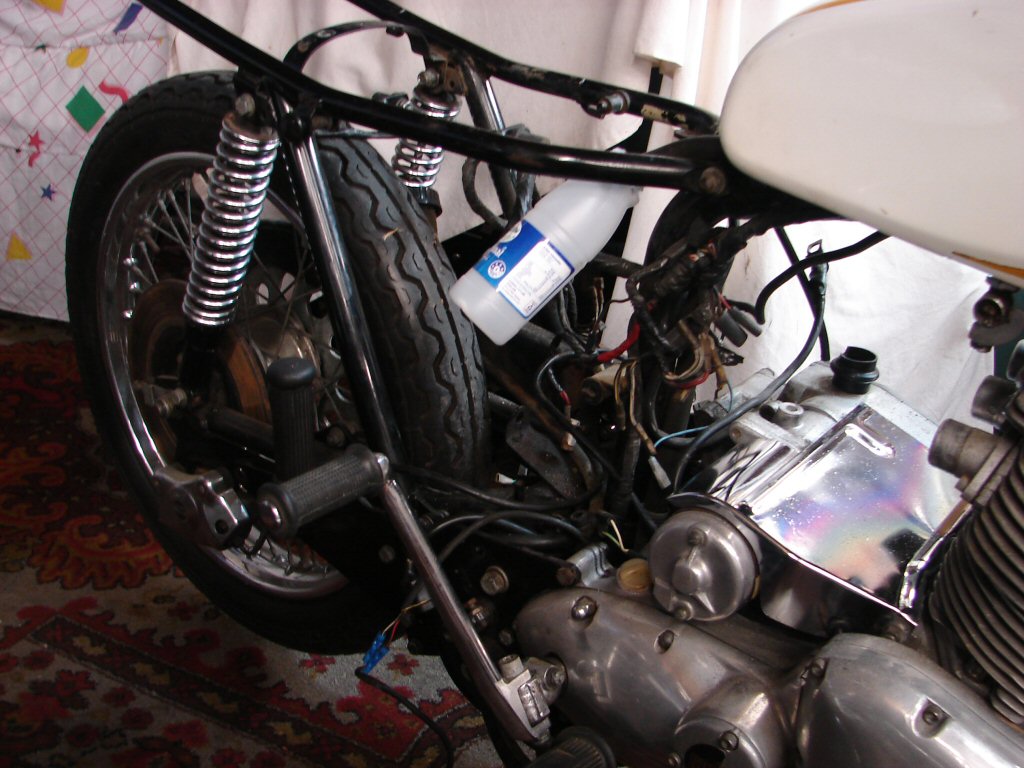
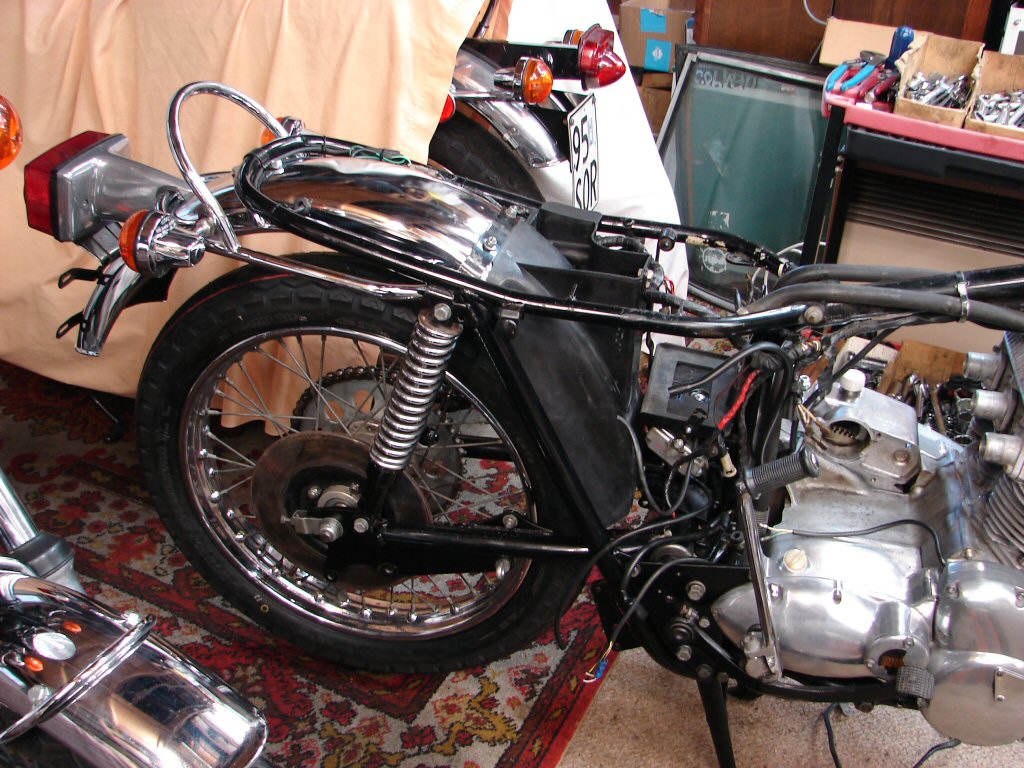
Suitably enthused I began the long cleanup of the mudguard assemblies, tail light assembly which required the "cable tie mod" to extend lamp life, then redid all the tailight and indicator wiring so that wires were not stretched tight across the mudguard where the seat could pinch them.
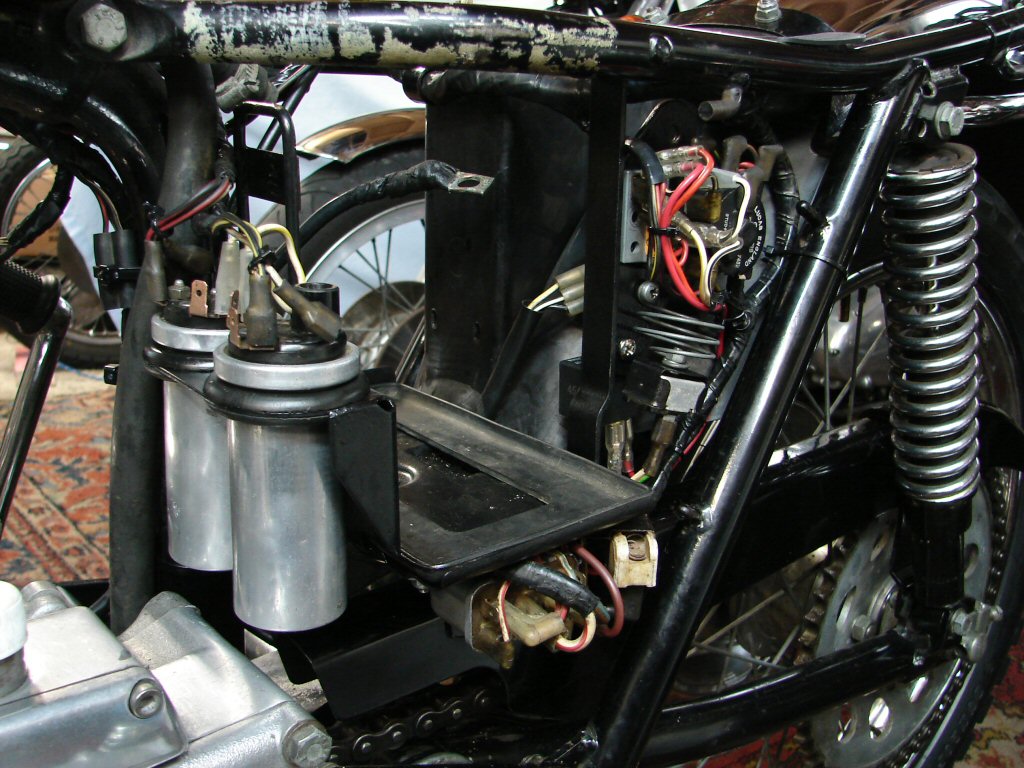
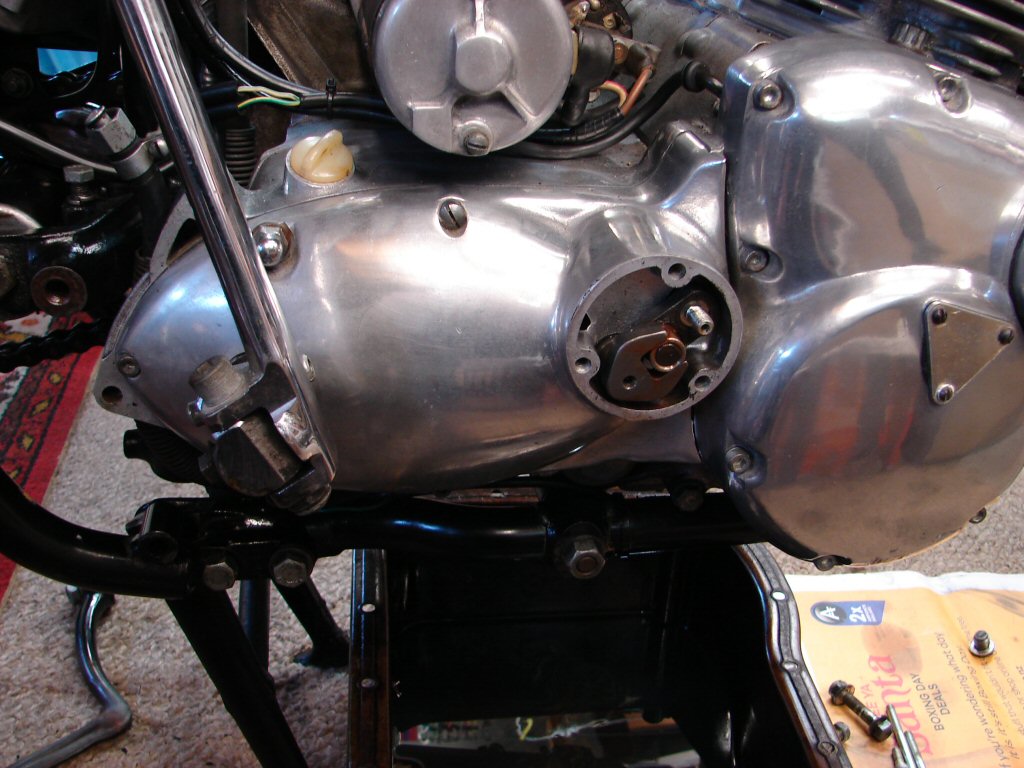
Everything came up nice, with a fair bit of elbow on the polishing, and pointed me in the direction of completing the wiring overhaul as the next step. The battery tray would be necessary as it is wiring central, and the Rita needed to be somewhat more carefully mounted beneath it before the wiring could be made to suit. I decided to remove the starter assembly now, as it would make the wiring more accessible.
The wiring takes ages to organise, as there is limited space and there is always damage to repair. The battery earth wire insulation was melted, a sure sign that someone left the heavy current starter cable off at some time, and the starter tried to draw massive current through the small wires intended to only handle accessories.
Part way through the wiring I decided to refit the starter to dictate some of the wiring positioning, so the starter got some maintenance and a good overall clean before rejoining the ship. I shall remove and clean the end cover later, as it is easier to manage when the starter is held in place. The chrome cover was put in place to check some panel beating I used to straighten its butchered front edge.
With the wiring on the right side complete I moved to the left to rehash the Rita setup. I found that I could re-use all the original points/condenser/coil wiring in a different way to get power to the coils and back, plus to the original ballast resistor which is used in series with the third coil as one of two 12 volt circuits the Rita powers.
To add to the mix I mounted the usual relay behind the flasher unit, as this helps to keep voltage to the ignition unit as high as possible to assist good starting when using the electric foot.
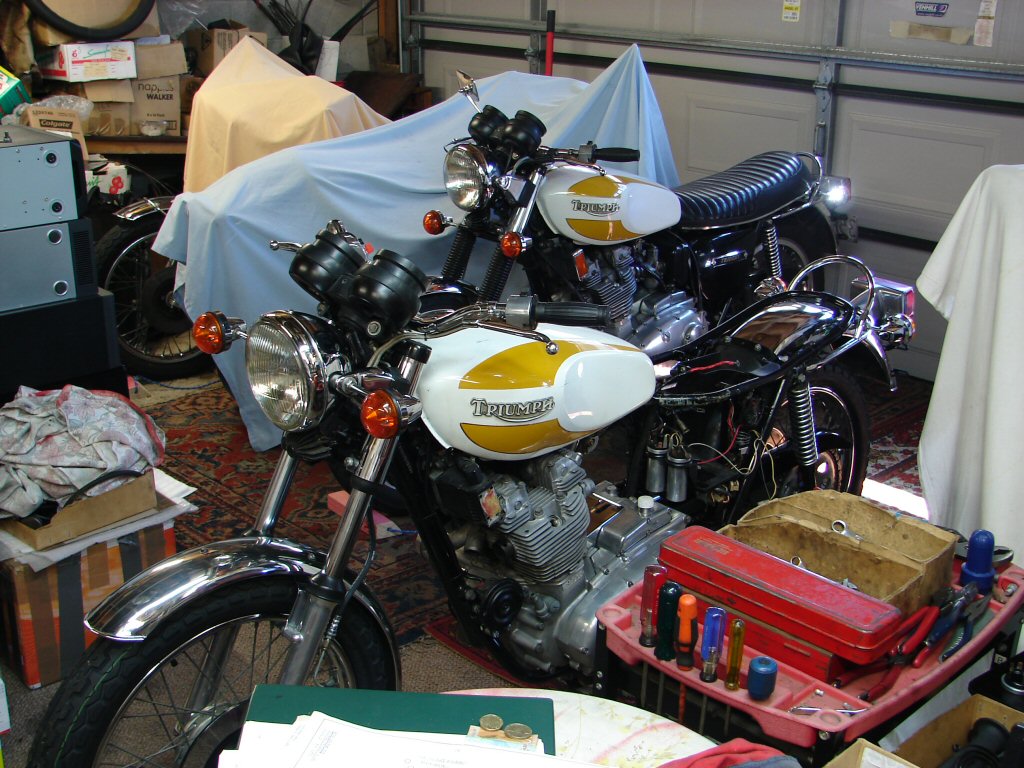
A bit of necessary re-shuffling in the shed then got the two T160s together so I could use my bike as a template for where everything really needed to be.
It all came good in the end, and I was confident enough to put a battery in place to check all the electrics. As usual the old Lucas flasher unit has completely run out of flashes so some form of new one will be fitted. The only other thing that didn't work was the neutral light, and it seems that the switch is either naff or badly adjusted. I will need to drain the gearbox oil in order to find which of these it is. There is another reason why I am going to drop the switch out - there is a tiny plunger fitted above the switch in its housing, and people often lose it when working in there as it can just drop out if you are unprepared. As I can only select first gear, the outer cover may have to come off the gearbox as well, so I need to decide what order I shall do things gearbox related.
Looking a million percent better though..
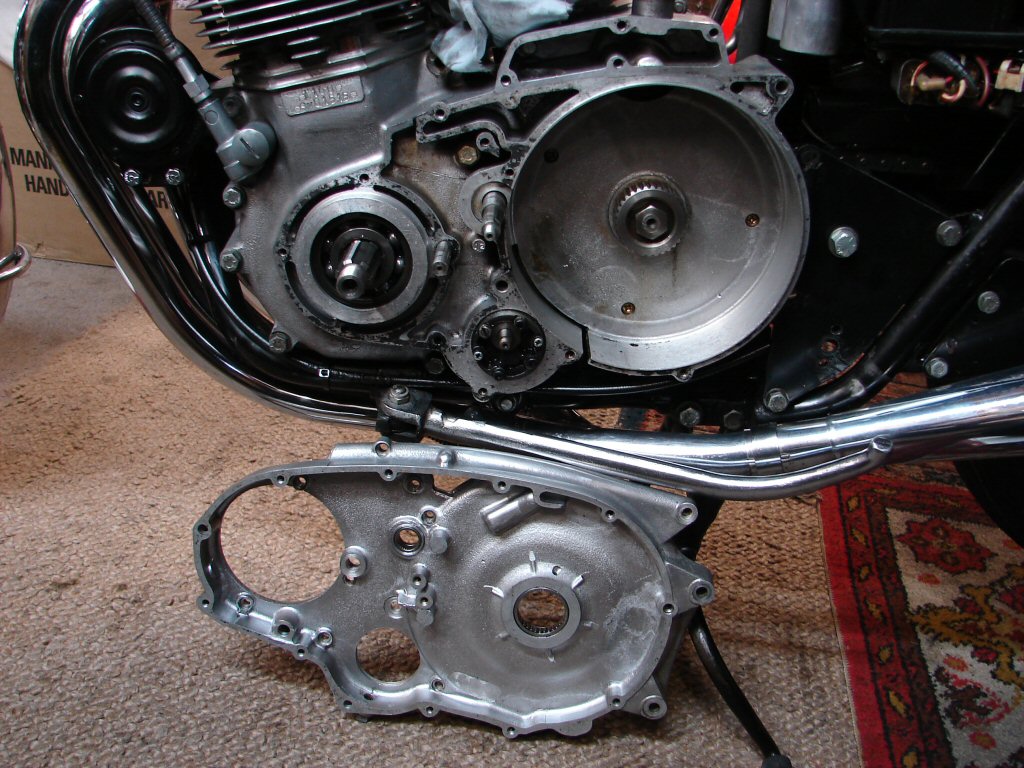
In other news, a badly bent footpeg got straightened by a handy mate, and the oil tank has been panelbeaten and painted, but one of the mounting lugs is proving to be reluctant to stay attached to the tank, so it is getting some more welding practice. A new bezel for the sidecover arrived, so that got fitted along with a new 'Trident' decal. A new swingarm bolt arrived to replace a butchered metric bolt someone had stuffed into place. Fortunately the original thread inside the cast frame housing cleaned up ok. The engine plate will need paint to hide signs of the butchery, but I will wait to see if I need to remove the inner primary case at the same time.
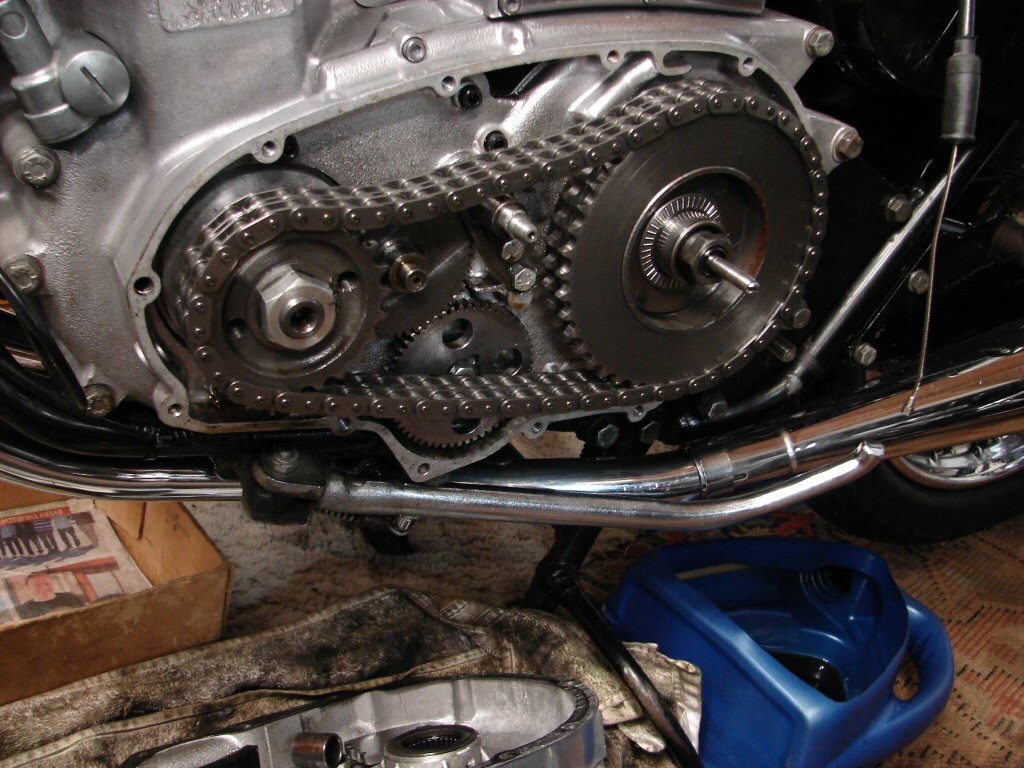
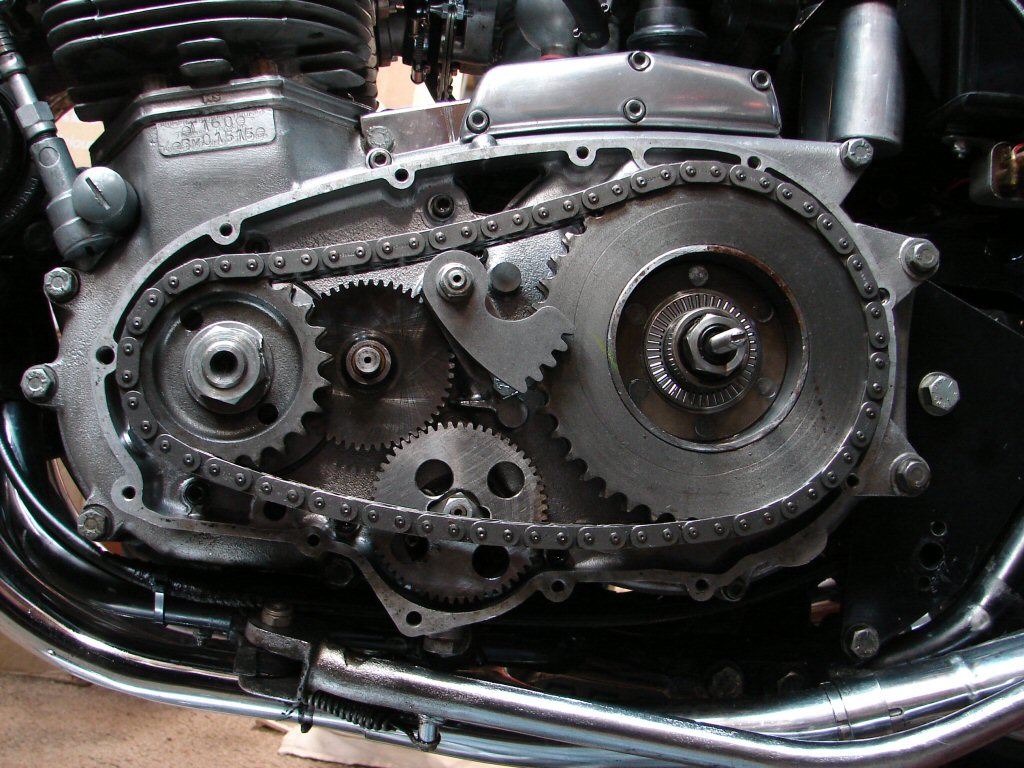
I checked the primary chain tension today and it was way over tight, so I am thinking I should pop the outer primary off for a good look at the state of things in there. I also found that the rear chain is pawked, with several tight spots and enough wear to have warranted its retirement anyway.
Sigh.
One move leads to another..
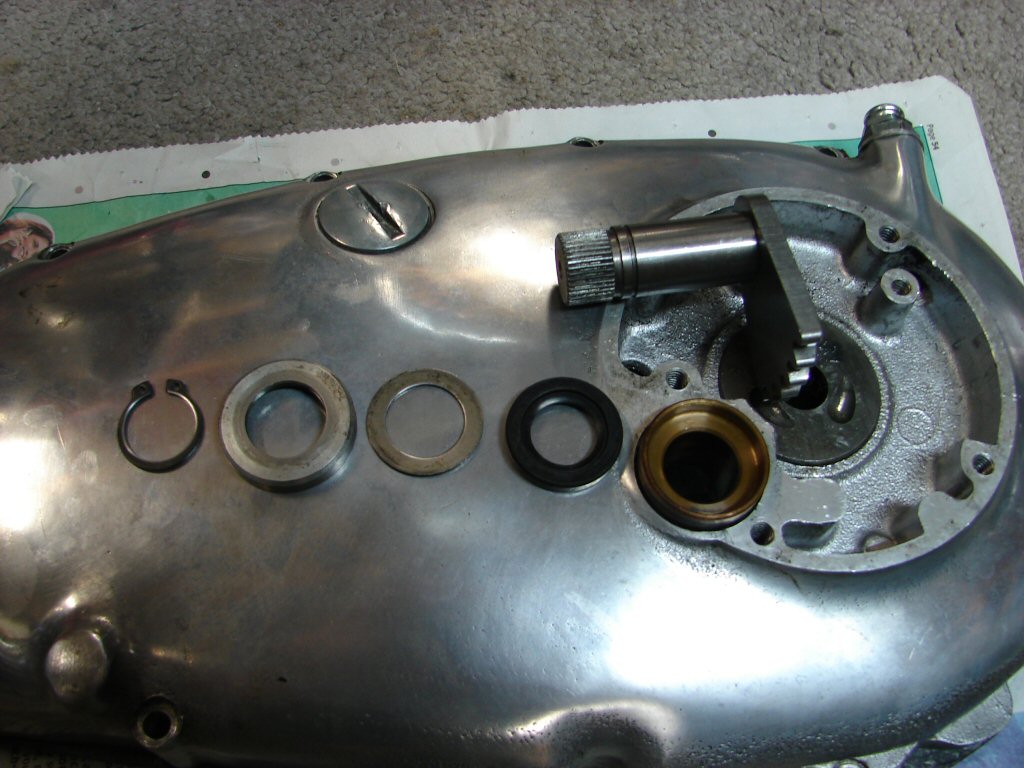
There was another reason I needed to pull the primary cover off, only first gear is selectable and this could be due to the cross shaft 'feet' being incorrectly engaged in the primary cover, so two reasons meant it was coming off now.
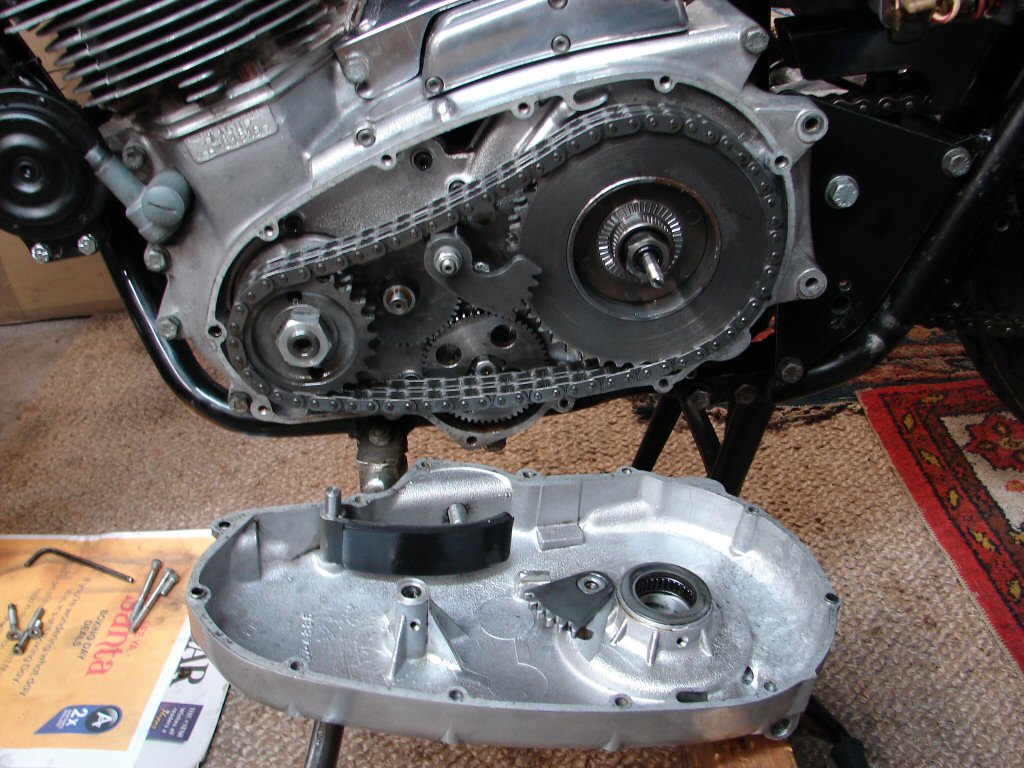
A wonderful sight to behold - it all looks as-new in there, and the cross shaft was timed properly, so problem is in the gearbox. My prime suspect would be the 'up' plunger that engages with the quadrant being either stuck, or having a broken spring.
It would be prudent to pluck the inner case and check the clutch while the outer is off, but several factors made me decide not to. The clutch adjusts and operates well at rest, there are no signs of any oil from beneath the clutch housing, the pullrod bearing feels free and smooth, the primary chain has been off at some stage, so perhaps it has already had a new clutch plate fitted, and if I disturb it I will have to replace all the bearings, seals and gaskets, simply because I was in there. We will see how it performs under fire.
All bikes, and certainly triples, have a few operations which are kind of annoying. On the T160 the bottom mount for the oil tank demands maximum dexterity to refit, but also removing the rear brake pedal which has a quite ferocious return spring, and in order for me to remove the gearbox outer cover to continue the gear selecting mystery, the brake pedal sure had to come off. I figured I would cheat, and instead remove the engine mount plate through which the brake pedal was mounted, leaving pedal and spring in place. It only takes 10 minutes as a rule, and it would be easier with the footpeg missing, which needs painting after being straightened. Sure enough, it was off in a trice.
As I now cleaned the previously hidden grubby bits I realised something that had not occurred to me before. Looking at where the oil tank mount bracket bolts to the cast part of the frame that the swingarm bolts through the engine plate I had just removed, I could see that the oil tank mount would be an absolute cinch in this state.
I guess I know in what order it will be going back together then.
Today I only managed to drain the gearbox oil and begin preparation for removing the gearbox outer cover, where hopefully I will find the answer to the missing gear mystery.
Play resumed and the gearbox outer cover came off, with some very thin oil emanating from within it. Within seconds it was apparent that the quadrant was indeed unable to move in any other mode than between first and neutral. I decided to remove the neutral light switch first, as it was not working and seemed to have been leaking a slight amount in the past.
The switch was absolutely seized solid, and now the quadrant was free. I fitted the gearlever on the primary and every gear was available and selected nicely. While I was hoping it may be that simple, I have never before seen a neutral switch fail in this way. All the other parts were in place, so I fitted a new switch and modified the wiring to suit the spade terminals on the replacement item. I adjusted it to the slightest pressure which resulted in normal operation and will leave it there for now. In the past I have found that in use it required another half turn to continue working when everything was hot. I also removed the plunger which locates each gear on the outer edge of the cam plate, and was pleased to find it hardly worn and the spring pressure healthy. So it all got buttoned up.
While it was easily accessible the end cover came off the starter, got cleaned up and the end bush greased. After that everything got a touch of polish and is complete except for gearbox oil which I have run low on.
This meant that the primary cover could be fully tightened in the knowledge that it was not going to need to come off again. I also fitted the clutch adjuster cover so it could benefit from a bit of polish along with the rest of the cover, which is the largest expanse of alloy on the whole bike.
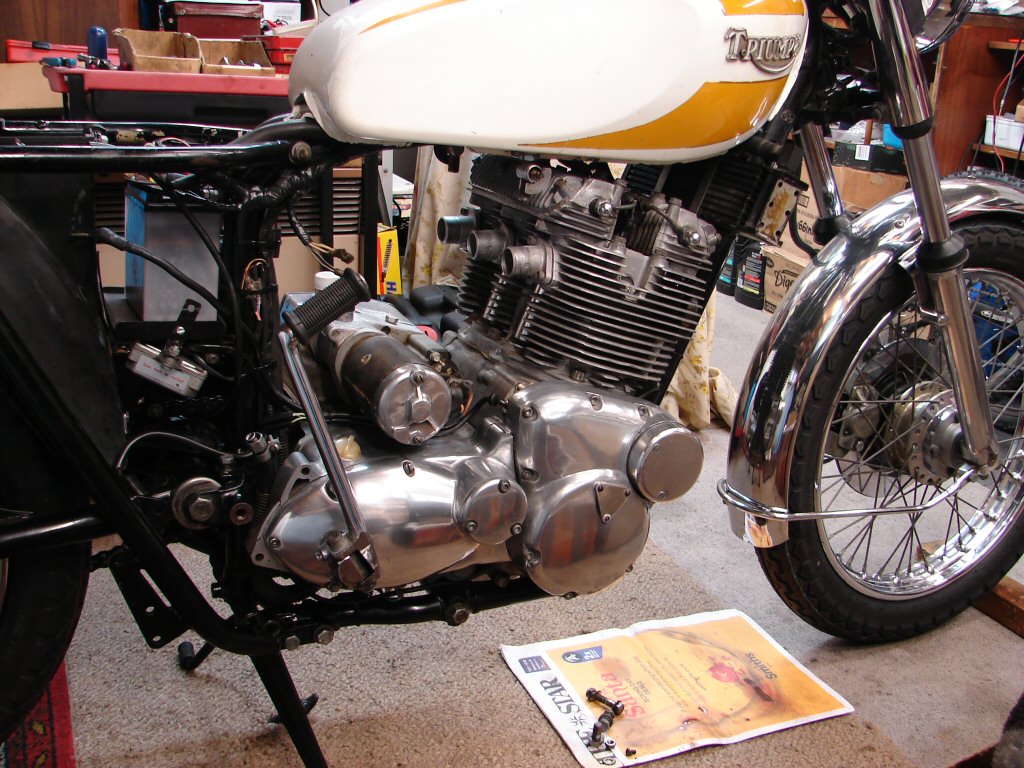
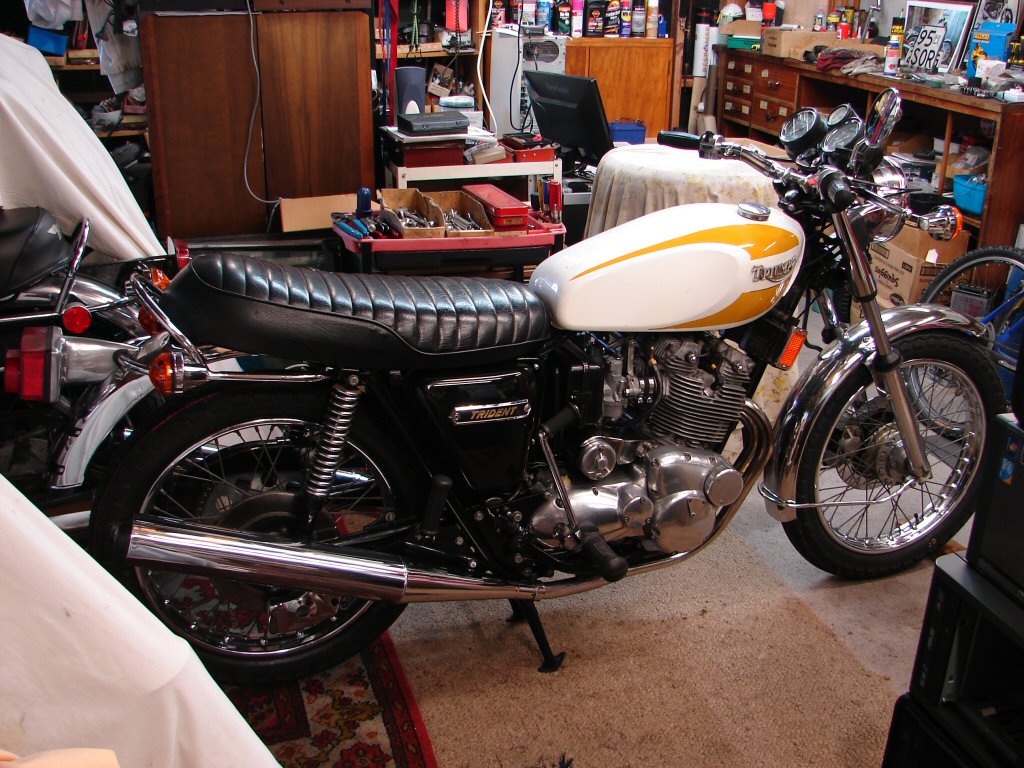
Starting to look quite smart as things get a shine on. It certainly makes me more enthused to keep progress up.
Tomorrow the oil tank comes back which is great timing, as I need to get some oil into the engine to flush it and to see what state the bottom end is in. Filling that large gap in the frame will make a huge visual difference. Yay.
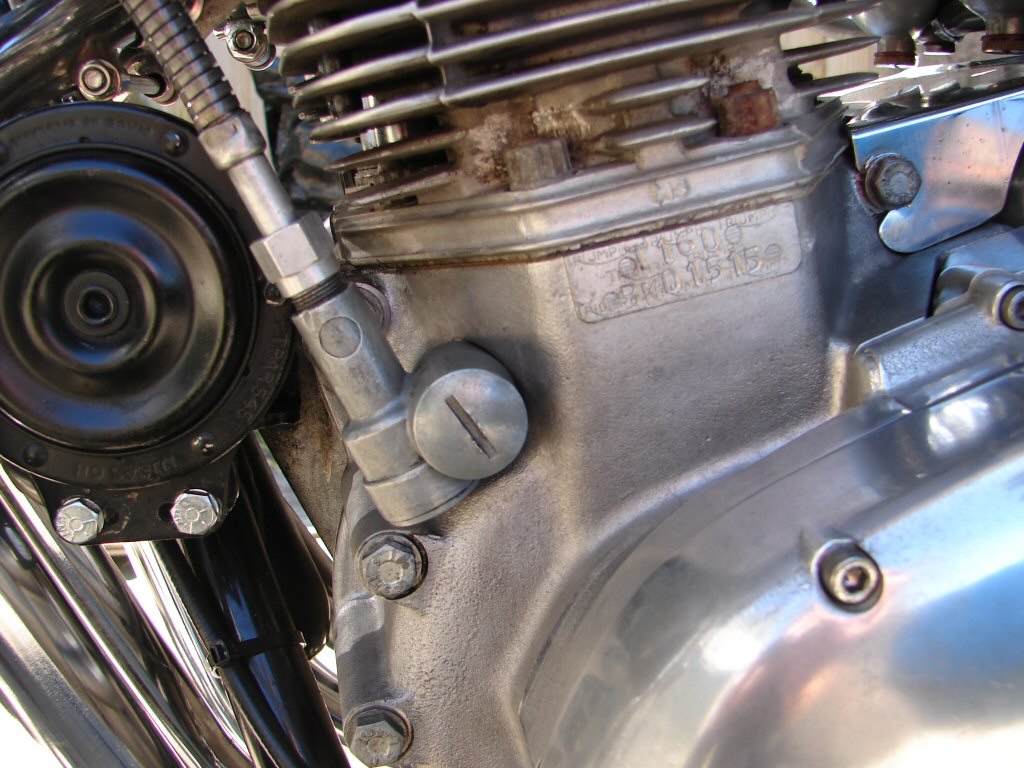
Final move today was to retension the cylinder head and check the valve clearances. I also removed the two studs which early T160's used for fixing earth wires and the heavy cable for the starter earth current, and replaced them with two ordinary bolts instead. The heavy earth cable got moved to the rear gearbox mounting bolt on later models and I shall do the same.
All the head bolts tightened down nicely and no stripped pillar studs which is always a relief. I noticed the bolts went down further than the 1/4 turn I had loosened them by, so I figured I would need to open up the valve adjustment. Every valve had way too little clearance as I would have expected, but some had virtually none, so I hope I may have found some of the missing compression I discovered on the initial test.
The oil tank came back looking mint, so after filling the gearbox with recently acquired 75W90 synthetic gear oil on it went. The lower mount was still a fussy job, but only half as much with the engine mounting plate absent. I even fitted the badge for maximum effect. Engine mount followed suit, and the earth cable for the starter, after which I poured some 20W50 oil into the tank and kicked the engine over until some black looking oil came out of the oil filter cavity. I kept that up until only clean oil was coming out, then buttoned it up again. Next job will be to see what oil pressure I can find.
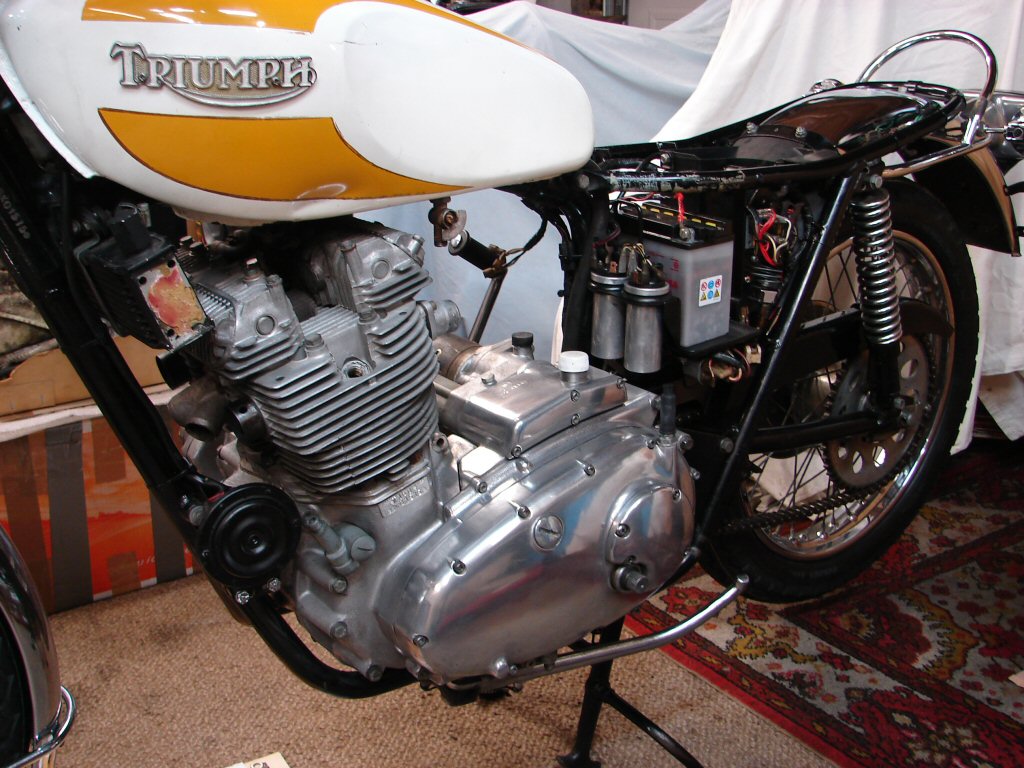
Looking a bit more solid with more tin in the picture.

As the starter cover was also in place I decided to trial fit the left sidecover just for the record. I had also fitted the clutch cable as I wanted to position the kickstart lever lower while I was kicking the engine over, and having a working clutch makes that a lot easier.
Here's hoping the oil pressure figures are pleasing, as that would make riding the bike a much closer event. Carbs and exhausts to fettle first, so I won't get too far ahead of myself..
Today I plumbed the oil pressure gauge into the main oil gallery. After a few kicks the pressure began to rise, and kept doing so to the point I was going to be happy. I managed to get an instantaneous reading of 80psi, but unless the kicking continued the pressure would decay quite quickly.
Hence the rush to take the pic resulted in a less than clear image, but you can see it is over 70, which is plenty.
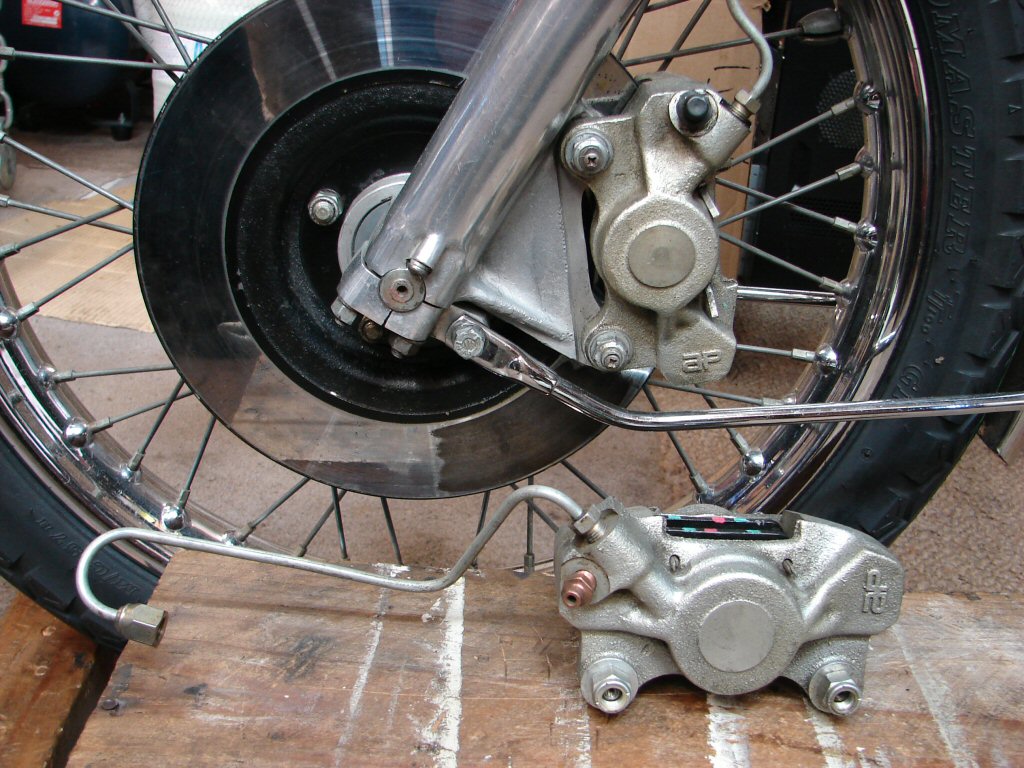
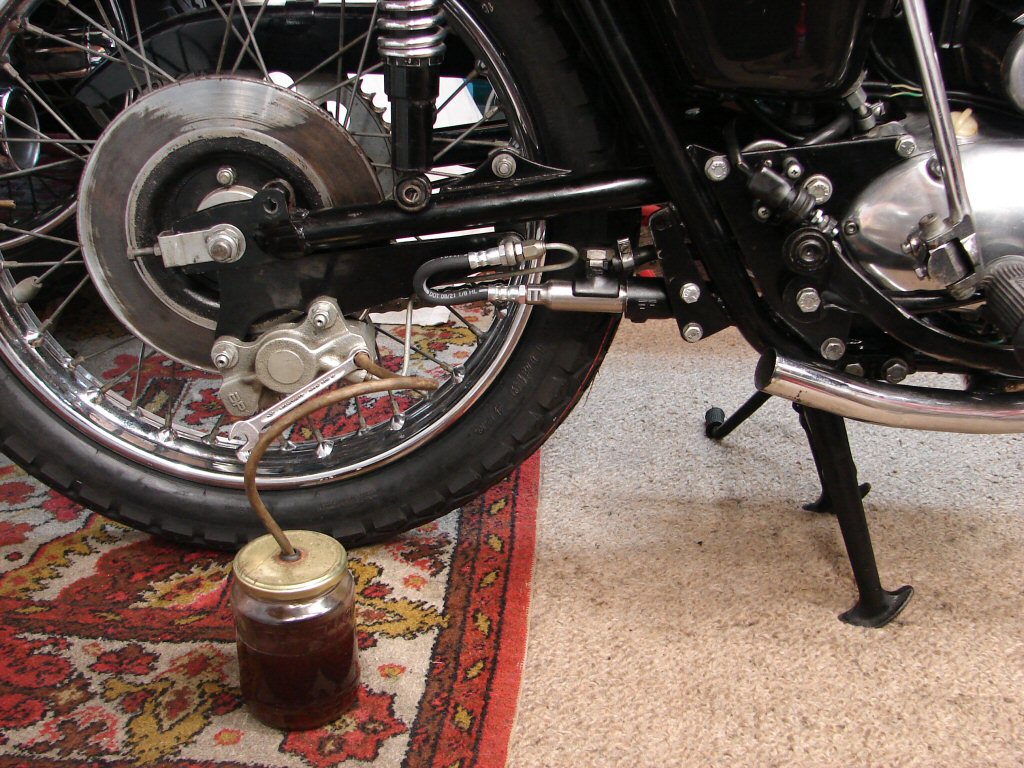
Next job was to strip the rear brake assembly, as the cylinder had seized solid. The plan was to buy a new cylinder and install it amongst all the old bits. The first step was cleaning up the fluid reservoir and line and reinstalling them into the bike. It takes time to clean up every single nut, bolt, washer, housing etc, grease threads and put it back in place, but it is probably the only time these parts have been disturbed since 1975, and they cleaned up really well, so one imagines quite a few years service will be guaranteed before they will need disturbing again.
I do wonder though - when I discover things like this - what sort of previous owner could not only manage to do this, but then leave it like this..?
I straightened the rod and cleaned all the parts up except the seized master cylinder which will be replaced by a stainless item in the not-too-distant. I then fitted everything clean to the bike so as to position the rear brake pedal away from the kickstart lever, seeing as how it was getting a bit of use lately.
It then occurred to me that I would be able to screw the new master cylinder into the housing while it was already on the bike, so I shall leave it where it is until then. That encouraged me to refit the pillion peg/muffler mounting plate if for no other reason than it had to be somewhere.
Kinda like this...
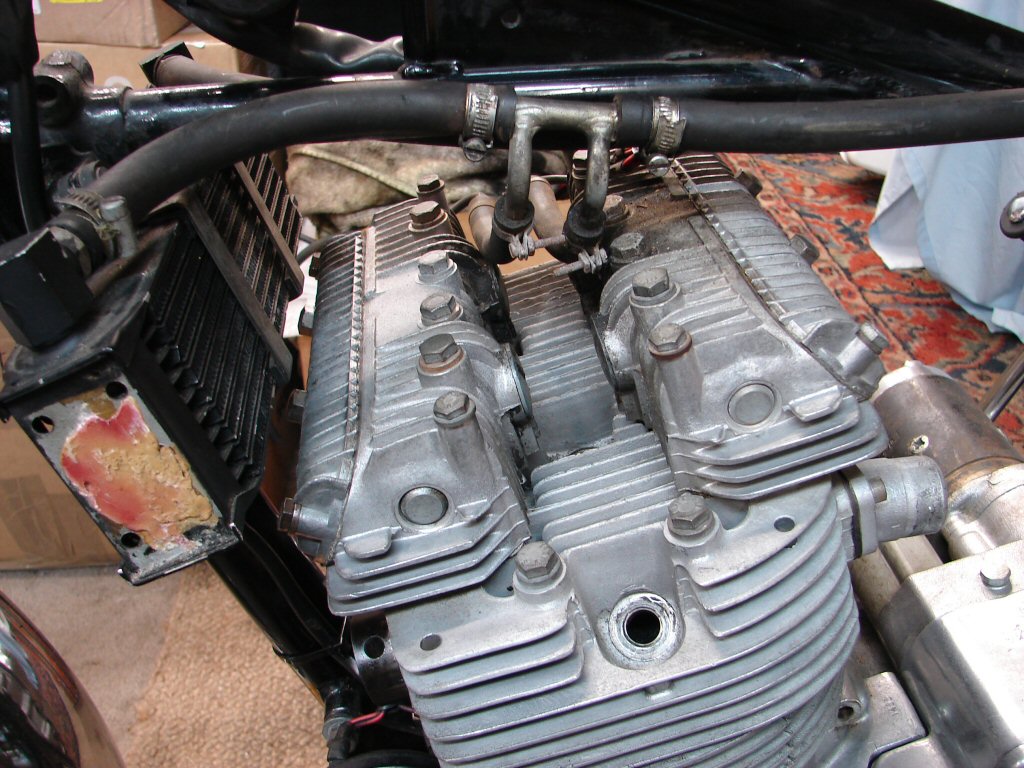
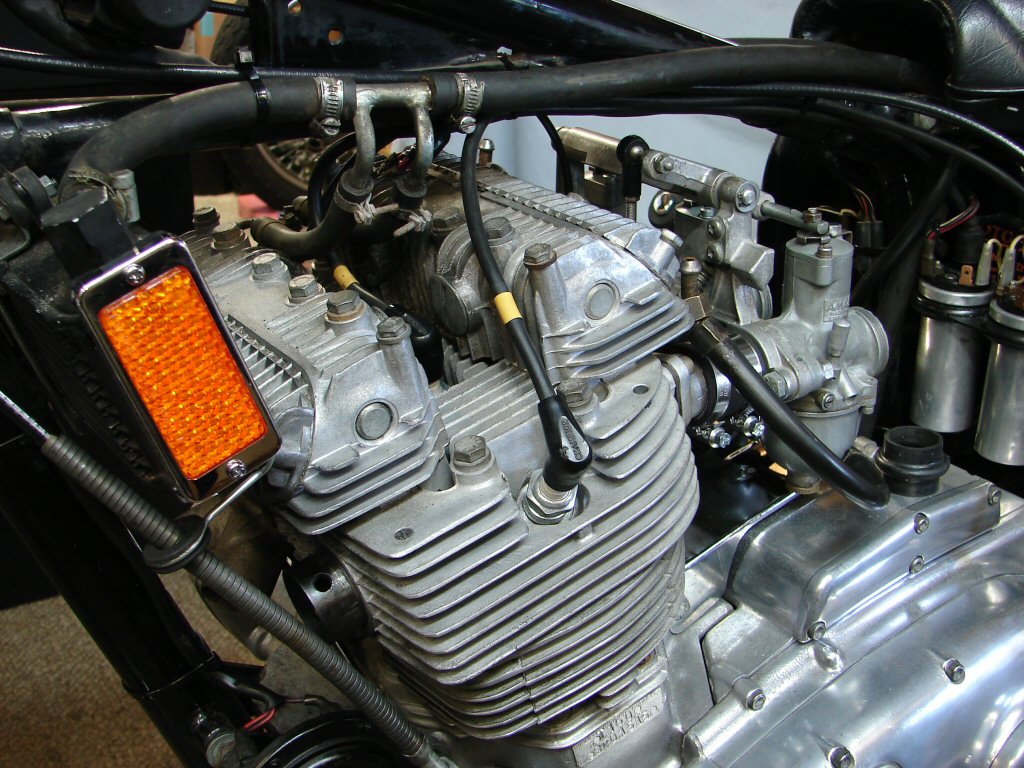
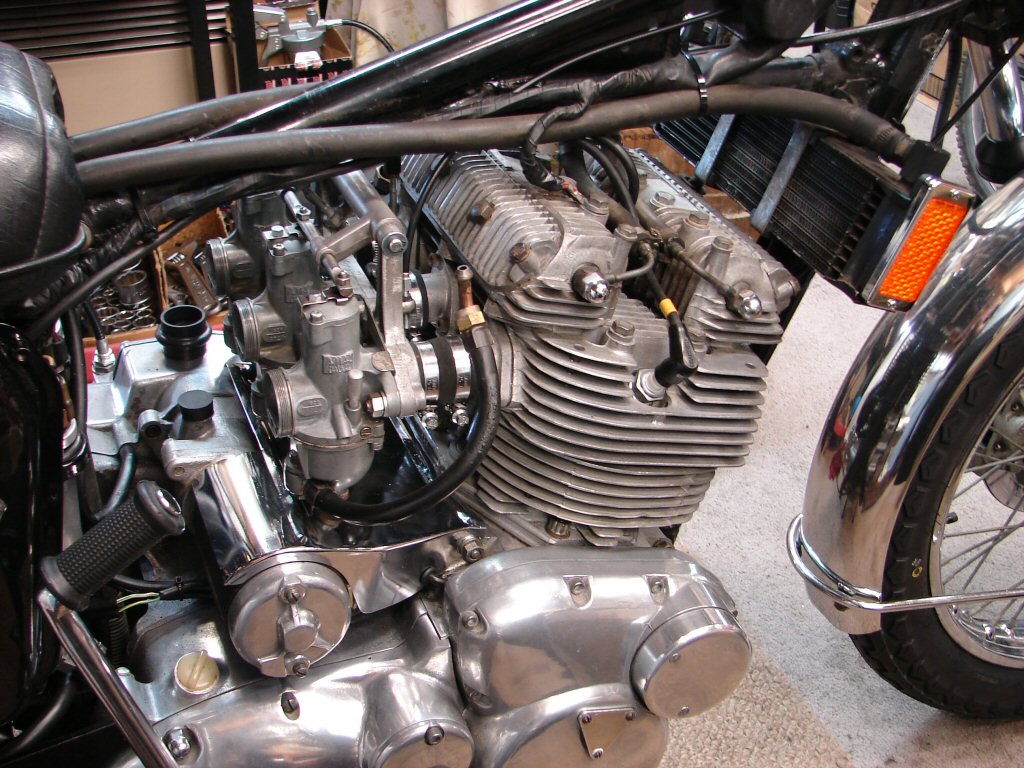
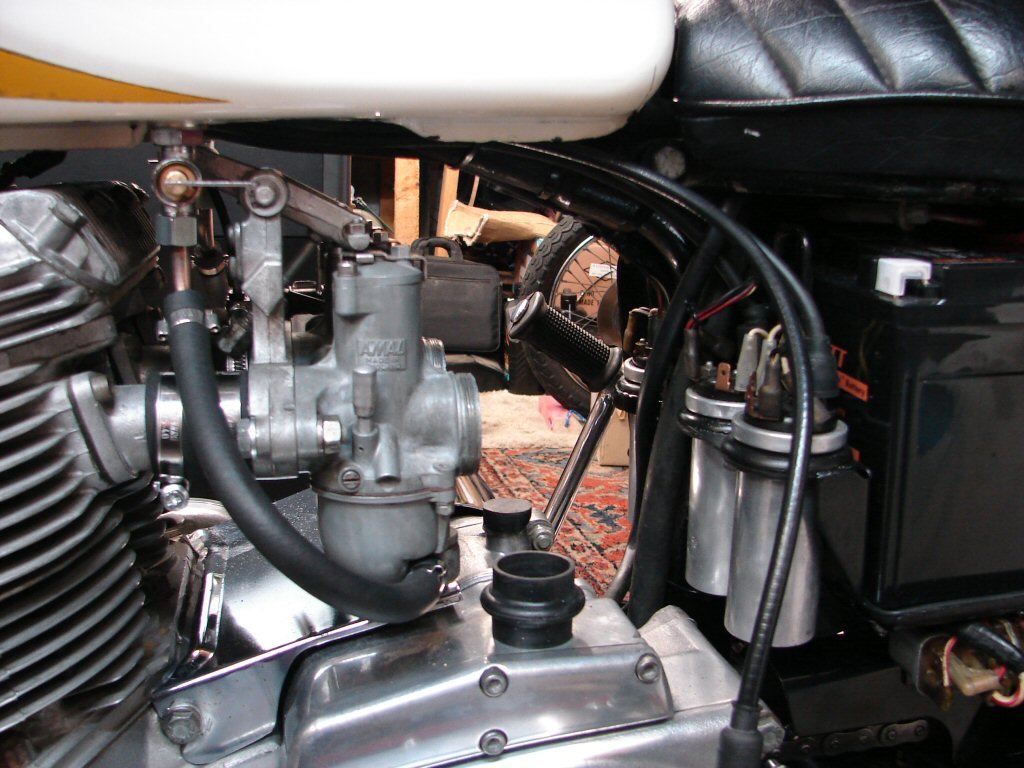
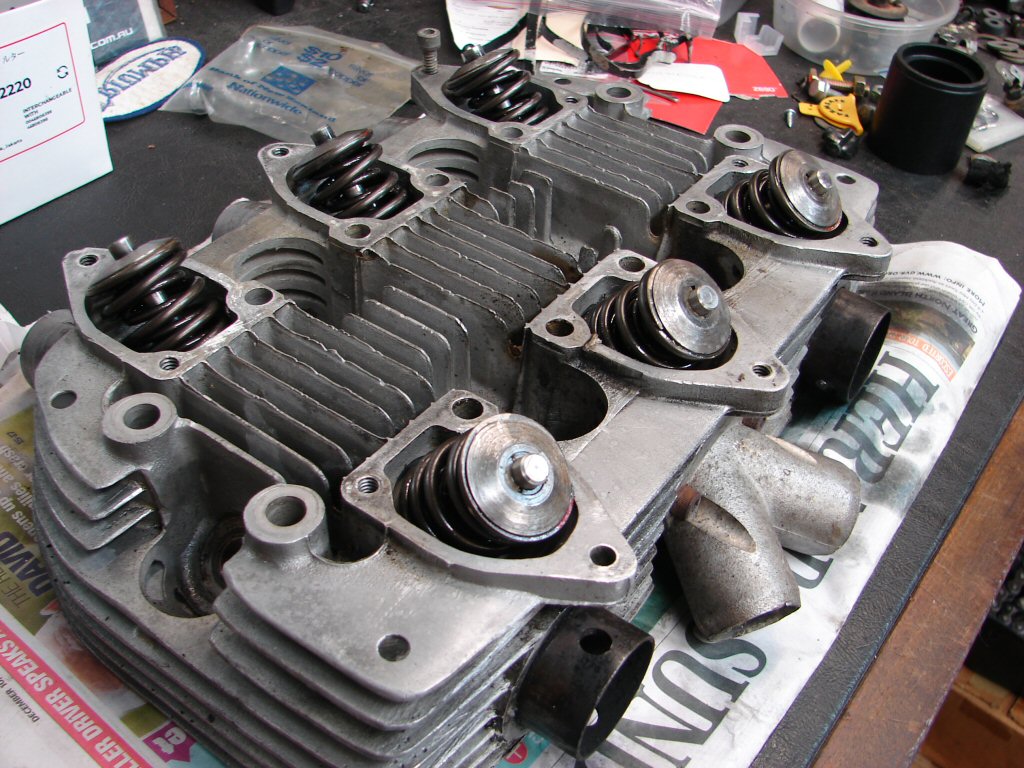
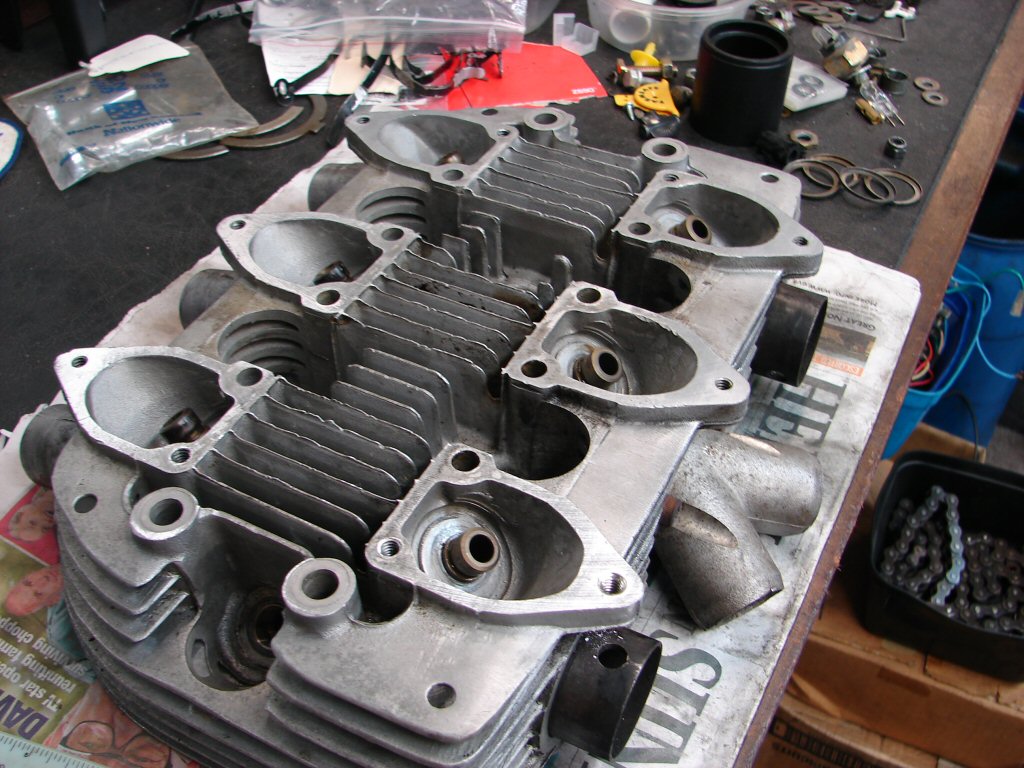
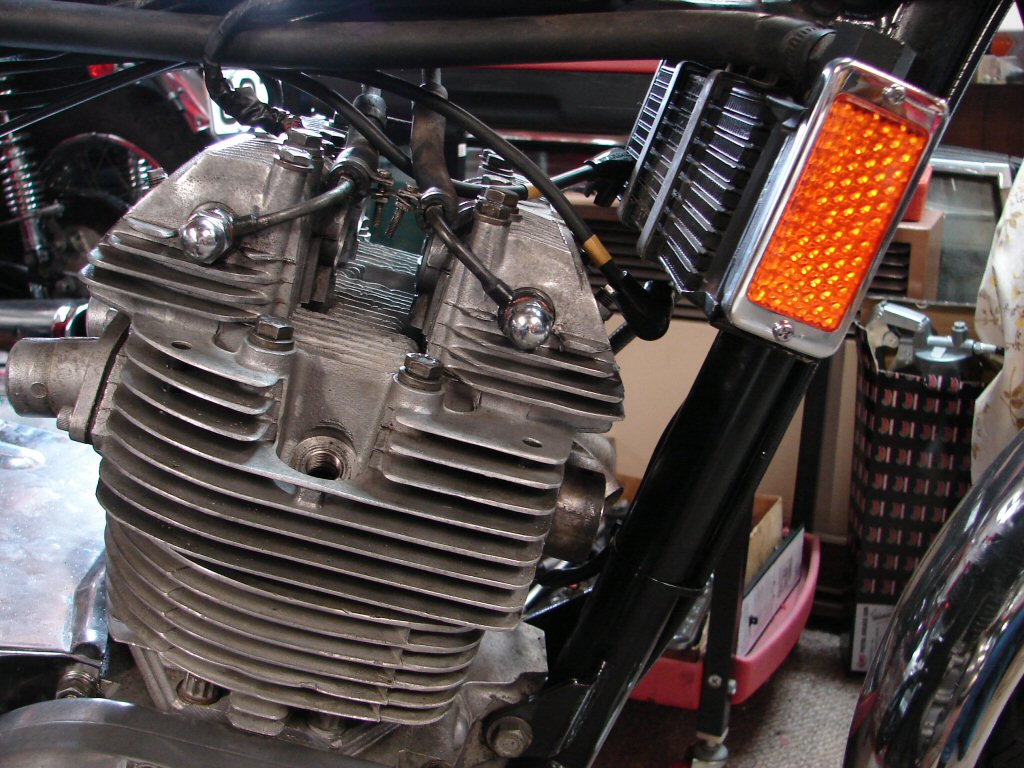
Next job would be one that requires an awful lot of time and attention if you want a sweet running bike, but it does frankly give me the shits. It is the left-until-last disaster zone known as the carb assembly, and this one was pretty manked. It is not just the carbs that were left to marinate in their own juice, but the entire gantry assembly which was suitably corroded and appeared to have had something like oil baked on it.
Two of the pullrods that lift the slides had locknuts seized to them so I had to dismantle each carb while still attached to the operating bar. Not fun but it can be done.
And was..
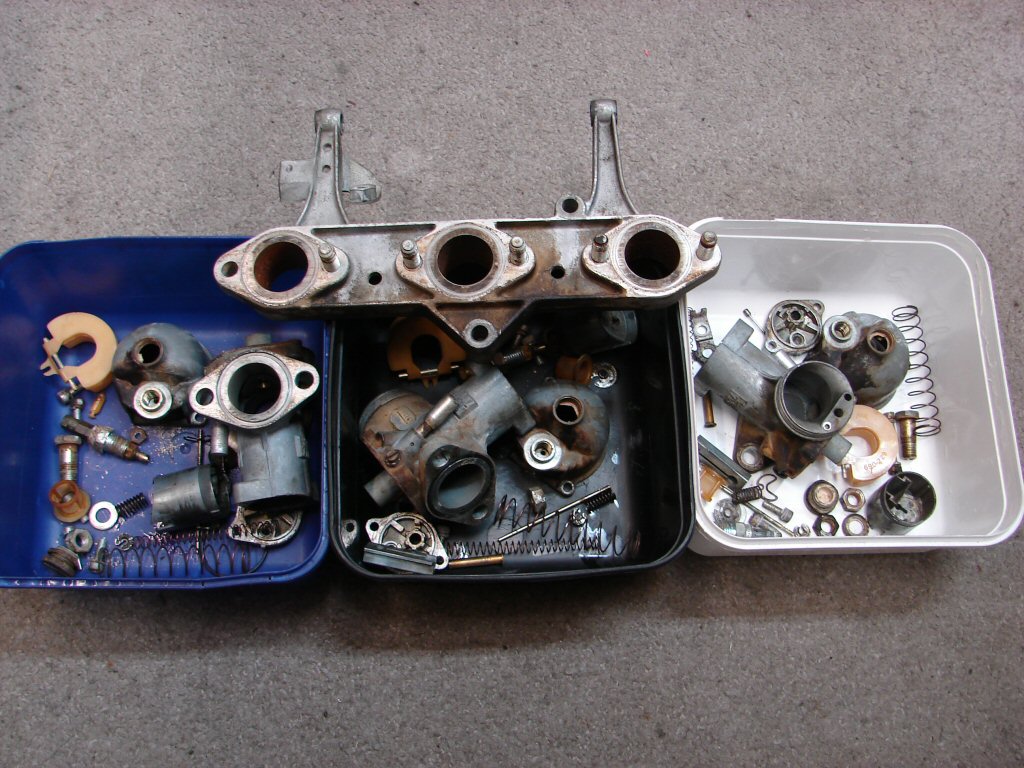
So here we are two days later, and I have worn out 3 small wire and brass brushes, sandpaper, steel wool and pot cleaners. Drill bits have been inside every drilling that could shelter ancient snot, pilot jet side drillings cleaned, float levels reset and blah blah.
Fortunately the chokes are not going back on, so that makes reassembly a lot simpler but only eliminates 3 parts per carb, so every other bit gets the treatment. For reasons I cannot explain, sometimes when I strip old carbs I find a slide that has jammed inside the carb body. This was such a time, and it was not grubbage, but a change in the dimensions of either the body or the slide so they have become an interference fit. It is beyond me how this can happen at all, let alone when sitting. The last T160 I restored suffered this same problem, and had what looked to be a bubble in the alloy surface inside the body where the slide fits. This one simply jammed each time it went in unless it went in upside down. I tried two other slides and they were fine in this body, but I could not see where the slide had grown. I filed and sanded and polished until it behaved itself, and the obvious shine on the slide will indicate which carb it was.
I have had enough of this game for a while, so I will work on another bike tomorrow. The results are pleasing enough and despite their poor condition due to storage the carbs seem to be low mileage such as the speedo suggests as 11,200 miles, so I am expecting the tuning will be pretty straightforward.
Now thats a bold statement.
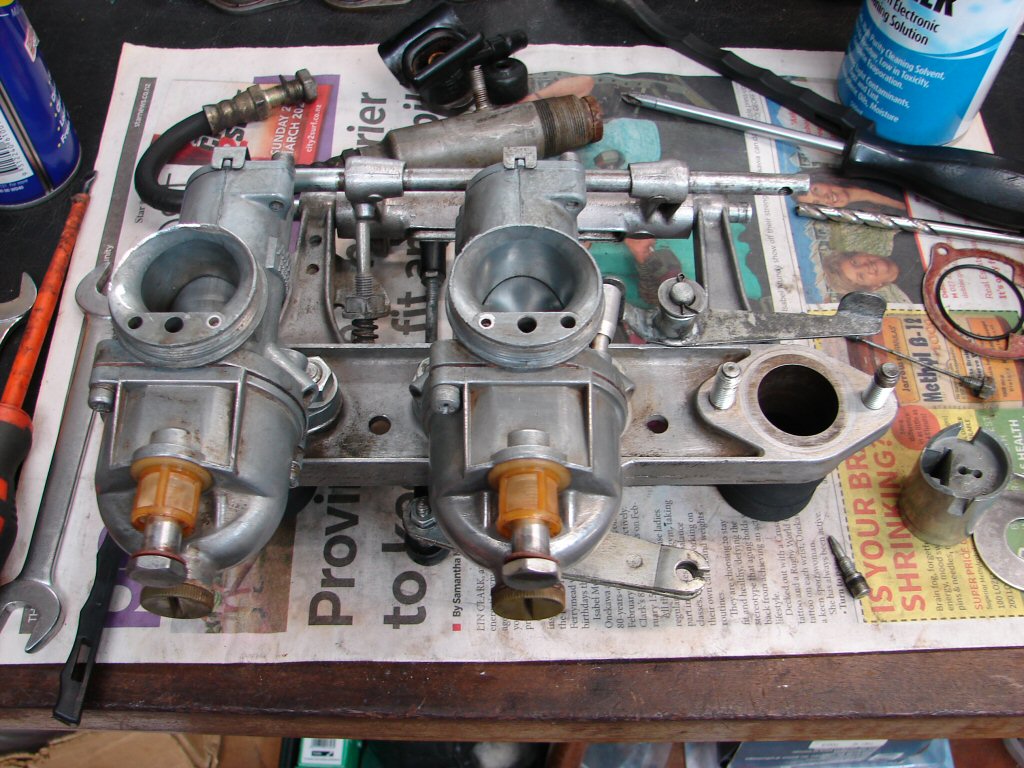
But now I'm back. And I finished the last carb while waiting for a computer to sort itself out. I think this is good enough, as this is a comprehensive re-commission, not a rebuild or a restoration, although it can feel that way at times.

Before the carbs went back aboard I wanted to test the electric starter, which would give me a second crack at getting a photo of the oil pressure gauge at cranking speed. It would also allow a second compression test to see if the valve adjsutments had improved things at all.
This introduced the need for a battery, so I went and got one. I use a Motobatt which is a size reserved for Harleys, and while still being smaller than the battery tray would allow, it is a fairly serious unit. It had no trouble whirring things up to a healthy level..
The compressions had certainly improved, having first presented as 110/85/85, they were now 145/130/125. There is room for more improvement, and it is possible that some may be obtained by putting a few miles on this engine, as it is now being woken from a very long sleep.
As a consequence of some extended engine cranking, the return oil line had now delivered half a litre of oil into the ice cream container which had been perched on top of the starter. The colour of the oil was now that of new, so we had successfully flushed the cooler as much as it could be until the engine and oil got hot.
With that all gone and the oil line returned to the tank it only took a few minutes to trial fit the carbs and airfilter to see how it all worked together. The new manifold rubbers made it somewhat demanding, but that is as it should be. The airfilter needs paint, but the weather is crap for paint right now. No doubt there will be other things to attend to before all this is considered sorted.
I have cleaned the fuel tank under and over, and will hopefully use it for a bit before attending to the paint or that nasty gark on the lower left side. The taps were throwaway, and have been. Besides those we still require another brake master cylinder, a new chain, throttle and possibly speedo cables, add to that the battery and you have a grands worth of bits. Although I have used as many original parts as I could manage there will be at least 2 grand in parts by the time it moves under its own power, and it may remain in that condition for the forseeable.
Sure is responding to treatment though...
Have had the fuel tank marinating in coca-cola for several days, as there was a thick coating of something covering the bottom and sides within. It could be scraped off quite easily, so was either fuel or stabiliser residue after decades of storage I guess. Still has to come out though. I checked it yesterday and the bottom of the tank was clean-as where it had been submerged, but the sides were still covered and there were a lot of 'flakes' of whatever the stuff was.
My second attempt began last night with white vinegar, as a comparison, and I left the tank on its side with a litre of that in it. I will leave it another day or so then do the other side. No leaks is good.
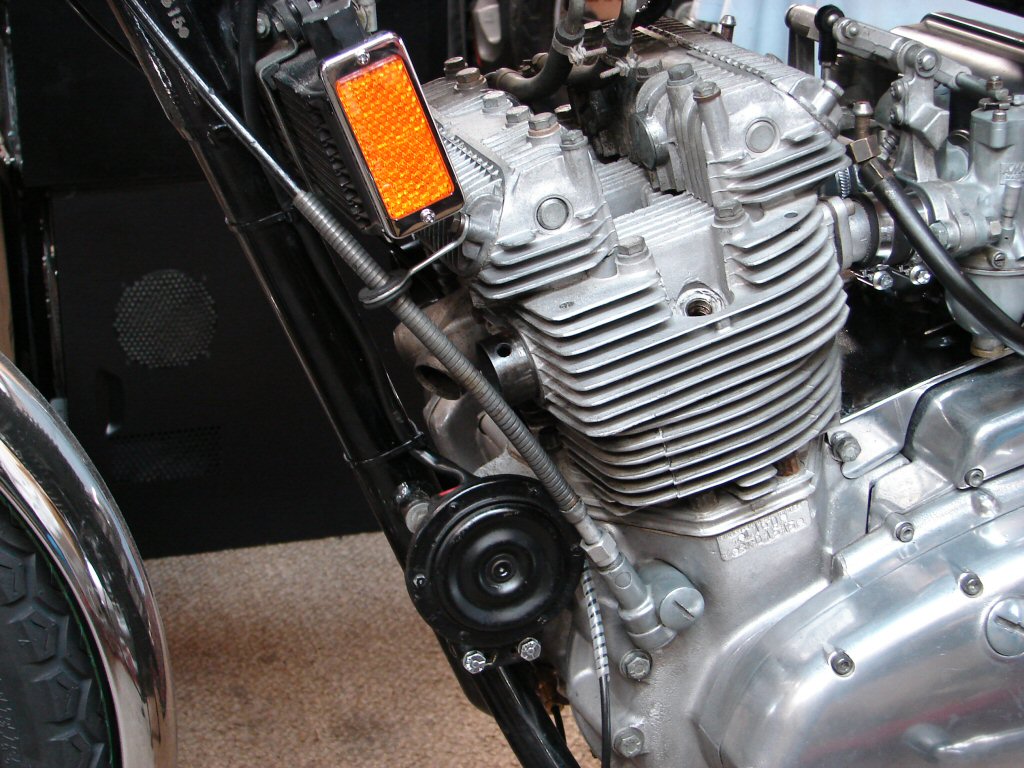
Meanwhile I have been glueing and wiring the mounting rubbers to the oil cooler so the reflectors do not go missing in action. The rubber is very soft on the latest examples, so I used plenty silicone to try to give it some rigidity and left it with cable ties holding some pressure on the finished job for a few days.
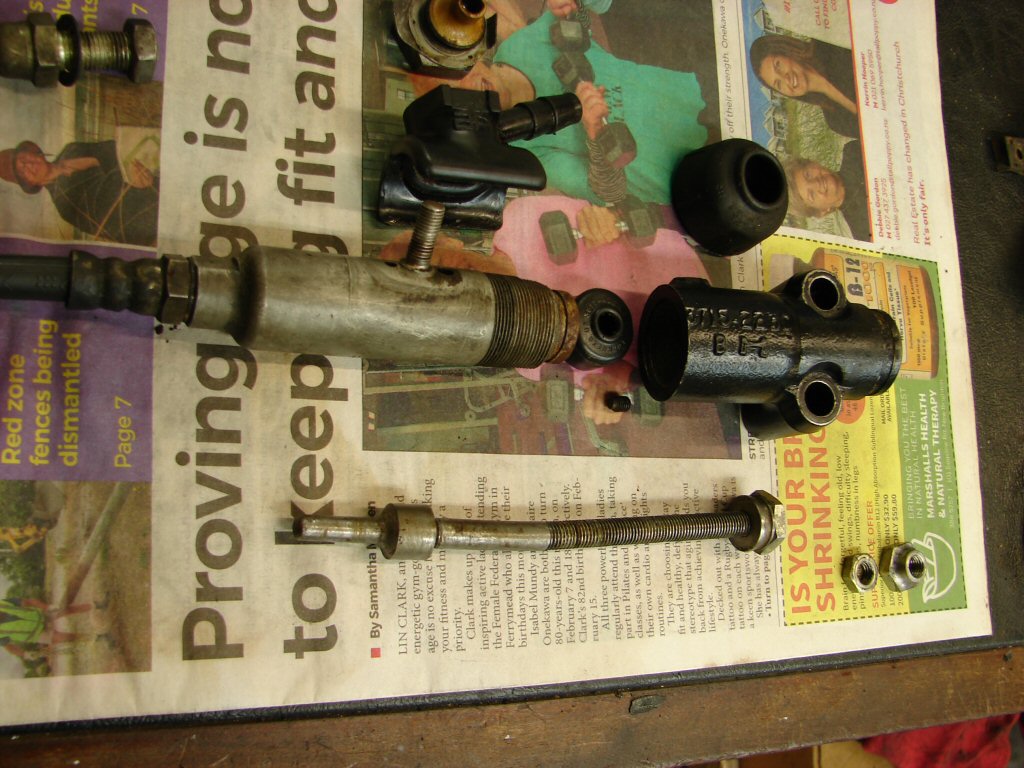
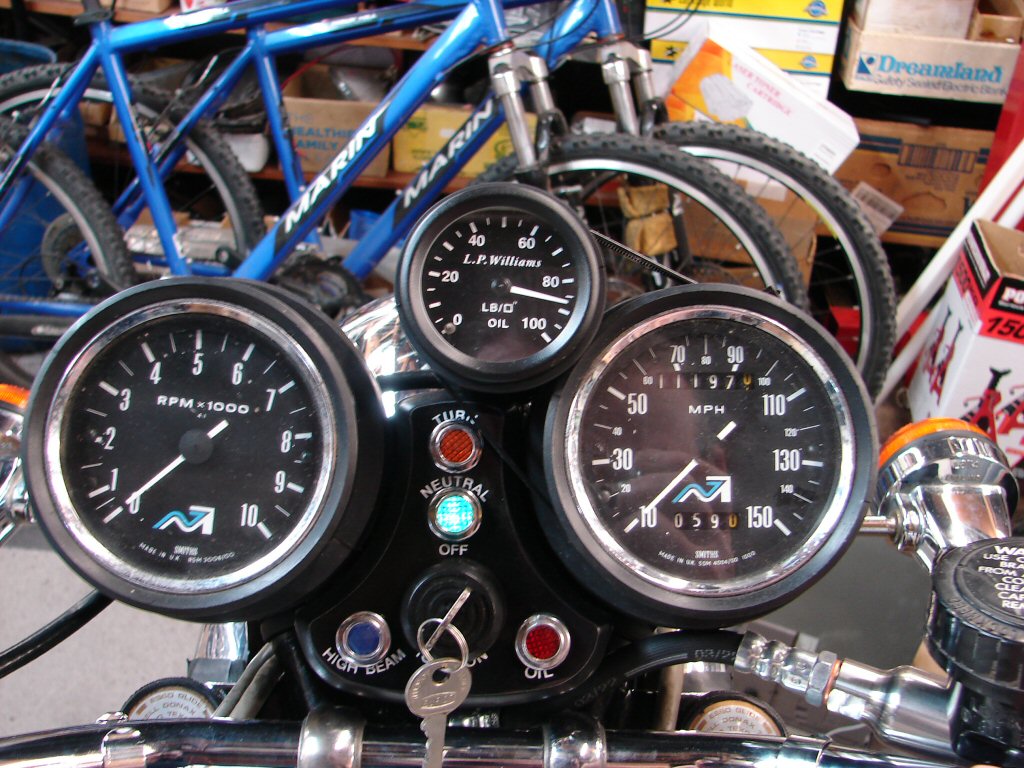
I began to refit the tacho cable and discovered that the thread was stripped on the tacho drive body. That explains why it was loose when I removed the cable. I remembered that Les Williams had sent me a couple of used tacho drive bodies back in the 80's or 90's with a parts order, and I found them surprisingly quickly considering the state of things in the shed of late.
It appeared that I would be able to build one out of the 3 I now had that should give a good result, as the offending thread was still intact on the right one, while past caring on the original on the left. I think this has been a common problem with triples over the years, when many owners only had one large spanner.
I noticed when twirling the freshly greased tacho cable by hand from drive end that there was a fair bit of resistance, and figured it was the clock itself, which it proved to be. You have to be very sparing with oil on these things, as you have no control where it goes inside the case.
My method is to use a sparing amount of 3-in-1 oil and to hold the clock horizontal while adding a few drops inside the threaded housing where the brass drive begins. I had to do this twice here before the drive suddenly freed up noticeably, so I treated it to quite a few rotations in both directions before allowing it to stand upright for any excess oil to come out. I did not wait too long, as it will do the cable a favour if any of the same oil goes down there.
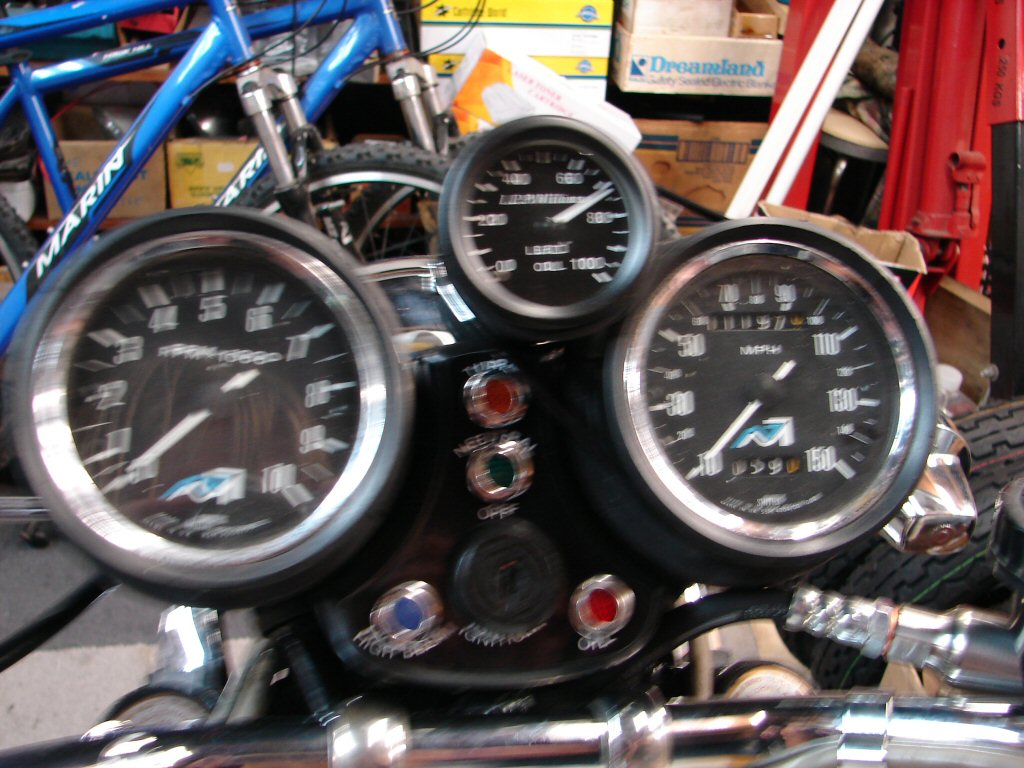
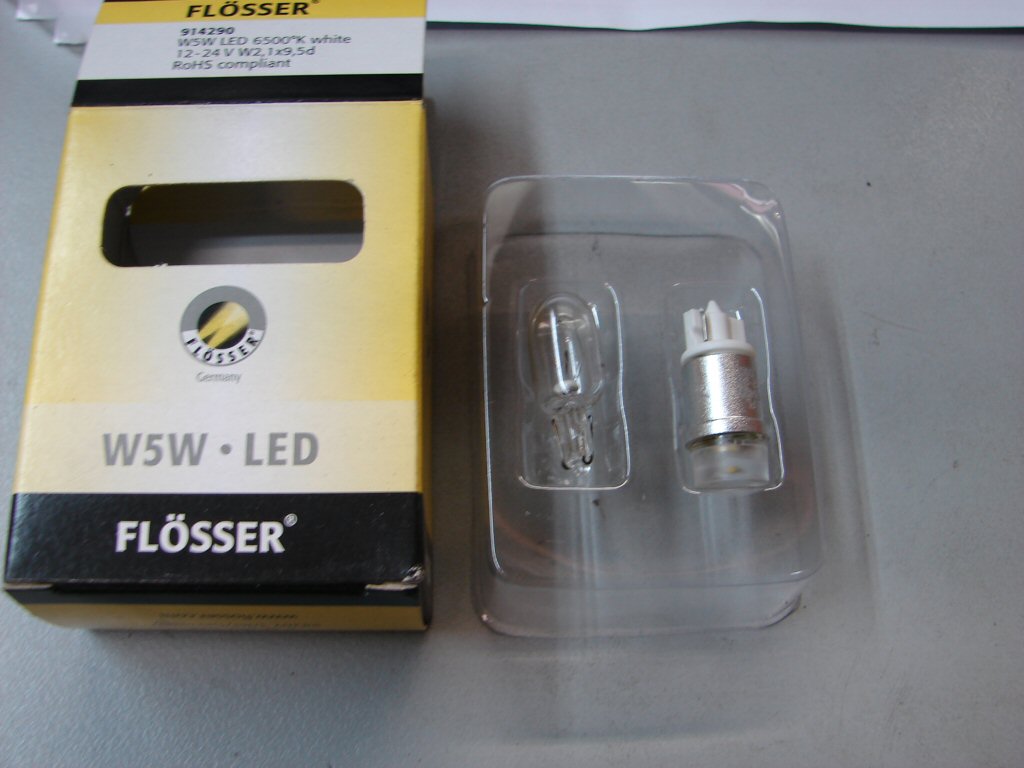
While messing with clocks I remembered to add one more 'modern' item which makes a difference. I know my failing eyesight has much to do with it, but the illumination of the clocks was never outstanding, so I am now in the habit of replacing the bulbs with LED's.
It makes a worthwhile improvement and I have yet to see one fail.
For anyone wondering, these are they alongside the original, but I have seen various types of LED for this purpose and they are all an improvement.
It all came together well, as did the oil cooler reflectors and the previously missing tacho cable support from the rocker box.
Today the rear disk caliper went back on. The front has been in place for some time as I wanted to fit all the new hoses up and the new master cylinder. I have not put any fluid in the system yet, as the front brake light switch refuses to behave and the fluid only makes the dismantling process more difficult.
Very pleased with how the calipers came up though, and the amount of chrome still on the front disk would suggest the mileage is genuine.
The alert will notice the axle clamp is broken, and t'other side also. Same guy as destroyed the tacho drive methinks. NZ is currently out of stock of these 'popular' items, but I am not averse to using it as-is if needed. The axle can hardly escape.
Today I resurrected an ancient set of original T160 spark plug leads and am very pleased to see them on. As the Rita does not require any form of suppression I have used wire leads and just the Champion dust caps.
I fitted new coil connectors and a new set of Champion N3C's and got three healthy sparks, which bodes well.
I had straightened the riders footpegs yesterday using my 2 metre length of galv pipe whose own weight does most of the work for me. Both pegs were seriously bent, so the bike had been down on both sides at some stage, and apparently with some forward motion, so they got a coat of paint today.
I also took the airfilter housing off for paint, and decided to leave it off for the imminent arrival of fuel. I have doubts about the integrity of the original fuel lines and would rather they were accessible for any needed attention if fuel starts running out..
Even if it is a small thing, if I do at least one thing per day I can relax in the knowledge that it will eventually be complete.!
So today the footpegs were fitted with new rubbers, having been painted for 24 hours. I also fitted the speedo cable, repaired the front brake light switch again, fitted and adjusted the rear brake light switch, and began cleaning the exhaust headers.
At this point I had cleaned and polished the inner headers, and just put the outers in place to see that everything cleared everything else.
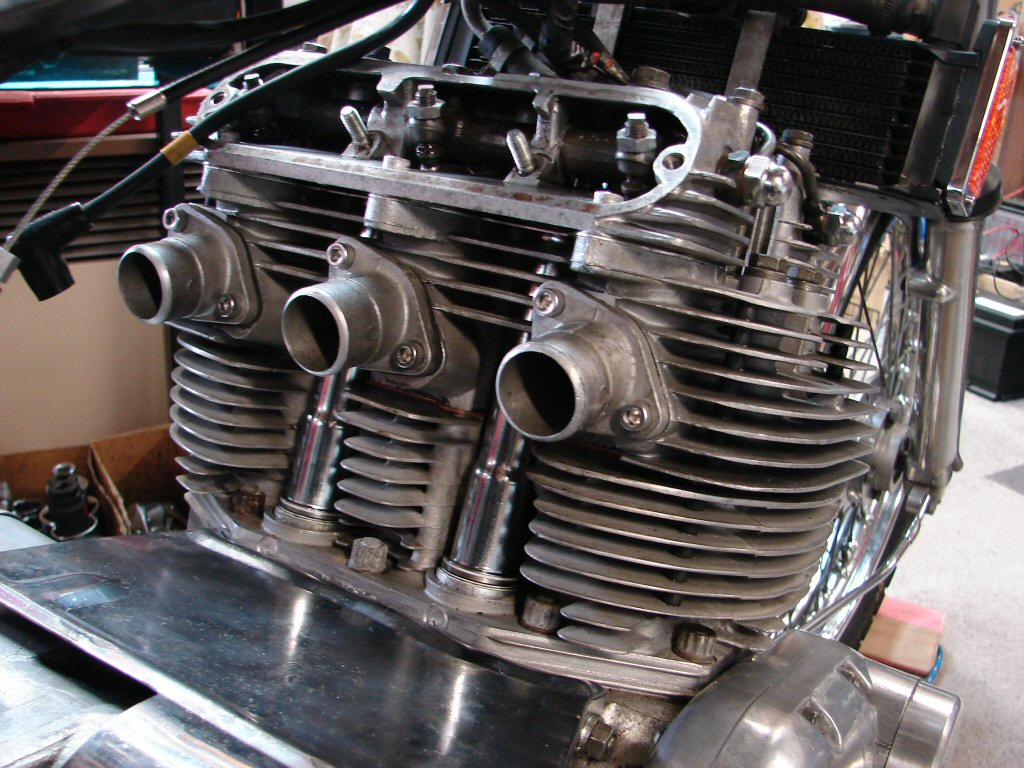
Partially repainted airfilter fitted hand-tight to guide me with cable tying the new plug leads in a position where they do not impede full throttle position of the carb gantry. The airfilter holds the carbs in the correct position so was necessary. It will come off again when the first fuel joins the mix.
The fuel tank is still marinating in white vinegar with only one side left to do. Each position gets at least a day, and the colour of the liquid is plenty proof that it is dissolving large amounts of crud.
I intend to put fluid in the front brake and bleed it up today if the brake light switch is still working. Rear has to wait until its new master cylinder arrives, hopefully later today.
The front brake bled up in fine style and no squawks with their action or the brake light switch, so thats just fine.
Rear brake cylinder arrived following day, so that went on with a new hose, and is seen here during the bleeding process. The only concession I make in order to bleed it easily is to release the rear shocks, which gives slight encouragement to air bubbles to leave the caliper. No problems at all so we have two working brakes.
The fuel tank finally got emptied and flushed with high pressure water, which dislodged a lot of sediment that had softened enough to go. I gave it a couple more rinses before the dark stuff coming out in the water had ceased.
Then I took a good look inside and was well pleased. There are a few spots of superficial rust but nothing that has developed to any degree. As long as there are no leaks we're sweet.
The chrome cover for the rear caliper took some reviving, but finally played ball, so the next step was to refit the rear peg/muffler bracket. The mounting boss for the peg was tarnished beyond achieving a good finish so I painted it with silver wheel paint. I have used the same paint for the boss end of the rear axle in the past and it gives a nice looking finish. I shall repeat that process on the left side pillion peg on the next paint day.
Meanwhile I gave the mufflers a clean and polish and emptied a considerable amount of old carbon out of both ends of each. I imagine it will still give off a good cloud on the first start.
Suddenly it looks nearly finished.
I decided that the two main fuel lines were past their best-by date and tried removing them. The collars had to be cut away after which the left hose broke into numerous pieces. It had become totally solid. That makes me think the two short inner hoses between the banjos may leak, but having not been disturbed perhaps they will comply.
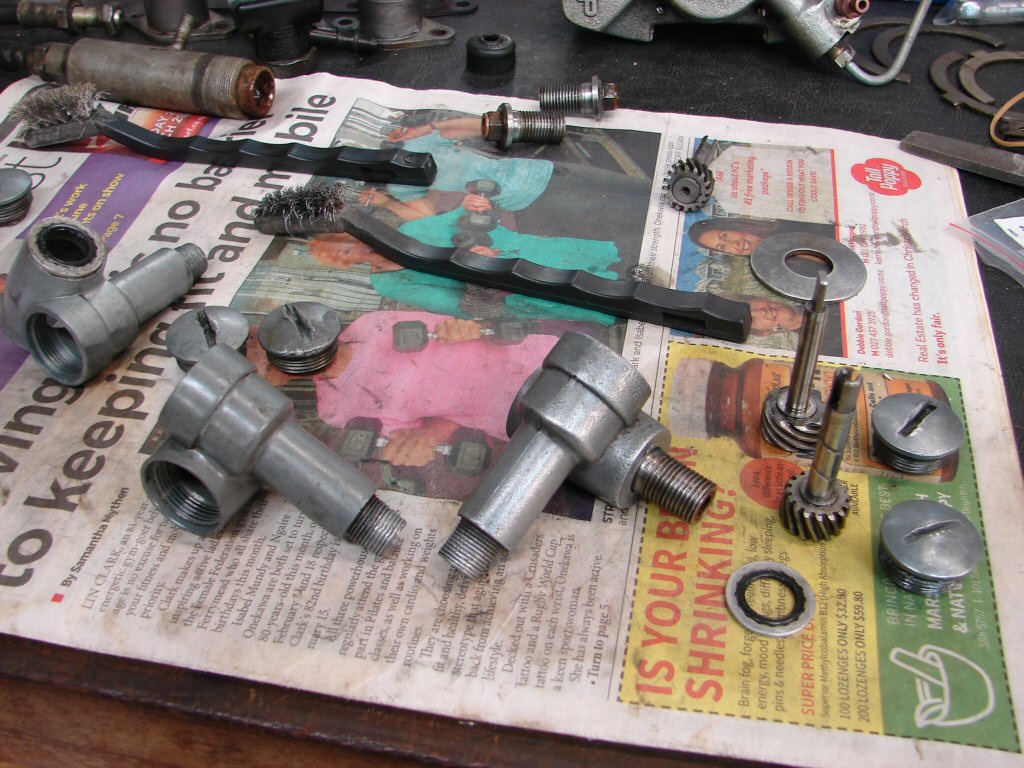
I tried two sets of fuel taps, appalled at the lack of quality control on the first 'BAP' style which would not offer a good fit to the pipe union. I had bought two new pipes and union nuts, and they were really not fit for service at all. I was able to remedy the nuts by drilling them internally so the pipes actually tightened without binding. I then polished up the original pipes from this bike for a second tour of duty.
I had intended to run the fuel lines inside the inlet rubbers and outwards to the taps, as the first publicity brochures showed the T160 as having, but it turned into a major headache so I simply kept them outside but used a shorter length hose which has brought them inboard some.
Getting close to putting some fuel in to see where it comes out. I think there is a high probability, more with what I have not done rather than what I have.
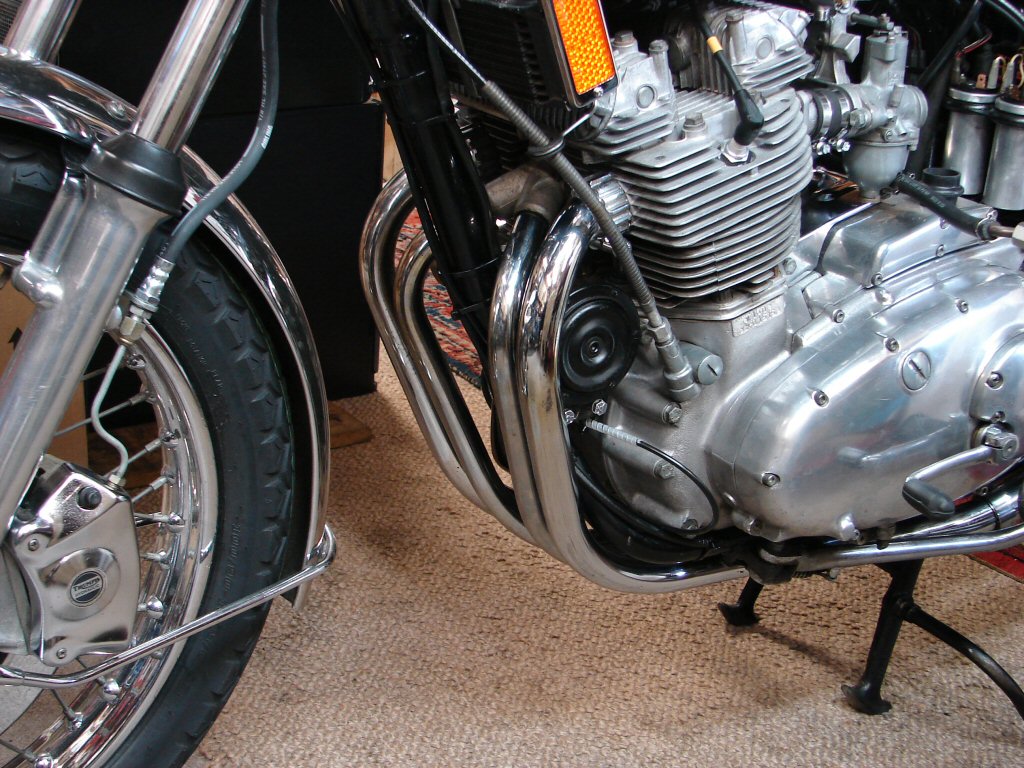
I have not yet polished the outer headers, so the muffler clamps have not been tightened, and the headers can be eased out leaving the rest in place. There is a reason why I had not done the final polish before trial fitting them.
Turned out that the exhaust manifold clamps were T150 items, so having thought I had nothing left to buy it seems I was wrong. While there are only two they still amount to roughly $150 delivered, so I think my estimate of spending 2 grand in parts will probably be accurate.
Unless the head has to come off...
Just because they cost nearly $150 a pair does not mean they include bolts. You have to invent those yourself. So I did.
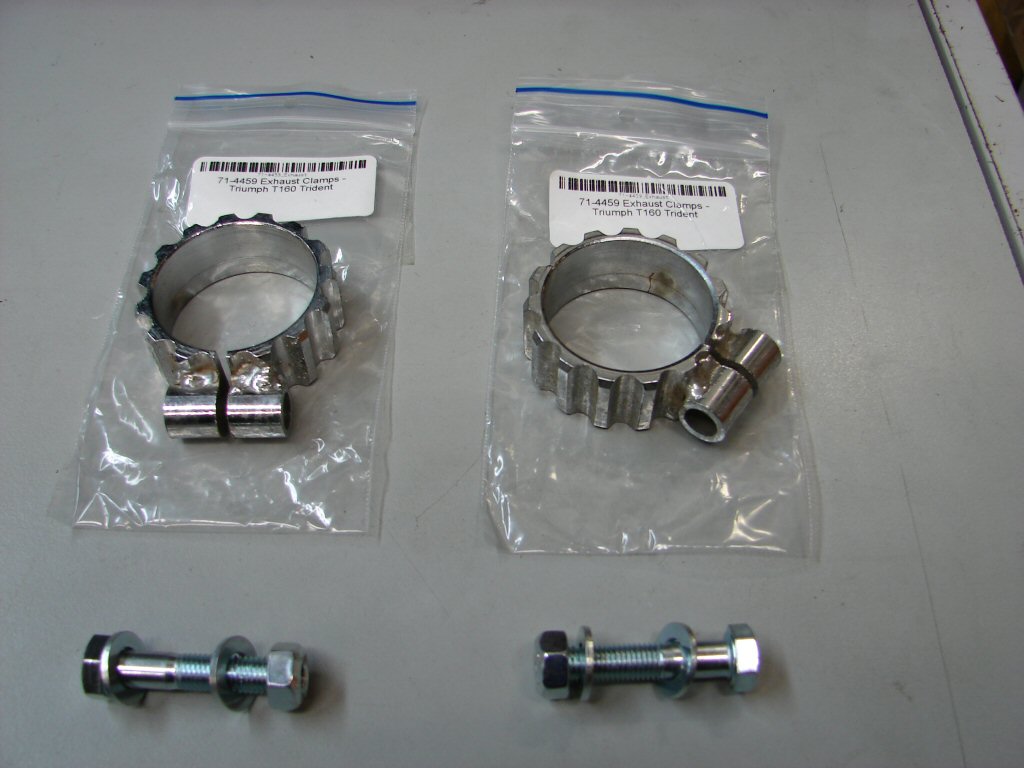
That led to removing the outer header pipes, giving them a good clean and polish, and doing the final refit. They behaved themselves and the new clamps were a good snug fit. No poor quality control measures there then.
With the muffler clamps also finally tightened the exhaust system is a done deal.
Next move will be to flush the fuel tank with a little sacrificial fuel to make sure everything else is out, then perform the leak test. We shall do that outdoors...
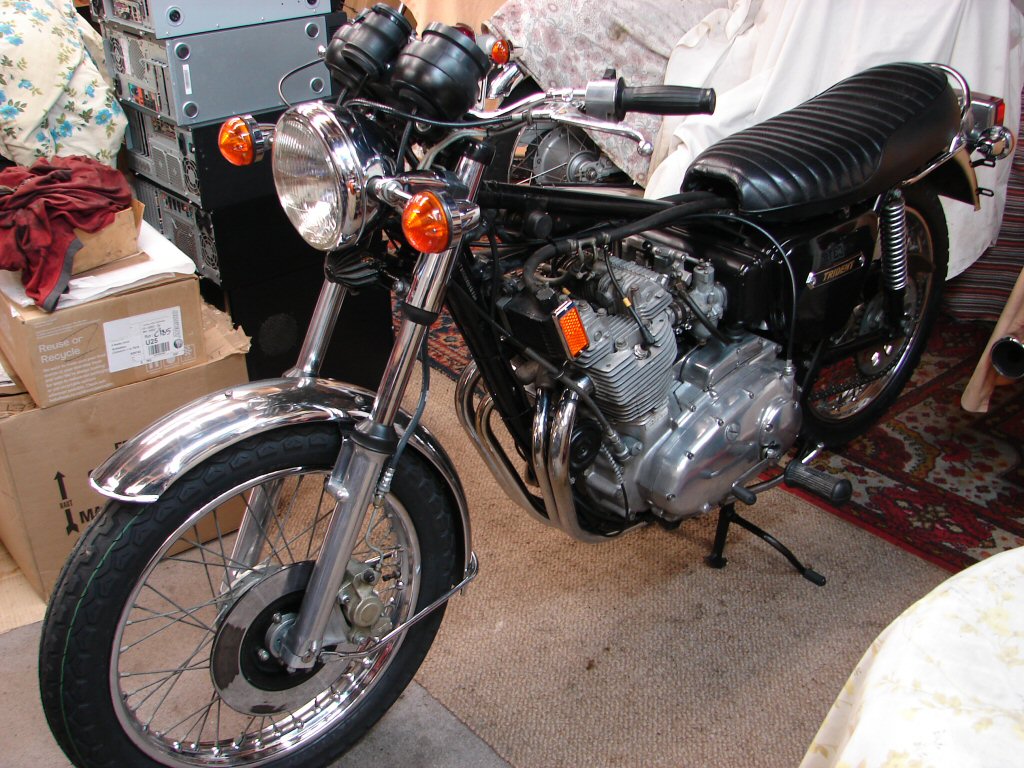
Yesterday the tank got its brief petrol rinse and was all fuel tight. So I put it back on the bike and poured a gallon of BP's finest into it and sat the bike outside.
Kinda like this -
Which quickly turned into this.
While the motor sounded sweet there was a nasty random knock sounding to be from deep in the primary area. Pulling in the clutch, or engaging first gear and letting the wheel spin did not seem to influence it. I wondered if the ring gear might be out of place or loose, but successive cranking tests sounded as if everything was engaging fine.
Obviously the primary will have to come apart again, and despite there not being any real visual evidence of it when I first looked in there, the cush drive rubbers will be the first suspect.
Much more good than bad. Yay.!
A nice pair...
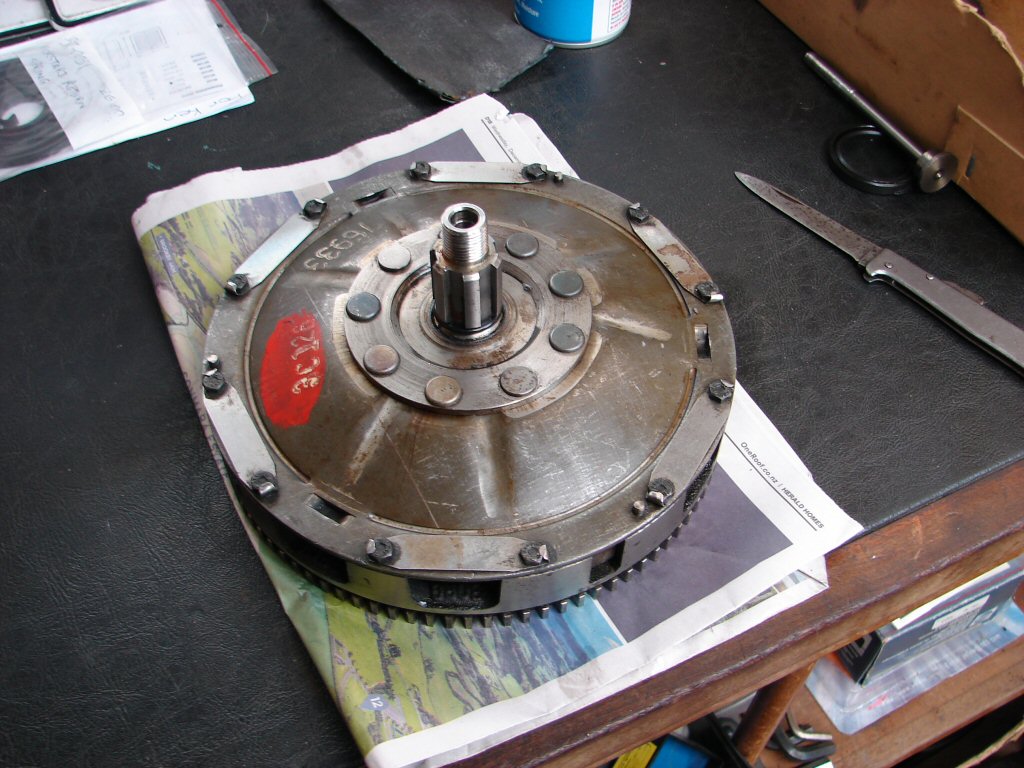
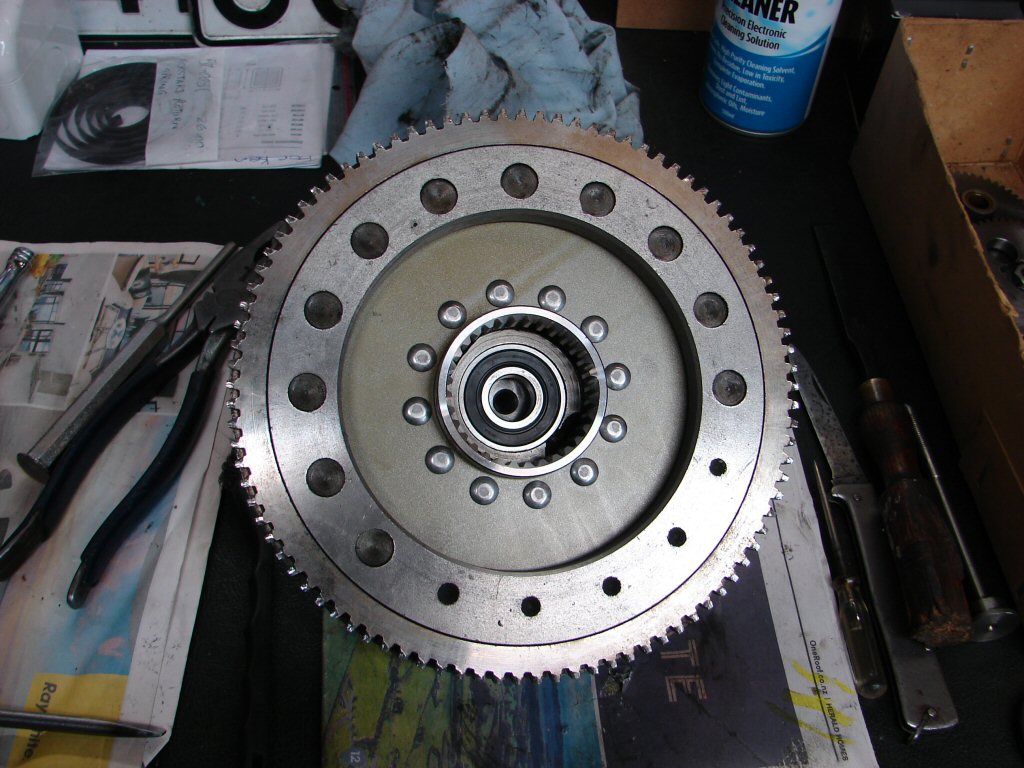
Today I pulled the primary off again. Having been off in the last few weeks it came away without too much persuasion and the new gasket remained in perfect shape. I had made a quick check prior to this by putting the bike in top gear and turning the wheel to and fro, and it did seem to me that I was getting full movement of the cush drive, as if there were no rubbers in it at all.
Now with the primary exposed I repeated the exercise and yes - there is zero indication that any rubbers are present at all. There is only one explanation that makes any sense - someone was previously in here and cleaned all the rubbers out then buttoned the whole thing up again. That would explain why the whole thing was beautifully clean, but not why it got closed up without any new ones fitted. The lock tab on the crankshaft sprocket looked to be freshly folded. Lets see where this goes...
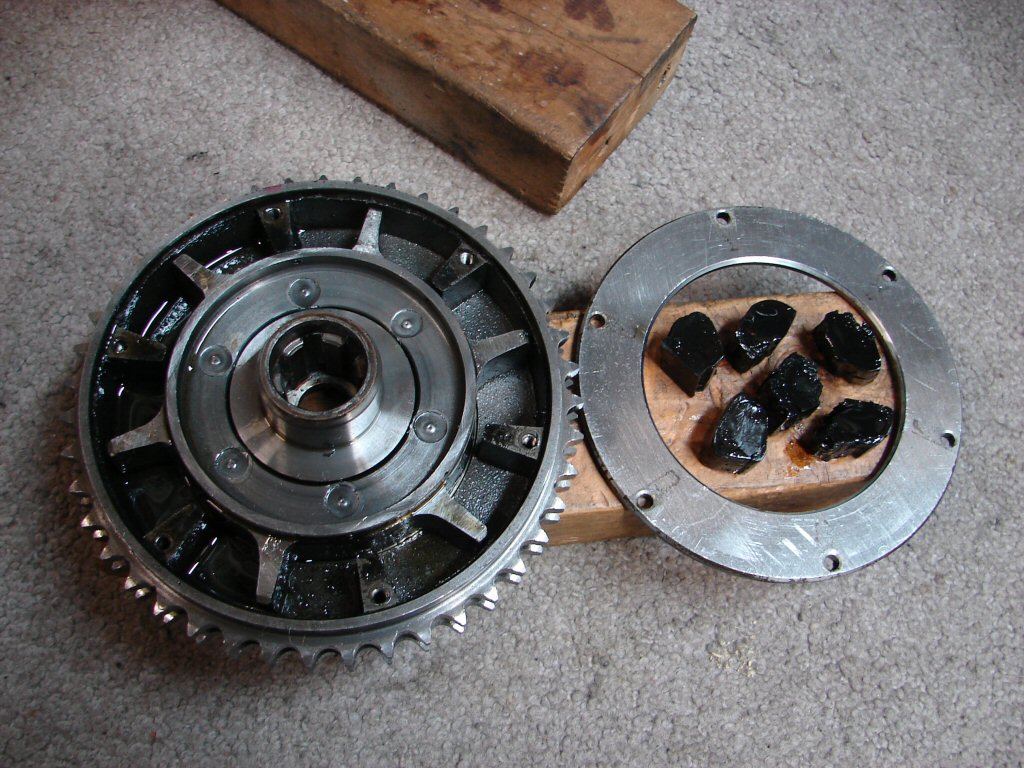
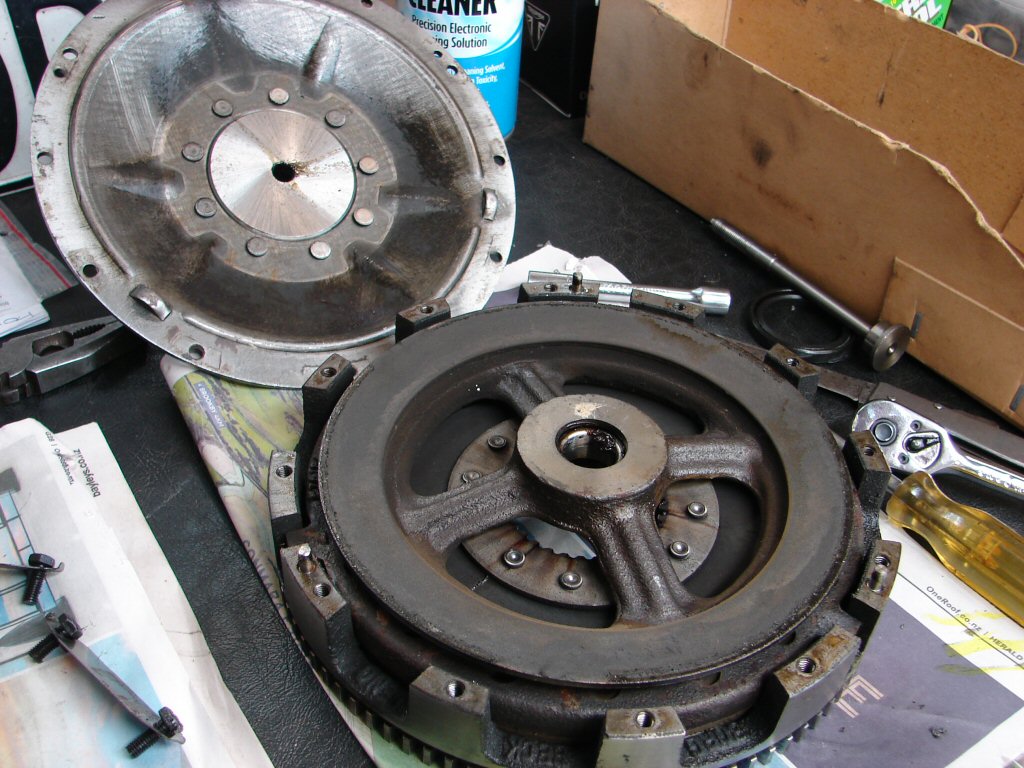
Well - I am pleased to be wrong. The cush drive contained the remains of 6 rubbers, the other 6 had vanished leaving traces - a melted then hardened coating between the retaining plate and the sprocket which required me to drive the retaining plate out.
Happily no internal damage and the problem isolated. It does mean that someone cleaned the mess out and did nothing about finding the source.
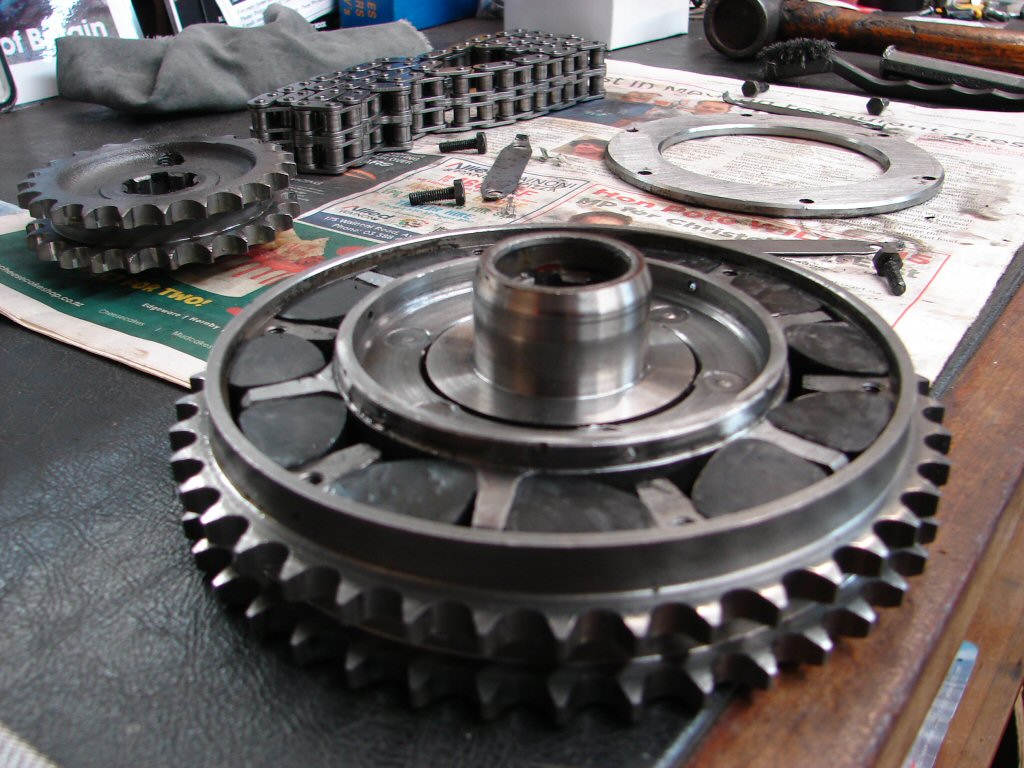
Interestingly perhaps, the other Trident I have been working on simultaneously to this also needed a new set of cush rubbers, but it was quite a lot harder to fit them than on this, due to the actual shape of the vanes on the spider. The T150 vanes had more angle which allowed one rubber to almost drop in and the other put up a tremendous fight.
This one still had an easy side and a not-so-easy side rubber, but overall the job was far more compliant, getting us to here.
I could see that the locking tabs had been reused once already, so this may not have been the original factory lot. That would also be suggested by the fact that the old rubbers were the same shape as the new ones I have just fitted. The currently supplied items are actually the smaller of two which are intended for the Triumph twins.
I decided that the locking tabs were in good enough shape to do a third duty cycle, so back they went. As none developed any cracks in the process I think it was a good call.
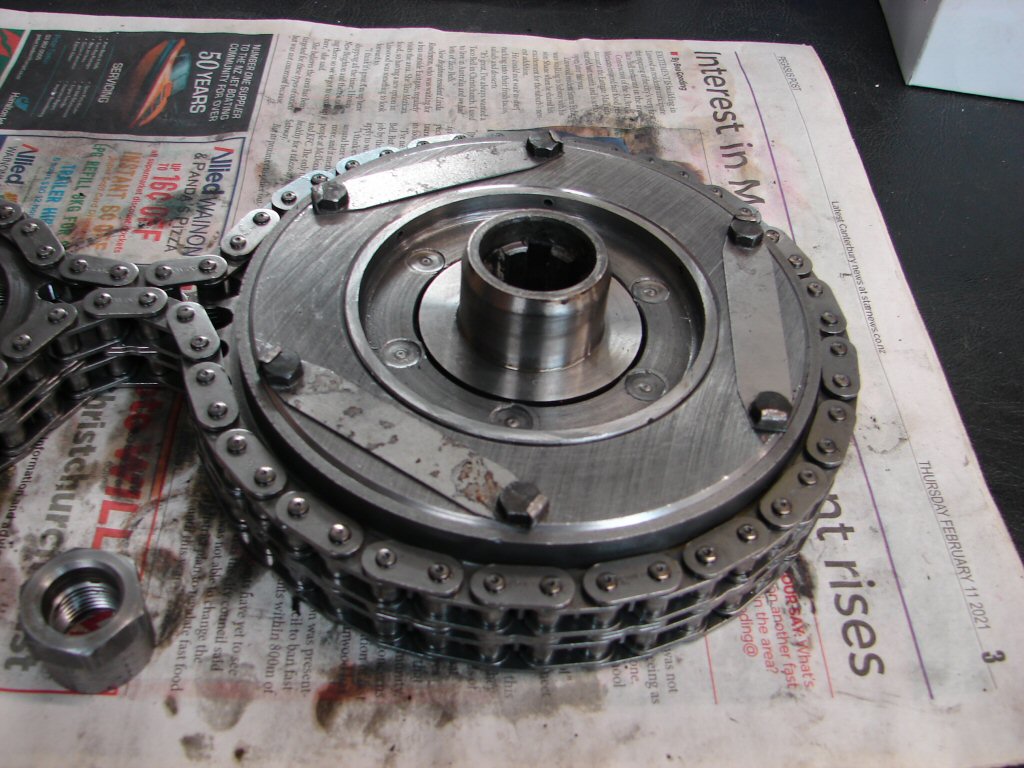
The chain and sprockets went back on in an orderly fashion. New locking tab on the crankshaft sprocket nut and new pullrod oil seal. I use a little thread lock on both nuts but I only tighten them using a powerbar and socket, high gear and rear brake engaged. While I am forced to resort to a rattle gun to get these nuts off most triples these days I do not see the point in using one to tighten to extreme amounts. I have not needed to for my first 45 years of repairing triples and do not intend to for the next 45. Plus - it might be me who has to get the buggers off.
So, close of play tonight has the outer cover back on, 350ml of Castrols finest GTX in there, and some paper beneath for the overnight leak test. Footpeg and gearlever left off as the case will get another brief polish after the clutch setup is complete. Much easier to do this without pegs in the way.

No leaks meant the clutch adjustment got sewn up today and the footpeg and gearlever restored.
I was keen to make sure all the foreign noises had left town, so it went outside next to its brother for the second start.
All good there so off around the block or 20 and everything went great. I had the gearlever a bit high but otherwise all the controls were where I wanted them and it all worked. There was a bit of a throttle glitch during power off/power on - seems to be a common problem lately - but we have not done any carb tuning yet.
On my return with wide grin I immediately set about doing that. Pilot air screws first, then airfilter off and vacuum gauge pressed into service. Both outer carbs were working harder than the centre, which is the exact opposite to what the T150 tends to do after the carbs are just synched on the bench. I was able to effect a lot of improvement, and the second test ride followed as soon as I had put everything back together.
This was even better than the first ride, and I felt confident enough to give it some stick, to which it responded immediately and impressively. I am liking this a lot.
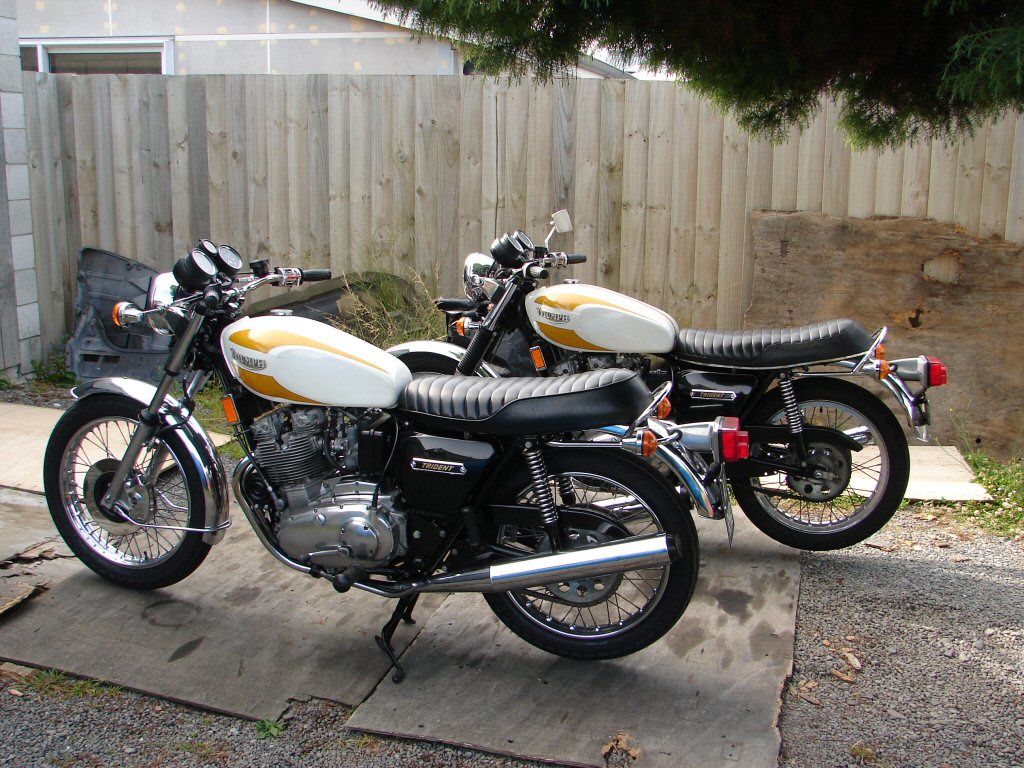
As tends to be the norm I then went out on my T160 for a quick comparison, but they are two quite different bikes to ride. The 750 feels a lot more eager than the 830 and I forget just how well these things went in standard form. My 830 has longer gearing so it doesn't feel as snappy, but builds up speed quicker as each gear is held a bit longer.
I went home before I got any demerit points and surveyed my handiwork in its now tested form.
Noice.!
A mate came around Saturday morning to test the bike and so that I could ride behind it to see if anything needed me to see it. Happily there was no smoke to be seen, and it did everything you would expect a used T160 to do and in a very friendly fashion. There were a only pair of loose bolts on one muffler to attend to while out, but there were obvious signs of oil leaks from several areas around the head, seemingly coming from the rocker box base gaskets and I figured they would have broken up being of the cardboard variety.
I figured they would have to come off to be replaced by aluminium items then.
Not only were suspicions justified, the gasket remains were so welded to the alloy that the head would need to come off to allow a good surface to be maintained.
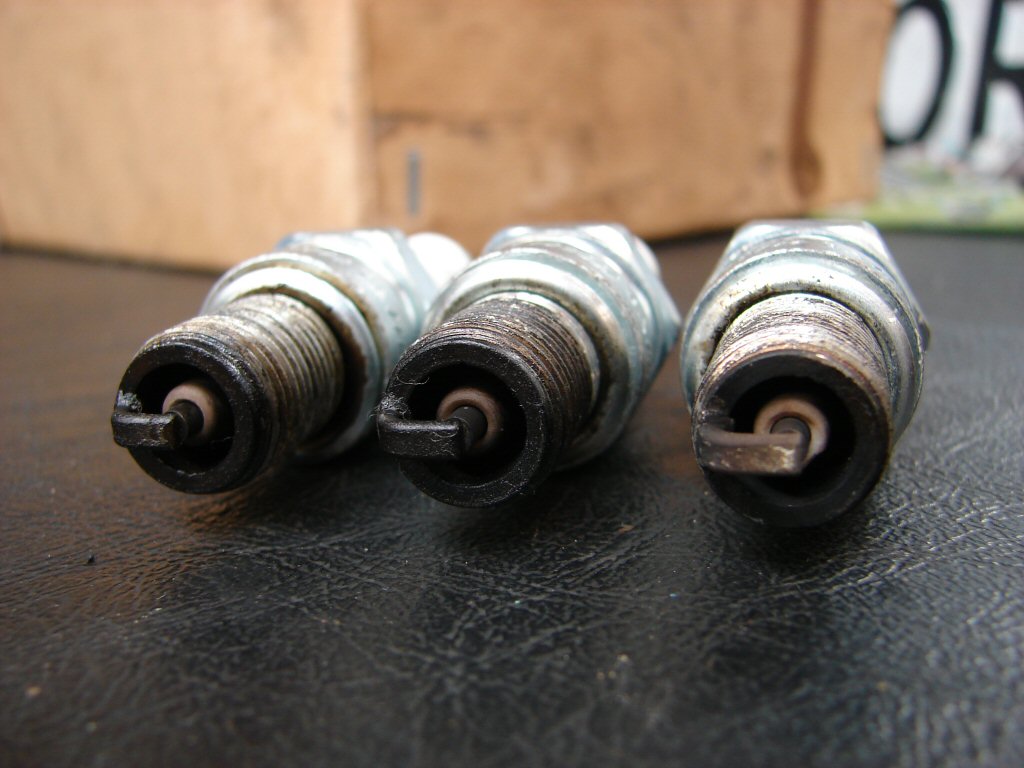
The spark plugs did not look too bad, although there were signs of a little oil having passed by lately.
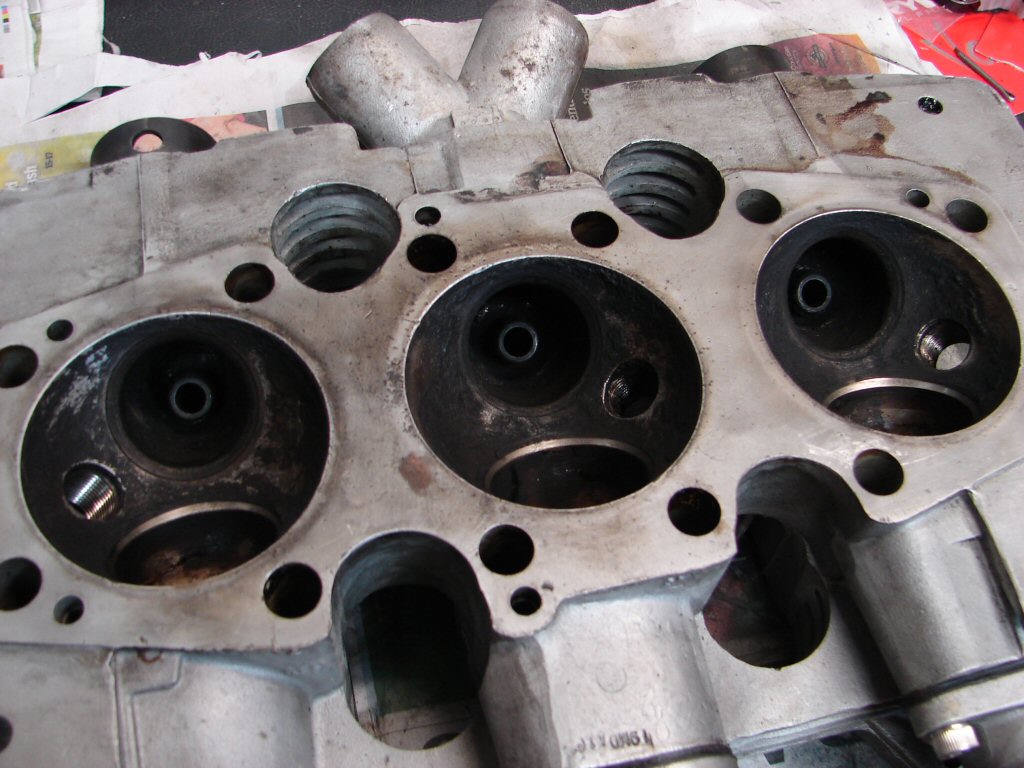
It is a tedious job scraping bits of mank off critical alloy surfaces, but it has to be done if oil tightness is a prerequisite. Quite a bit of carbon in the combustion chambers, and the valve guides are non-standard, so there has been work done in the past.
As can be seen, the nearest allen screw hole has completely lost its thread, which wound out with the screw, so it will need to be helicoiled. This was another factor which made me decide to lift the head, and by the feel of things a couple of the others will also need doing.
A fair smattering of carbon on the pistons, though the pistons feel pretty firm in the bores. If I strip the head I will be able to tell whether the oil has come from the guides or past the rings.
I have two options now. Put it back together in an oiltight fashion and just use it, or look for trouble. Valves, guides, pistons and rebore would be the whole drama, but to what end. If it runs ok now it may run ok for another 10 years, and there is no predicting how many miles it may accumulate in that period. I am erring on that side of the equation right now. I could be tempted to pull the timing cover and correct the cam timing, or at least check if someone else already has, but that may have to do for now.

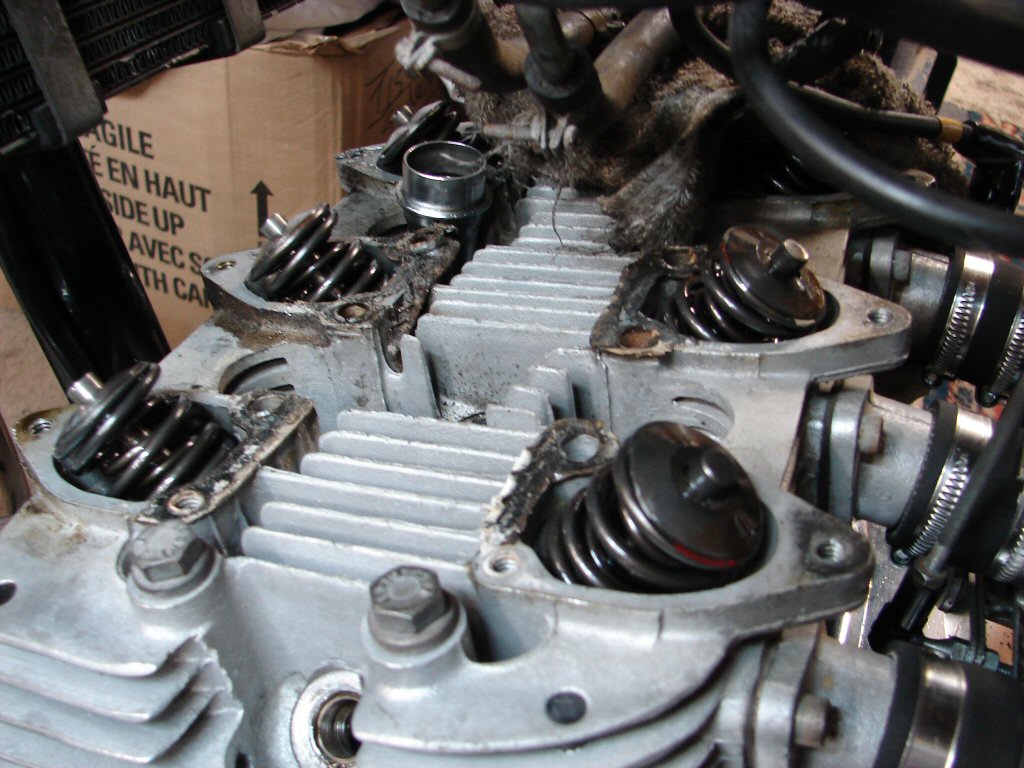
Of course, as you clean things up curiosity gets the better of you and next thing valves are coming out just to see where things are at. There were several "things".
The valve guides are the seal type, and while the seals were still fitted on the inlet side, they were so brittle that they crumbled to pieces as I removed them. I would expect to find pronounced wear in the valve stems when seals have been fitted, and sure enough they are quite bad. The seats and valve faces were still good on the inlets though.
Because the exhaust guides did not have seals fitted they were still a good fit in the guides, but the seats and faces were very manky. Probably where the missing compression was going.
I devised a plan to get the most for the least. I would face the rocker box mating surfaces of the head on emery paper and a sheet of glass while the valves were out. I would also fit whatever helicoils were needed after checking the rocker boxes on the head and trial tightening. I would then have the exhaust valves and seats machined by my machinist as they looked too bad to clean up by hand. I would do the inlets by hand though, and put them back as-is because new seals would ensure not too much oil got sucked down the worn stems. There was some evidence that oil had been going by that route prior to now.
So here is the head mildly surfaced, only the one helicoil freshly fitted nearest the camera. From here it went off for Glen's attention and he agreed the process would offer the best results for the least effort. If things deteriorate in due course then new valves and guides of the original design will be the next chapter. By then more will be known about the state of the pistons and bore condition.
While the head was away I cleaned up the copper head gasket, the top of the cylinder block and the rocker boxes, mostly in the interest of achieving oil tightness. The head was done in short time, and beside clean valves and seats, the combustion chambers were all shiny to boot. Nice work that man.
The head got reassembled immediately with new seals on the inlet guides. There had been an exhaust leak underneath a manifold clamp because one of the holes in the exhaust stub coincided with a slit in the header pipe. I could not move the stub so decided to use a piece of brass shim between pipe and stub when the header went back on.
Checking exhaust pushrod seal crush seemed to provide adequate results with just one fibre washer beneath the cup, but when checking the intake tubes it was apparent that it really needed two to effect the required compression. As I only had 6 washers on hand I left it like that, figuring that if the exhaust side seals leaked then I would have some new stock by then to address the problem.
It is sometimes a mistake to even form such thoughts, as that is exactly what eventually happened.
The rest of the reassembly went fine, and everything bolted up without complaint. The best part of having to reinvestigate recent work is that everything that was put together carefully and with a smear of lube on threads, now comes apart sweetly and is a pleasant enough procedure. Errors and ommissions are simply a fact of life in the engine trade.
Once everything was together and the valve clearances all set I did a compression test before refitting the carbs. The readings were much the same as they had been prior to the head work, so any lack of compression would appear to be rings rather than valve related.
Carbs back on it lit up happily enough and I did a few short rides using more throttle than previously just to encourage any remaining oil seepages to show themselves. Of course, several did. The exhaust pushrod tube seals confirmed my suspicions, but there was also a small leak from the tacho drive, which appeared to be coming from the cable entry point. That was strange.
As my new fibre washers had turned up meantime, the exhaust rocker box came off and the extra washers were fitted.

I could not find any reason for the tacho drive behaviour, unless there were some excess crankcase pressure pushing oil out in an obscure way. I shall remove the engine breather hose next run to see what may be happening, although there have been no other signs of fumes so far.
Less pleasing was the discovery of some oil now finding its way out of the clutch housing, indicating that the oil seal between the primary and clutch cavity was not doing its job. Seems I am not done with the primary yet.!
It was time to switch my attention to another machine for a day or two. This one was heading in the wrong direction.
With the benefit of some new perspective work began. The outer primary and chain all came off sweetly, having only been on for a month or so. The inner primary case refused to budge, so I invoked a few levers and persevered until it gave signs of complying. The gasket behind it was made of a very heavy material, and it was so successfully adhered to the crankcase and clutch housing that the gasket ripped apart and left a diabolical coating on both faces, which took some hours with a chisel to convince it to bugger off, and then needed some light sanding to get spots smooth. Mind numbing stuff.
The clutch and its housing were the mankiest I have ever seen, in fact I have never seen a triple clutch with as many excuses for slipping that I can't believe it wasn't. There were many deposits of what appeared to be black grease amongst the copious oil deposits, and it took a while to realise that it was the remains of the missing cush drive rubbers which had formed a slurry with old primary chain oil. It seems that most of the squashed rubbers had managed to migrate through various oil seals into the clutch cavity, plus inside and outside the clutch itself. Quite a mess indeed. The clutch plate spline and the hub appeared to be in good repair, but the lining thickness was a few mm thinner than a new Surflex plate I had on hand, and as that lightens up the lever action I figured I would treat it to a new plate.
Half way through the cleaning process.
After giving the outside of the clutch assembly a good wipe it came up looking pretty smart considering. The appearance of the locking tabs suggested that it had been open before now at least once.
Opening it up revealed that oil had for some time been traveling along the pullrod, and all the components were oily to the touch. The black goo sitting in the release bearing is some of the cush drive rubber and oil mix, which had the consistency of a heavy grease.
Oil had also been arriving via the gearlever cross shaft seal and the clutch cover seal, and the needle roller bearings seemed a bit worse for wear, so no other course of action but to replace the lot. The clutch release bearing would receive an angular thrust type equivalent and the outer end of the pullrod would get a new stock bearing. I was greatly relieved to find I had all of these parts on hand, but I guess I won't when the next one comes along.
The clutch got all cleaned up, new plate fitted, holes drilled for future use of punch to remove angular thrust bearing, and said bearing fitted.
So here it is ready to go back in once other work is completed.
'Other work' means the laborious task of scraping all the remains of shitty gasket from these mating surfaces. There must be some magic liquid that would soften these baked gaskets and make life easier, but I have not found it yet. Mostly I use WD40 to soften such things.
After that there will be some demanding accuracy involved in correctly positioning the new needle roller bearings in the inner chain case. I shall use my well tried boiling water method to ease the fitting process, but there needs to be sockets and such placed in the oil seal recesses so that the bearings end up exactly flush.
Not only did it get the full gasket removal treatment, but the carbs got their banjo filters cleaned - the filter fell off one tap inside the tank and some dross reached the reserve side carb - and the carb assembly all went back on.
There was some other good news, which has been a commodity in scarce supply, so I am pleased to report it. Prior to fitting the two new needle roller bearings, I fitted each bearing to its mating running surface, then compared each to its replacement bearing. Needle rollers tend to exhibit a fair amount of lateral play even when new, and surprisingly the current bearings tested better than the new items, so I decided to just replace the two associated oil seals and give the existing bearings a good oil flush.
It turned out that the gearlever cross shaft seals I had in stock were not correct, merely masquerading under the correct part number, so I ordered more and assembled everything up as far as I could while awaiting a seal.
The seals arrived in one day - thanks Tim - so the inner case went back on with new seals and oilpump O ring as well as a new gasket to replace the disaster model. All the oil seals were visibly deteriorated, presumably due to the cush rubbers migrating through them, so I am not expecting any leaks this time around. Only the pullrod seal remains as it has only been in place for a couple of weeks. Not having to replace the needle rollers has saved me a lot of work.
Best not to get too complacent though. I noticed the beginnings of oil seepage around the gearlever seal in the outer case, so it would be silly not to include that on the to-do list.
I had such a seal, but it was old stock and was no longer very supple, so I managed to damage the feathered edge while attempting to get it over the wider groove outside the circlip groove. This thing is gonna fight me all the way for some reason. I ordered a new pair of seals plus a number of other small parts I used on the carbs, so play has paused again until Monday and a courier.
My parts arrived and the fitting of the new oil seal went without a hitch. I fitted the shaft through the cover and wound insulation tape around the spline and the two grooves, then slid the seal happily up to the bush and pressed it in. I put the lightest smear of silicone sealant on the outer edges of seals such as this, as it acts as a lubricant on the way in then provides some extra incentive for it to stay in place. A good polish helped make it all look sweet and then the gearlever and footpeg went back on and the clutch cable got fitted and adjusted.
I could tell that the clutch operation had improved even without the engine running, so after refilling the primary oil off we went for a spin around a block or three. Big improvement in clutch action, ease of operation and smooth gearchanging. Very pleasing outcome.
Back home I found all leaks from clutch housing have ceased, so the only culprit now was the tacho drive. That is why it is missing...
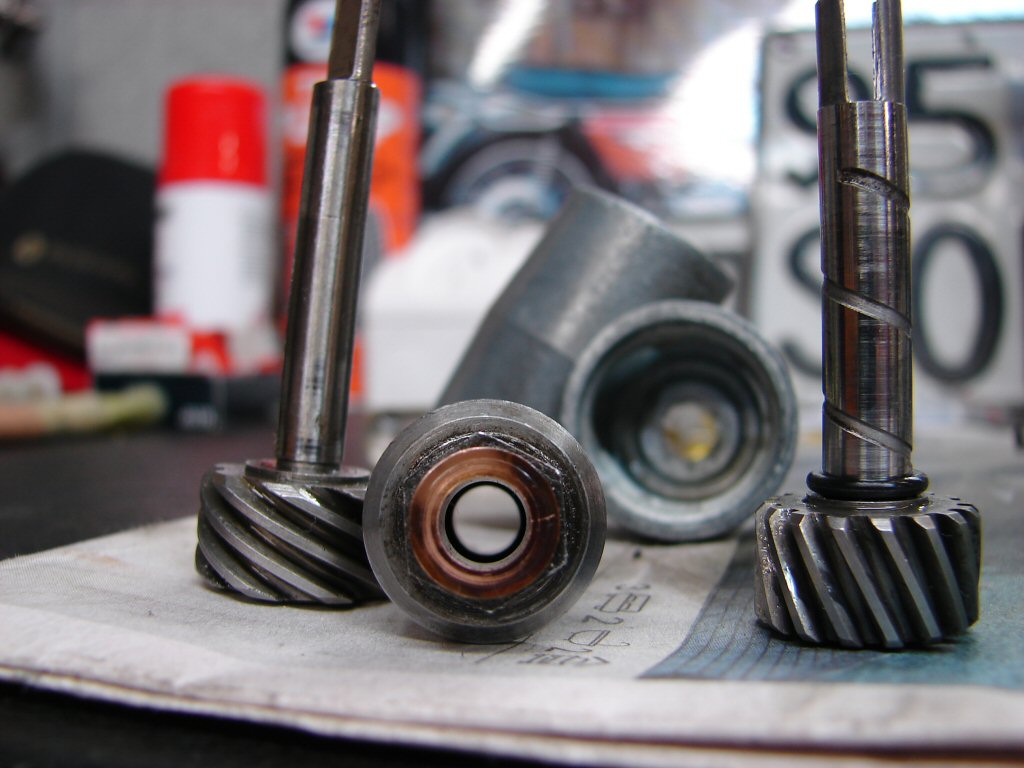
I had proved that there were no crankcase pressure issues so why oil wanted to come out the top of the tacho drive was a puzzle. I did a bit of research and in no time had the answer. The oil which lubes the end bearing of the exhaust camshaft has nowhere to go, so it finds is way out through the tacho drive if it can. After mid-1975 the factory drilled a drain hole so this oil could easily return to the sump, but my model being 'BK' was built in January so did not get the mod. As drilling the hole would involve splitting the crankcases I would need to find another solution.
Looking at the components of the tacho drive, the oil was coming in via the drive gear on the right, passing through the fixing bolt which houses two bronze bushes. It then fills the drive housing and works its way up the cable drive shaft, despite it having a scroll to pull oil back down. There was quite a lot of oil coming out at the cable joint, so some form of seal would be needed to discourage it.
The input shaft is 6mm dia and the output shaft is 7mm, so I went to my O ring guys and bought some 6mm O rings, 10 x 1mm cross section and 10 x 1.5mm cross section. I figured that the most elegant solution would be to shove a 1mm thick O ring down inside the fixing bolt to the space between the two bushes which is about 12mm. The bush walls are about 1mm so an interference fit should result.
If that should fail to do the job I would next try a 1.5mm thick O ring at the base of the output shaft, which just happens to give an overall O.D. of a smidge more than 3/16", and drill a small recess into the alloy housing you can see at the rear to accommodate the O ring. I figured this would be the better seal of the two, plus it would still allow oil to enter the housing and lubricate the gears.
You can see the thicker O ring in place below, but what you may not be able to see is that one of the thinner O rings is actually inside the fitting bolt. Because the fitting bolt has to be tightened up before the input shaft is fitted, I was concerned that the O ring may simply push out the far end, but I fitted the shaft 4 or 5 times and the O ring stayed put, and an interference fit can be felt by resistance to turning the shaft. Perfect.
Happily there is a backup plan, but it is pleasing that I do not need to make any permanent changes to the housing thus far. I could even fit a second O ring inside the fixing bolt if necessary.
I should observe here that I may have made the oil leak worse because I thoroughly cleaned out the housing when I first rebuilt it. Usually these gearboxes are pretty much crammed full of grease, which would hinder the passage of oil, and I was rather sparing when I put it back together. This time I will be more generous, so between the two changes we hope the problem will be solved.
A test ride tomorrow will answer that.
And the answer was this...
If any oil should find its way out during more extensive riding I will simply add one more O ring on top of the current one.
Unfortunately - there is always the fly in the ointment - there is now a mild weep of oil from the left side fork seal. Obviously the state of our roads is making itself felt as the bike gets more use. It has 'leakproof' seals fitted which is why I gave them the benefit of the doubt originally, but at least it is possible to extract such seals from beneath their retaining washer and ease a new one in, so apart from having to remove the slider, the job is not too serious otherwise.
Well - it would have been a leakproof seal if someone had put it in successfully.
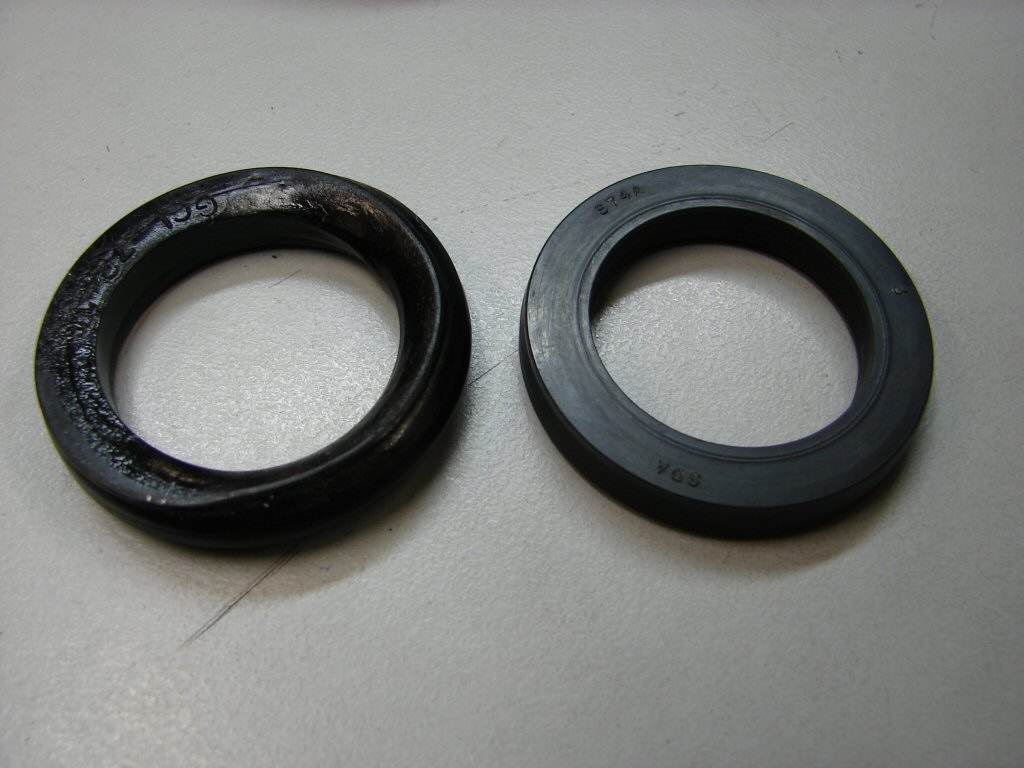
At least this explains why a seal of a type that usually gives long service with no problems failed to do so. I was able to fish the old one out and fit a new one without disturbing the thick washer that retains the seal, as the seal is flexible enough to be manipulated into place without harm, but it was not an easy job, and I can see how the last one failed to seat correctly. A lot of care needs to be taken, and I would probably heat the seal in hot water the next time.
Lets see what shows up on the next ride then...
The next ride was - interesting. It involved negotiating a rather steep incline of some duration, during which some roadworks dictated that I stop and await a change in the status of the temporary traffic lights. When that happened I gunned it away and noticed a decent puff of smoke from the left muffler, but despite a long downhill run on the far side there was no repeat.
I stopped briefly to show the bike to a friend who recently rejoined the riding fraternity after some decades of absenteeism, and he was keen to check this bike out. When I made to leave I turned the key on to find that absolutely nothing lit up. No oil light, no neutral light, seemingly no electrics worthy of note. The battery is on the far side of its useful life but I thought I would have put more in than I took out on this ride. My friend offered a starter pack he had nearby, but then asked if it might start anyway. I doubted so, but I thought there was nothing wasted in trying, so I gave it a good kick and it burst into life immediately. Wow - wasn't expecting that.
I bid hasty farewell and headed home by the direct route. During the ride I used my indicators and found them to be quite happy. Once home there was still no sign of life when stopped. I pushed the bike into the shed to investigate. I soon found that my oil pressure light switch had failed, and the neutral light switch needed another quarter turn in to function properly when the bike was at operating temperature. I guess it just got hotter during the uphill hangout than it had until now. The battery was fine and it was only the absence of idiot lights that made it look like nobody was home.
What are the chances..?
The effort required to kickstart the engine now would suggest that we have gained a distinct improvement in compression since it has been in use. This would make sense if the rings had been gummed up prior to being pressed back into service. The left side spark plug looks a little oily compared to the other two and would suggest that the oil rings may not quite have followed suit just yet, so I will continue putting miles on the bike and see what happens.
All the oil leaks have ceased in response to their treatment, and I have made an improvement in the position and operation of the seat, having found that one of the hinges was well out of shape and managed to coax it back to its correct profile.
Some warmer weather would see it out a lot more, so bring it on...
Fast forward to late August. Frequent frosts have made riding less enjoyable so there has not been much. Today however, I had to remove this bike from the shed in order to liberate another, and despite low ambient temp the sun was out, so what the hell.
As I briefly thawed the bike I puzzled over a strange thing I have observed since running in winter conditions. After about 30 seconds running, steam begins emanating from the right muffler but not the left. The left one starts about 30 seconds after that, but overall both mufflers end up delivering the same amount of obvious condensation turned to steam. I held my hand behind one muffler then the other and it was quite obvious that less gas was coming from the left side.
I pondered this as I rode along, and my thoughts were biased by the fact that the left side had been seen to smoke a bit. If the left cylinder rings were compromised then the combustion process could quite likely be less than a healthy cylinder. It was not until I got home and made some small carb tweaks that I remembered that the T160 exhaust runs all headers into a collector which then exits to both sides, so gases will take the path of least resistance. I took a good look at the rear of the left blackcap muffler and was surprised to see that the rather small aperture around the outer edge of the chrome skin was very much blocked with carbon. I used a screwdriver blade to run around the periphery and liberated a large amount of carbon deposit, plus a good amount of sticky stuff was left stuck to the blade with each scrape. Well that would explain something. I am unsure how far inside the muffler that the aperture is so restricted, so shall use a hacksaw blade to dig a bit deeper and see what I find.
The hacksaw blade indeed liberated a lot of tar-like grunge, and I then found the same on the right side, albeit in far lesser quantities. I now suspect that the cloud of smoke I observed after a prolonged idle was more oil residue burning inside the muffler rather than combustion gases. Either the broken up valve seals had been allowing copious amounts of oil into the cylinders, or Allan had poured oil into the mufflers to preserve them. Unfortunately the design of the blackcaps is somewhat convoluted, so cleaning them out does not look feasible. I figure I shall keep riding it as-is and hope that the oil burns itself out over time.
I sense a good thrash coming on.
I had to retune the carbs after the muffler deblock, so it has obviously made a difference. A plug check after a recent ride showed that the left side spark plug is now much the same as the others, so things are going in the right direction.
I am trying to maintain momentum on this bike, as there are always small issues that come to light during extended use. The petrol cap had a habit of leaking fuel out the top, so that got a new cork sealing washer which cured it.
A small amount of oil weepage was occurring somewhere around the head so I loosened and retorqued the cylinder head. I was relieved to note that it did go down further, so the used copper head gasket has seemingly settled a bit. The valve clearances confirmed this, and all needed slight opening up.
While smooth at low to medium revs, the engine has an annoying vibration which most triples do not, and it gets worse as the revs are increased. Made a mental note that the crank would be treated to a balance job if it ever saw the light of day. but otherwise there was little I could do about it.
The most obvious thing that was a nuisance, was the angle of the sidestand. Some previous abuse had managed to bend the frame lug to the point where the stand was virtually horizontal.
Even a block of that size still sees an unhealthy amount of lean, so unless finding a generous curb to place the bike next to it is predominantly useless, and means using the main stand all the time.
Removing the engine for a proper repair was the greater evil of course, so I ignored it while trying to invent a solution.
However, I recently saw a posting on Triplesonline from someone lamenting the same problem, and a UK correspondent whom I have great respect for said that he had repaired his by standing on the extended sidestand and bending it back down. Having met him in person I suspect that the person doing the standing was of considerably greater girth than himself, but it could be worth a try.
Yesterday being mostly sunny I decided to get serious. The sidestand came off easily, both because the bolt was loose and the forked end of the stand was splayed, as one would expect with a horizontal stand and all. I made the two halves of the stand mounting parallel again then turned my attention to the frame lug. I figured I could get my 15" adjustable spanner on it, so I did as the man said and stood on it. The length of the wrench was advantageous, and the jolly thing actually bent just enough to get the jaws of the wrench now firmly clamped on the lug, but no further movement could be obtained.
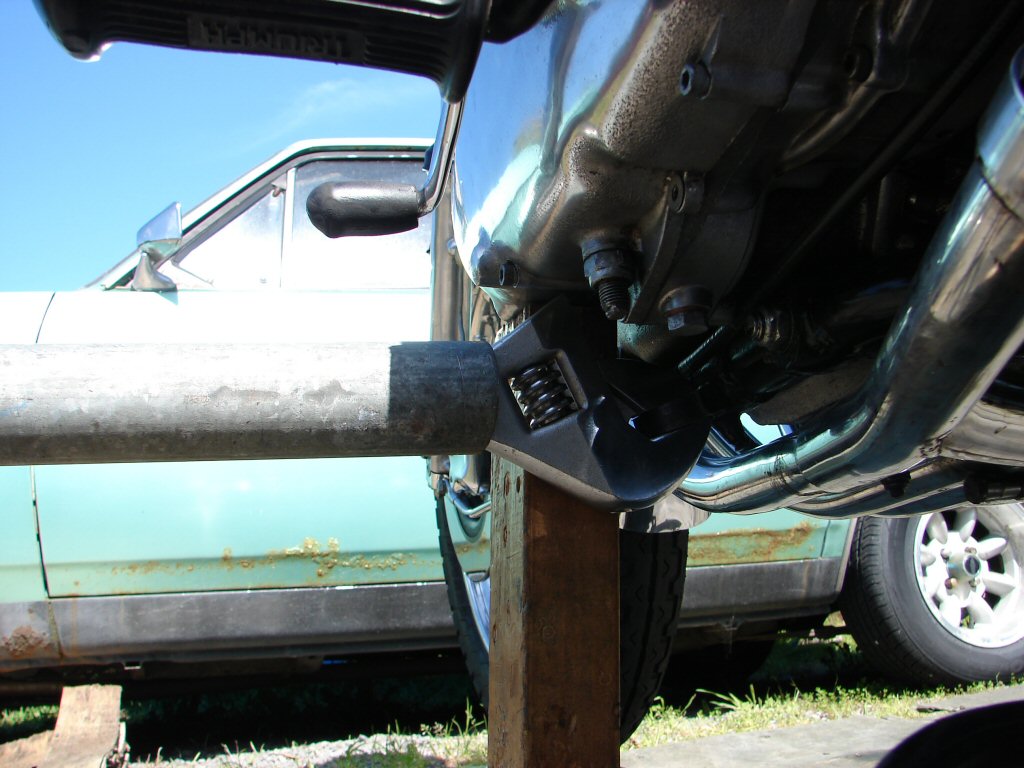
I am fortunate to have the very rare special tool part no."wtf" which I mostly use for straightening footpegs, and I figured it would amplify the leverage dramatically.
As you can see, the limiting factor was the shape of the earth, which is obviously not curved at all, so another method would need to be adopted. Having reached the point in the photo, even if the pipe was taken to ground level, it would simply spring back up to horizontal.
The solution was simplicity itself, but precluded taking any photos. I took the bike off the stand and leaned it to the right side where I supported it. My unwilling helper then put weight on the far end of the special tool, beginning at around 4ft above ground and ending around 2ft after releasing it. It felt like a pretty radical amount of travel, but fortunately nothing bust.
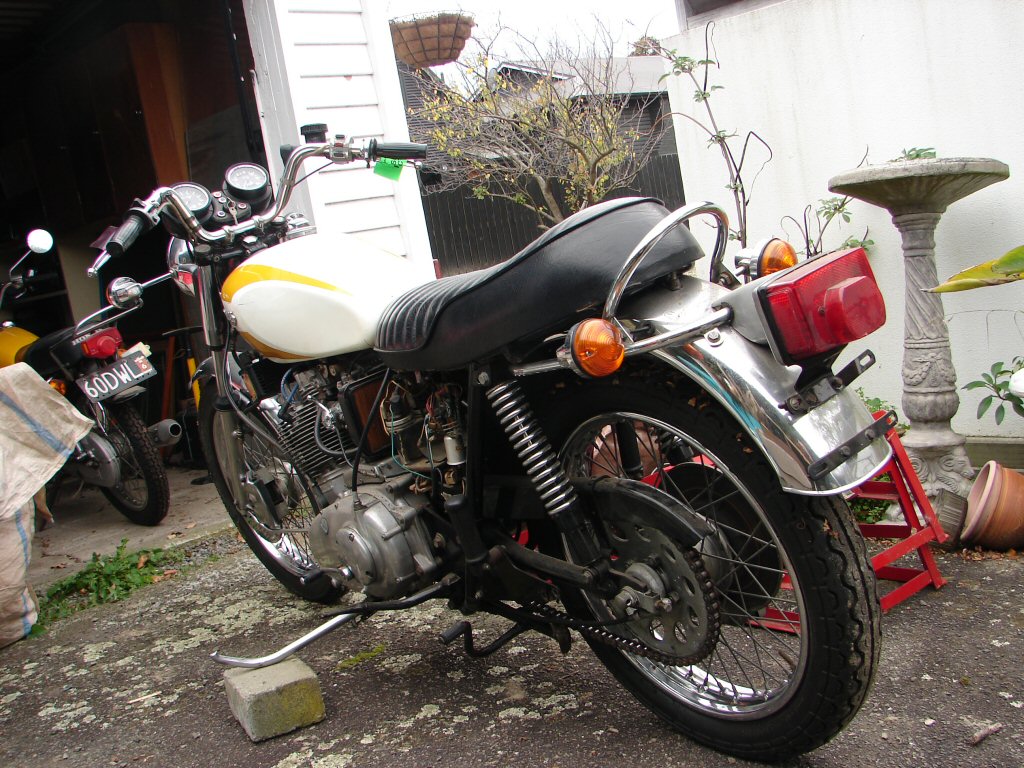
I had noted the appearance of the other resident T160, and the lowest part of the sidestand was slightly lower than the extended operating part of the mainstand when the bike was on the main. Trial fitting the sidestand on this bike now showed we had reached much the same position. The bike now looks like this on the sidestand.
It looks like we have a win, and although a tiny crack appeared at the top of the weld between the lug and the frame, it has gone no further, and that would only be a concern with downwards force rather than in normal use, so it is to be noted that this repair is indeed possible.
The end of the sidestand used to sit right against the muffler, so it would have been difficult to get your foot on it to flip it out, even if you had bothered, but the new geometry has of course angled the very end away from the muffler, so it is user friendly at last. Also it is most gratifying that the lowest reaches of the sidestand sit flat on the ground in use, which very few T160s seem to manage.
Being extremely pleased with progress I decided it was only proper to ride the beast, and albeit being a slightly warmer day than last ride, the tuning felt much improved by the latest muffler scrapings, especially at slow running where it is most noticeable. There was another thing. Almost from the get-go the bike felt very smooth, so I headed for the earliest opportunity to give it some gas and hit some higher numbers on the tacho.
The bad vibes were totally absent.! It would seem that the floppy sidestand had been the issue, rattling against the muffler. It makes sense, as most out-of-balance vibes have good revs and bad revs, where this one had just steadily increased with revs, and as I had not been using the sidestand at all since the bike has been going I had not realised that it was so loose on its mounting.
It is now the smooth-as-silk triple it was always meant to be - yay.!
The list of defects has shrunk to currently nil other than the final outcome of the mufflers situation.
I have now put 230 miles on the bike. Only half of those have been since I set the oil tank level to exactly the top mark, and I am waiting to see what the oil consumption looks like. If it is more than I am happy with the barrels will come off, but as there is no sign of smoke I am optimistic. I have a new set of 060" pistons that can be pressed into service if needed, plus a set of my favourite rings with the 3-piece oil scrapers.
It starts first or second kick from cold without the chokes, and is extremely well behaved in performance, handling and braking, although I feel that the rear brake is still not fully effective so am giving it a little 'accelerated wear test' to bed the old pads in properly. Certainly works well when they are heated up.
Looking good.
Not much has changed with this bike as my workload has increased considerably so not much riding is happening other than testing and tuning.
However, after much procrastinating, last night I decided it was time to attempt the fitting of a seat trim, having found one amongst the chaos in the workshop. As the vinyl is torn right on the very lower edge of the seat base in several places I am expecting a bit of a fight. I shall use a hair dryer to soften the plastic up, but the main weapon is the determination not to hurry...
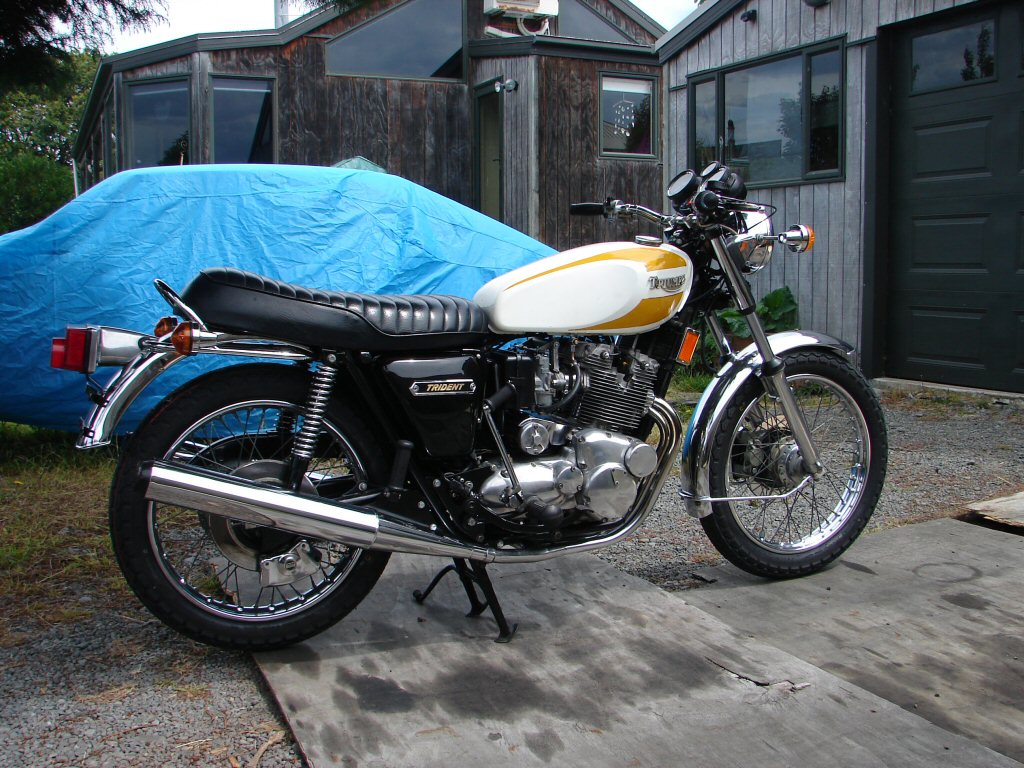
Happily, I won, and it makes quite a visible difference having it in place at last.